Van's Air Force

The definitive Van's Aircraft support community! Buying, building or flying an RV? Join our exclusive family of mentors and enthusiasts!

RV-15 #150118

flymore

Well Known Member
Sponsor
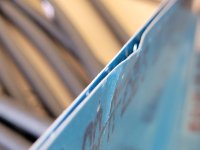
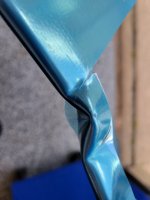
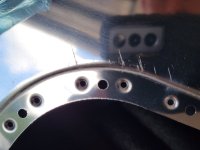
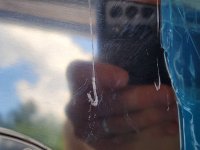
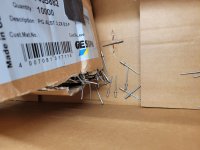
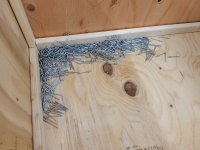
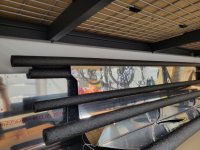
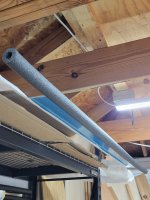
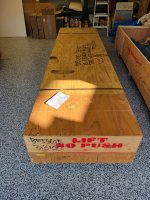
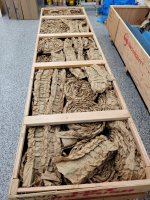
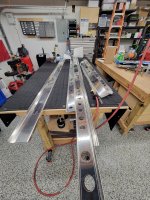
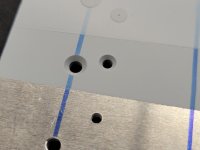
Finally got the Wing Kit(minus the Spars) late last week. Delivery was ABF and they got it here in good time. All appeared in good shape on the exterior of the boxes. Until.... Things went a bit sideways(literally) when I opened the big wooden crate. The airline words, "Items in the overhead may shift during flight" came to mind. At some point there was enough side load on the main box to jar loose a few of the skins and parts; sideways. This bent and curled a few of the leading edges and tabs on the skins, in addition to busting open the box of over 7,000 blind rivets. There were hundreds of rivets on the bottom of the crate when I opened it up. One piece has deep surface scratches. In an odd twist, one of the leading edges has some light "veins" in it. This appears to be a manufacturing defect in the metal. Not sure.

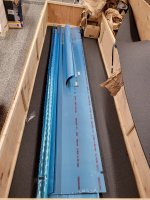
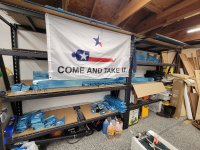
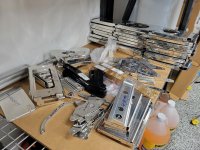
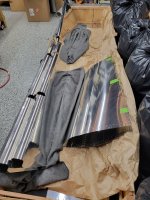
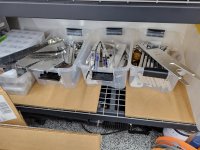
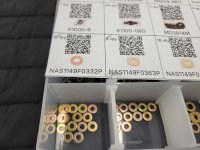
Once past that, inventory started. I was supplied a hardware bin with fuel tank parts, but I have pre-built tanks. I am missing the entire Hardware Bin 1. Otherwise, I'm only short in one area for a few bolts. Someone got crazy with the Plate Cover's and I have double of those. There are a few other backordered items in addition to the spars but that will work out just fine. I completed inventory today and it's somewhat organized on the shelves. I have affectionately dubbed this area the "Come and Take It Parts Center". Ha! It's a Texas thing. The parts look to be in good shape overall. It will be interesting to see how the claim process works between ABF and Van's. There was a big side load(drop?) somewhere but the crate was in tact with no damage. Not sure how that happens. The tanks are in cardboard boxes instead of wood and I still need to get into those.

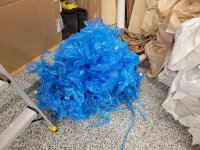
Next up is organizing the garage for the Tail Kit as it's coming this week. Lots of parts all at once and I'll probably prep and prime both of these kits at the same time. It's time to start peeling blue plastic...
 

Attachments

  • 20260510_133314.jpg
    20260510_133314.jpg
    880.8 KB · Views: 133
  • 20260510_181002.jpg
    20260510_181002.jpg
    2.6 MB · Views: 129
  • 20260510_180942.jpg
    20260510_180942.jpg
    2.2 MB · Views: 111
  • 20260510_144309.jpg
    20260510_144309.jpg
    986.8 KB · Views: 103
  • 20260510_141140.jpg
    20260510_141140.jpg
    856 KB · Views: 103
  • 20260510_135933.jpg
    20260510_135933.jpg
    1.1 MB · Views: 95
  • 20260510_135925.jpg
    20260510_135925.jpg
    1.3 MB · Views: 104
  • 20260510_134318.jpg
    20260510_134318.jpg
    1,020.8 KB · Views: 134
I've got the blues... blue plastic that is. The pile is growing and blue parts are turning into shiny happy parts. I've identified parts that will be visible after primer and taking note of where to write those part numbers after scuffing/cleaning. I don't want any part numbers showing outside through primer and eventually paint.

I've drawn two areas of blood so far on edges, but no significant DNA on the parts. Yet... Because of the damages to the edges in the crate, and the blood, I decided some leading edge protection was in order. 1/2" pipe insulation fits nicely down the leading edges of the skins, especially since they'll be in storage for a while.

Speaking of damages, I composed and sent an email to Van's today regarding the damaged parts.

My prints of the Tail Kit KAI's will be here tomorrow. I get them printed at PrintDirtCheap.com. Great people, great service, and good prices. I'm using them as the "Official" build log. It's old school but I like real paper in my hands.

I'll have some extra hands later this week to dig out the wing tanks and do the inspection on those. They are well-packaged and I don't expect any issues.

My Tail Kit is heading to Houston this evening; probably will deliver in a few days. I received a call from Van's about missing holes on the Rudder Skin; they are sending me a new one.
 

Attachments

  • 20260512_170531.jpg
    20260512_170531.jpg
    1.5 MB · Views: 46
  • 20260512_170511.jpg
    20260512_170511.jpg
    1.6 MB · Views: 41
  • 20260512_170446.jpg
    20260512_170446.jpg
    2.1 MB · Views: 46
  • 20260512_170428.jpg
    20260512_170428.jpg
    2.9 MB · Views: 44
The tail kit arrived in good shape and was quickly inventoried. In a few places, the inventory sheets called for a different number of items in the hardware bins than was shown on the bin count in the box, but the actual number of items included matched the inventory sheets. Go by the inventory sheets, not the bin count beside the QR code. There are a few missing items, but as Louise noted, I'm not sure they belong in the kit. I can't find them in the KAI's anywhere.

All the blue is peeled away. The blue mountain and all the packaging paper from crates bagged up. Organized the tail parts in bins on the shelf. Laid out the long parts for the rest of the prep process. These parts will be the first batch through the etch/alodine/primer process.

Did some final countersink testing. Since I plan to countersink before priming, I wanted to make sure the primer thickness would be ok with where I had set my countersinks. Turns out I needed to lower my #40 countersink .001" as it was just catching the edge of another flat edge running across the top of the rivet head.

I've been working with Van's on the damaged Wing Kit parts. They've been responsive and I hope to have them soon.
 

Attachments

  • 20260514_175134.jpg
    20260514_175134.jpg
    2.9 MB · Views: 49
  • 20260514_183301.jpg
    20260514_183301.jpg
    3 MB · Views: 45
  • 20260516_205812.jpg
    20260516_205812.jpg
    2.4 MB · Views: 42
  • 20260516_205853.jpg
    20260516_205853.jpg
    1.6 MB · Views: 42
  • 20260516_205841.jpg
    20260516_205841.jpg
    2.9 MB · Views: 40
  • 20260517_070304.jpg
    20260517_070304.jpg
    1 MB · Views: 45
  • 20260517_080806.jpg
    20260517_080806.jpg
    1.1 MB · Views: 50
Last edited:
Got my groove on today with the start of deburring. I did a few of the bigger edges on the long pieces but decided I need a little more aggressive wheel for some of them(edges are a little choppy) so I'm holding off for a medium wheel from Cleaveland Tool. I'll end up running two deburring wheels on the same grinder unit. This will also allow more freedom to run long parts down the wheel on both sides. In the meantime, I decided to tackle the lightening holes with the die grinder. Running the edge in the groove(not too deep) forms a nice rounded edge. Works like a champ with the 1" wheels.
 

Attachments

  • 20260517_210647.jpg
    20260517_210647.jpg
    1.4 MB · Views: 43
  • 20260517_210635.jpg
    20260517_210635.jpg
    1.3 MB · Views: 43
  • 20260517_210603.jpg
    20260517_210603.jpg
    1.8 MB · Views: 41
  • 20260517_210458.jpg
    20260517_210458.jpg
    1.1 MB · Views: 36
  • 20260517_203420.jpg
    20260517_203420.jpg
    1.5 MB · Views: 36
  • 20260517_203405.jpg
    20260517_203405.jpg
    1.3 MB · Views: 42
The tail kit arrived in good shape and was quickly inventoried. In a few places, the inventory sheets called for a different number of items in the hardware bins than was shown on the bin count in the box, but the actual number of items included matched the inventory sheets. Go by the inventory sheets, not the bin count beside the QR code. There are a few missing items, but as Louise noted, I'm not sure they belong in the kit. I can't find them in the KAI's anywhere.

All the blue is peeled away. The blue mountain and all the packaging paper from crates bagged up. Organized the tail parts in bins on the shelf. Laid out the long parts for the rest of the prep process. These parts will be the first batch through the etch/alodine/primer process.

Did some final countersink testing. Since I plan to countersink before priming, I wanted to make sure the primer thickness would be ok with where I had set my countersinks. Turns out I needed to lower my #40 countersink .001" as it was just catching the edge of another flat edge running across the top of the rivet head.

I've been working with Van's on the damaged Wing Kit parts. They've been responsive and I hope to have them soon.
The hardware bins stating a different number than the inventory sheet in some places was intentional. We're providing extra hardware parts
 
Odds and ends this week. There is always something to be done. As in flying, if you're flying along and think there's nothing to do, you're doing it wrong.

Most of the holes in my kit don't have large burrs on the backside. I tested using a scotchbrite pad with prekote rubbing over the holes. This is leaving a nice, clean edge on the hole.

20260519_193133.jpg

A new rudder skin from Van's arrived. It was well-packaged and looks in good shape with additional holes.

20260520_151823.jpg


New one beside the old one for reference.

20260520_152043.jpg


I also built the dip tanks(troughs) for the long parts of the tail and wing kits. There will be one each for etch, alodine, and a common rinse trough. I used the top of the tail kit crate for a base with 2x6 lumber on the sides and will be lined with thick mil plastic liner. These will make the first batch of parts in the etch/alodine/primer process. Once the long parts are done, I will transfer the chemicals to more manageable 5 gal containers for smaller parts. I have confirmed a local waste facility to dispose of the chemicals as needed.

20260520_141016.jpg20260520_133606.jpg
 
I'm glad to hear you found a proper way to dispose of the used alodine. It is really nasty stuff -- hexavalent chromium. Thats the stuff that made Erin Brockovich famous and P,G&E $333 Million dollars poorer.
 
I'm glad to hear you found a proper way to dispose of the used alodine. It is really nasty stuff -- hexavalent chromium. Thats the stuff that made Erin Brockovich famous and P,G&E $333 Million dollars poorer.

Yes, that's the first thing I did was find a place to take it. That was after I made several attempts to find a company to do the alodine for me. I'm still not happy about it, but so it goes. I wouldn't even be messing with it if I didn't plan to be on floats part of the time.
 
Good progress the last few days. All the long parts for the trough treatment are ready, including countersinks. The new HAAS Cut & Polish wheel does well on the thicker, rougher edges of some of the pieces. I also got to check off my first boxes of the build. Countersinking the Horiz Stab spar was nerve wracking due to not using the countersink cage. I put them on the drill press and cautiously did the countersinking. A friend of mine came over and helped with putting plastic lining on the troughs. I'm using 10mil plastic sheeting with spray adhesive. We filled them with water to set overnight, testing for leaks.

Long pieces ready for etching and alodine

20260527_204659.jpg

First countersinking of the build

20260527_212228.jpg
20260527_171342.jpg

Felt good to check off a few boxes
20260527_203108.jpg

Testing the troughs for no leaks
20260527_190603.jpg
 
Yesterday was the first Alodine session. Busy day! All the long pieces in the Wing and Tail kits are done now. I'll save the troughs for anything in the fuselage kit I may need to process. It seemed the acid etch and alodine were near the end of effectiveness by the time the parts were done. I needed to leave the last few parts in the alodine about twice as long as the first ones to get the same color. The solution did get hit with a bit of direct sunlight in the day so that probably affected it as well. The etch(Bonderite C-IC 33) was diluted 1:3(One gallon of product mixed with three gallons of water), and the Alodine(Bonderite M-CR 1201) was mixed 1:2. Parts were dipped for three minutes in each solution followed by a rinse after each dip. I bought a cheap water pump on Amazon to transfer the liquids back to storage containers. The acid etch was transferred last because I was worried it would eat the pump parts from the inside. It worked fine though.

You can see the lighter colored piece between the elevator horn ribs. I think it will still get enough protection.

20260528_194412.jpg

20260528_194713.jpg


Prior to dipping in the acid etch, I briefly hit each piece with Prekote and a maroon scotch brite attached to an orbital. This provides some mechanical etching, plus it deburrs the holes perfectly(there weren't any major burrs to begin with). It's messy and I recommend full coverage. The foamy Prekote solution really flies around!
IMG_20260529_074636.jpg

The Wing spars showed up today. They look good, much better finish than my parts. Ha!
20260529_123632.jpg

The holes line up!
20260529_163739.jpg

Interesting side note: The spars have different dates and numbers. The one from March has been sitting for a while given the amount of dust on it. The one from May is clean. Both appear to be in good shape.
20260529_162600.jpg

I have a couple more Wing kit parts on backorder. Van's says they will be around 4-5 weeks. No rush as I will start the tail kit first.

Back to parts prep...
 
Another good day in the books. My schedule opened up to allow a primer session. Got the AkzoNobel nicely stirred using a paint stick(this took a while as the bottom was completely gunked up). If you've had primer sitting on your shelf for months, I recommend stiring it every now and then.

For protection I used a body suit, gloves, full face mask, and old shoes that wanted to be green.

20260530_132201.jpg

Using equal parts to mix, 325ml of each in my case, the primer then has a 30minute induction time. I stirred this every 5 mins or so along the way.

20260530_132229.jpg

20260530_132237.jpg

20260530_132247.jpg

While the primer was "cooking", I took advice from VAF and wiped down the parts with Acetone. I was surprised how much gunk came off the parts after only a few days in the garage.

The 3M gun works great, but was a little pricey. The advantage is there is no cleaning involved afterwards as the tip and cups are thrown away. You can re-use the tips again if you want, just swirl it around in some MEK and it's good for the next batch. Really easy and convenient.

20260530_132221.jpg

The cups collapse when empty. You will know when it's done.

20260530_134616.jpg

Being in Texas, I used a two-handed pistol drip during all priming application. Just kidding... Ha!

IMG_20260530_141710 (6).jpg

Going green... The larger parts were sprayed in full sun; they dried very quickly. I was worried about them being too hot so I stashed them in the shade until just before spraying each piece.

IMG_20260530_141710 (2).jpg


20260530_132326.jpg
20260530_135956.jpg

This was a satisfying day, and a hot one! Finally some parts ready for assembly. Happy building.
 
Another good day in the books. My schedule opened up to allow a primer session. Got the AkzoNobel nicely stirred using a paint stick(this took a while as the bottom was completely gunked up). If you've had primer sitting on your shelf for months, I recommend stiring it every now and then.

For protection I used a body suit, gloves, full face mask, and old shoes that wanted to be green.

View attachment 119106

Using equal parts to mix, 325ml of each in my case, the primer then has a 30minute induction time. I stirred this every 5 mins or so along the way.

View attachment 119107

View attachment 119108

View attachment 119109

While the primer was "cooking", I took advice from VAF and wiped down the parts with Acetone. I was surprised how much gunk came off the parts after only a few days in the garage.

The 3M gun works great, but was a little pricey. The advantage is there is no cleaning involved afterwards as the tip and cups are thrown away. You can re-use the tips again if you want, just swirl it around in some MEK and it's good for the next batch. Really easy and convenient.

View attachment 119110

The cups collapse when empty. You will know when it's done.

View attachment 119111

Being in Texas, I used a two-handed pistol drip during all priming application. Just kidding... Ha!

View attachment 119112

Going green... The larger parts were sprayed in full sun; they dried very quickly. I was worried about them being too hot so I stashed them in the shade until just before spraying each piece.

View attachment 119113


View attachment 119114
View attachment 119115

This was a satisfying day, and a hot one! Finally some parts ready for assembly. Happy building.
Don't let your neighbor see you spraying outside. He will find overspray on his car! We both know that primer dries so fast that it isn't a problem, but you won't be able to convince some people.
 
Don't let your neighbor see you spraying outside. He will find overspray on his car! We both know that primer dries so fast that it isn't a problem, but you won't be able to convince some people.

A little green “dust” is nothing compared to the pollen we get every year. My white truck turns yellow for about two months.
 
Back
Top