Van's Air Force

The definitive Van's Aircraft support community! Buying, building or flying an RV? Join our exclusive family of mentors and enthusiasts!

Lesson learned cutting wire jacket

RyanWhite

Active Member
Patron
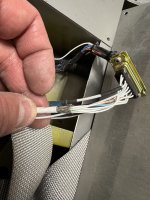
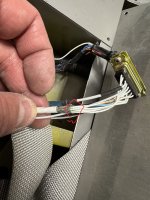
This is the wire bundle for my two stick grips. After two years of flying I had a failure with down trim on my pilot stick. Zoom way in on pic and you will see where I nicked 2 wires when I built it. I cut the outer jacket with a razor blade and obviously pushed too hard. 2 years later the shield wiggled in a way to ground out that signal wire through that tiny crack. I had heat shrink over this and it took 2 years for the shield to wiggle into that crack. Thought I would post this as a lesson learned. I have the g3x set up to ignore trim switch activations after 5 seconds so no runaway trim issues.

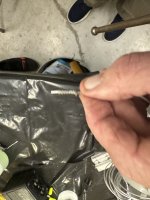
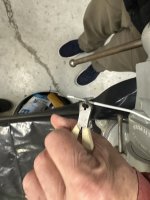
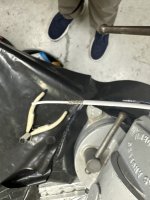
If anyone has a better way to trim outside jacket I’m all ears…
 

Attachments

  • IMG_0875.jpeg
    IMG_0875.jpeg
    1.5 MB · Views: 216
Assuming your are talking about the shielding. If you push it back a bit it will bulge out (Think Chinese finger trap). Use a small nippers to cut the shielding at the bulge where you want it to end. Real easy to get a nice edge.
 
The jacket is normally cut longitudinally then peeled back, not around circumference .
Good Tip Walt - I think what I did with this one is cut around the outside then longitudinally then push the shield back and nip w/ small nippers - but when I did my method (cut around first) that the nick was hidden - I like the idea of only longitudinal cut. This is why I'm posting my mistake - so others can learn!!!
 
I had something similar on a brand new engine with brand new Slick magnetos. Had a misfire on the first start and it was traced to a cross cut on the inner of one HT lead, inside the cap :oops:
 
Don't cut. Score and bend. The jacket will crack.
This is how I do it. And believe it or not, the best tool I've found to score the cable jacket just the right amount is the nail scissors on the little Swiss Army knife I keep in my pocket! The scissors aren't quite so sharp as a razor blade or knife, and I find I can control the amount of pressure better.

1742395444912.webp
 
This is how I do it. And believe it or not, the best tool I've found to score the cable jacket just the right amount is the nail scissors on the little Swiss Army knife I keep in my pocket! The scissors aren't quite so sharp as a razor blade or knife, and I find I can control the amount of pressure better.

View attachment 83215
I use a pair of these, but I've had a lot of practice! Telephone Lineman Snips.
410YFL-VCkL._AC_UF1000,1000_QL80_FMwebp_.webp
 
Thermal strippers are how the big kids do it. Using a sharp edge is a QA bust pretty much everywhere. It’s generally accepted to cheat and knife cut the part of the jacket length wise to reduce the friction over the part of the shield that you are going to discard like Walt said.
<SNIP>
 
Last edited by a moderator:
Assuming your are talking about the shielding. If you push it back a bit it will bulge out (Think Chinese finger trap). Use a small nippers to cut the shielding at the bulge where you want it to end. Real easy to get a nice edge.

That’s how the big kids cut the shield. It’s even easier than it looks with sharp flush cutters. Practice a couple of times and you will be able to do it perfectly.
 

Attachments

  • IMG_1406.jpeg
    IMG_1406.jpeg
    1.1 MB · Views: 101
  • IMG_1408.jpeg
    IMG_1408.jpeg
    1 MB · Views: 101
  • IMG_1409.jpeg
    IMG_1409.jpeg
    1.1 MB · Views: 101
Last edited:
That’s how the big kids cut the shield. It’s even easier than it looks with sharp flush cutters. Practice a couple of times and you will be able to do it perfectly.
The problem was cutting the outer sheath not the shield.
 
That’s how the big kids cut the shield. It’s even easier than it looks with sharp flush cutters. Practice a couple of times and you will be able to do it perfectly.
This is the way. You can do it with sharp angle cutters too, you don't really need the front nippers if you don't have them.
 
The problem was cutting the outer sheath not the shield.
Having trouble understanding how the individual conductors underneath the shield could be nicked while cutting the outer sheath.

Apparently I'm missing something.
 
Having trouble understanding how the individual conductors underneath the shield could be nicked while cutting the outer sheath.

Apparently I'm missing something.
Mel - instead of using Walts method - I used a razor blade and cut the sheath around the cable and must have pushed hard enough to go through the shield and nick the wire - its the only thing I can think of.... Tell Klaus T hi from me next time you see him! My son and I flew down and came with him to your house for an EAA mtg a couple years back...
 
We were maybe confused because it looks like knife cuts in two of those wires where the shield was cut
 

Attachments

  • IMG_0528.jpeg
    IMG_0528.jpeg
    882.2 KB · Views: 20
Mel - instead of using Walts method - I used a razor blade and cut the sheath around the cable and must have pushed hard enough to go through the shield and nick the wire - its the only thing I can think of.... Tell Klaus T hi from me next time you see him! My son and I flew down and came with him to your house for an EAA mtg a couple years back...
Been there done that Ryan. If/when I see the lower wires nicked, cut off and start over.
Suggest this tool to add to the arsenal and use instead -

Stripper.png

You can use a metal scribe to spread shielding apart or push back shield to "bulge" and then cut excess shielding.
Mil-Spec wire strippers are worth the time to troubleshoot years later.
 
We were maybe confused because it looks like knife cuts in two of those wires where the shield was cut
Good point I didn't do a good job of explaining the original picture. The original termination of the outer sheath (prior to the picture in thread) was at the point where the inner wires were nicked. It was impossible to see the nicks until I cut the outer sheath back further as you see in the picture (I later trimmed the shield back too). I must have screwed up when originally cutting the outer sheath and pushed too hard with a razor blade cutting through the shield and nicking the wire (hard to believe).

I love all the suggestions on methods, tools, etc. This is exactly why I posted hoping to save a new builder the trouble I went through. Thanks @DeltaRomeo for hosting such a great forum to share mistakes and learn!!!

Ryan
 
Don't cut. Score and bend. The jacket will crack.
+1 on this.

The Tefzel is tough. That is, until you nick it and bend it. It cracks all the way around the outside shell. Easy-peazy! Then cut it longitudinally as Walt said. Once the outside Tefzel is removed it is time for the “Chinese Finger Trap” described earlier.

To do this,
1.) push the braided shield with your left and right hands about an inch or so apart from each other.
2.) Press the braid together and it will “bulge”.
3.) In the area of the bulge, use a small pick to separate the braids apart to gain access to the wires inside the braid.
4.) hold the braids and slide the pick underneath all the wires and slowly pull the loop of wires through the opening in the braid.

Once the wires are outside the braid you can do whatever you needed to do with the wires. With this method you should never need to have a blade near the wires.
Exactly.
Someone has spent some time in the wire trench!
 
Back
Top