
Van's Air Force
You are using an out of date browser. It may not display this or other websites correctly.
You should upgrade or use an alternative browser.
You should upgrade or use an alternative browser.
Lower Skin Rivets
- Thread starter Want2Doit
- Start date


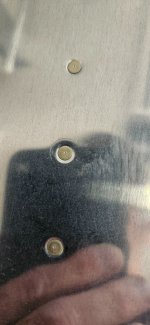
What's your rivet gun pressure? Looks like it's too high.So I'm riveting the lower skin,View attachment 78077 empennage on my RV-14 and this is what I'm seeing....pucks after bucking - is this normal? The dimples before riveting look great without any waves. Am I being to OCD?
Mark
Yup....probably pushing the gun....wanta figure this out before working on the more visible skins....thanksAre you "pushing" on the gun? Most of the pressure should be on the bucking bar. The gun should be held with just enough pressure to keep the rivet seated in the hole.
"Back riveting" will help where possible.
Set at 32....What's your rivet gun pressure? Looks like it's too high.
czechsix
Well Known Member
What brand of dimple dies are you using? To me it looks like the dimples might not be good quality...I've done plenty of riveting with a variety of gun pressure settings, and usually press on the gun pretty hard (balanced with a lot of force on bucking bar, but you need more pressure on the gun to make sure it stays flush to the surface) and have never had results like this. If you have any experienced builders nearby, might be worth having them pay you a visit so they can take a look at your tools, gun settings, and technique to figure out what is going on.
The dimple die is from Cleaveland. The dimples look great - no distortion/waves at all until after I set the rivets - thanks for the input - gotta figure this out.What brand of dimple dies are you using? To me it looks like the dimples might not be good quality...I've done plenty of riveting with a variety of gun pressure settings, and usually press on the gun pretty hard (balanced with a lot of force on bucking bar, but you need more pressure on the gun to make sure it stays flush to the surface) and have never had results like this. If you have any experienced builders nearby, might be worth having them pay you a visit so they can take a look at your tools, gun settings, and technique to figure out what is going on.
I use a 2X rivet gun at around 42# and place clear packing tape over the rivet to provide some friction to help prevent creeping of the mushroom set. About a half second of squeezing the trigger usually does it when using my tungsten bucking bar. I use a C-Frame and, like you, Cleaveland dies, really whacking the thing for each hole. There can be other reasons for it, but it looks to me like the dimples might have needed more "whacking" or squeezing.Set at 32....
You might be pushing in too hard with the rivet gun? I prefer to back rivet all the skin items I can. A few rivets under the stiffeners require conventional riveting so then I use a tungsten bucking bar that treats those -3 rivets like soft butter.So I'm riveting the lower skin,View attachment 78077 empennage on my RV-14 and this is what I'm seeing....pucks after bucking - is this normal? The dimples before riveting look great without any waves. Am I being to OCD?

czechsix
Well Known Member
Cleaveland makes excellent dies. You're sure you're not using their tank dies, right?The dimple die is from Cleaveland. The dimples look great - no distortion/waves at all until after I set the rivets - thanks for the input - gotta figure this out.
No but good thought....the dimples look great BEFORE I set the rivets....Cleaveland makes excellent dies. You're sure you're not using their tank dies, right?


Certainly looks like your rivets are not seating well in the dimples.
Top picture is back riveting of my horizontal stabilizer, bottom picture ( with the reflection of the Maule wing in it) is of my wing which was regular bucked, can’t really tell which process was used from just the picture .
Questions I have for you are.
Do your dimples look as “crisp” as the empty ones in my picture?
When you drop a rivet in your dimple does it set flush in the dimple smooth to the top of the skin maybe an few thousands below the surface of the skin and completely fill it flush around the head like mine look before you buck it?
Can you post a picture of the shop heads of your rivets?
I’m thinking you might have 2 issues going on. Not making a good well formed dimples ( maybe using tank dies or poorly machined dimple tooling, or maybe poor dimpling technique . Perhaps you’re over setting the rivets and in the process flattening out the dimples to to cause the dimples to recede from the edge of the rivet head
Really appreciate everyone's feedback....here is a pic of a set rivet and some dimples....View attachment 78384View attachment 78385
Certainly looks like your rivets are not seating well in the dimples.
Top picture is back riveting of my horizontal stabilizer, bottom picture ( with the reflection of the Maule wing in it) is of my wing which was regular bucked, can’t really tell which process was used from just the picture .
Questions I have for you are.
Do your dimples look as “crisp” as the empty ones in my picture?
When you drop a rivet in your dimple does it set flush in the dimple smooth to the top of the skin maybe an few thousands below the surface of the skin and completely fill it flush around the head like mine look before you buck it?
Can you post a picture of the shop heads of your rivets?
I’m thinking you might have 2 issues going on. Not making a good well formed dimples ( maybe using tank dies or poorly machined dimple tooling, or maybe poor dimpling technique . Perhaps you’re over setting the rivets and in the process flattening out the dimples to to cause the dimples to recede from the edge of the rivet head
Attachments
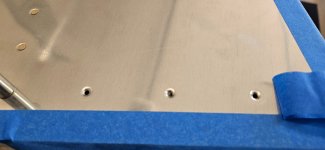
They are fine. The “witness” mark from the male dimple die “should” make a full circle though.Really appreciate everyone's feedback....here is a pic of a set rivet and some dimples....
The lighting here on the set rivet will make some think they are not seated well. (Shadow gap)
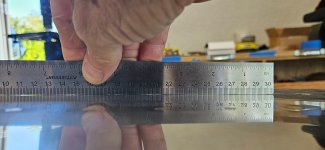
Lay a straight edge over the finished rivet and show us that image.
If you close you eyes and run a finger down the rivet you will definitely feel a high set rivet.
Also, if the -3 rivet is not set enough, it will not pass the minimum height test on the shop side.
As others have stated, back rivet. I placed my extra large back rivet plate on the floor, with thick carpeting around it, and leaned into the fuselage to get to the rivets. I also did this for the rivets on the curved skin surfaces, just be very careful to get the rivet properly sitting on the plate, and rivet tape is nice to use for this.
With the straight edge you can see the puck marks that is my original concern. Maybe others are right...holding the gun too hard against the surface?They are fine. The “witness” mark from the male dimple die “should” make a full circle though.
The lighting here on the set rivet will make some think they are not seated well. (Shadow gap)
Lay a straight edge over the finished rivet and show us that image.
If you close you eyes and run a finger down the rivet you will definitely feel a high set rivet.
Also, if the -3 rivet is not set enough, it will not pass the minimum height test on the shop side.
What's the best method for this and still have cleco's in to keep the skin aligned....anyone have a video?As others have stated, back rivet. I placed my extra large back rivet plate on the floor, with thick carpeting around it, and leaned into the fuselage to get to the rivets. I also did this for the rivets on the curved skin surfaces, just be very careful to get the rivet properly sitting on the plate, and rivet tape is nice to use for this.
With the straight edge you can see the puck marks that is my original concern. Maybe others are right...holding the gun too hard against the surface?
Attachments
Yes. The gun pressure may be too high.
The gun should rest against the skin with enough pressure to prevent bounce only.
(Test on the side of the work bench)
Then use the mass of the bucking bar to set the rivet.
(I like the tungsten bars, expensive? Yes. But they set -3 rivets like they are plastic.
Anyways we back rivet as much as we can to prevent skin dents.
This is a "technique" we used to set the skins on the tailcone -
We back riveted them using a #3 gun (i can check my notes for PSI) but it's about a 1 second burst, then "blips" as needed.
The bucking bar is this one from Cleaveland Tool (not a sponsor)
The face of this bucking bar is 2" so center placement is not an issue.
I used this setting pattern for my skin rivets
"Cleco 3 rivets Cleco 3 Rivets Cleco"
Our sequence was Center, Forward, Aft on setting the rivets
After all are set remove solo Cleoc's and set the remaining single rivets.


 .
.
I also have an offset back rivet set

The gun should rest against the skin with enough pressure to prevent bounce only.
(Test on the side of the work bench)
Then use the mass of the bucking bar to set the rivet.
(I like the tungsten bars, expensive? Yes. But they set -3 rivets like they are plastic.
Anyways we back rivet as much as we can to prevent skin dents.
This is a "technique" we used to set the skins on the tailcone -
We back riveted them using a #3 gun (i can check my notes for PSI) but it's about a 1 second burst, then "blips" as needed.
The bucking bar is this one from Cleaveland Tool (not a sponsor)
The face of this bucking bar is 2" so center placement is not an issue.
I used this setting pattern for my skin rivets
"Cleco 3 rivets Cleco 3 Rivets Cleco"
Our sequence was Center, Forward, Aft on setting the rivets
After all are set remove solo Cleoc's and set the remaining single rivets.
.I also have an offset back rivet set
Last edited:
Set Ok. Dents may be from too much air pressure and too much force on skin.
See my post #19 for our technique on back riveting the skins.What's the best method for this and still have cleco's in to keep the skin aligned....anyone have a video?
Thanks for the info and pics!See my post #19 for our technique on back riveting the skins.
That is the point on the rivet tape. I cleco everything that I can, and remove just the clecos needed to allow the skin to rest on the plate. I load all the holes that don't have clecos with rivets and then keep them in with rivet tape. Some use masking or scotch tape, but I think the rivet tape works best. It's a bit more $, but in the long run, it's like going to the coffee shop vs a cup at home. Having all the rivets in place works a bit like a cleco to keep everything properly positioned. What you don't get, without the clecos is something to keep the rib and skin flat against each other, but the back rivet set has a spring loaded teflon bushing that keeps them in contact. I'm sure you know that from back riveting other components. good luck!What's the best method for this and still have cleco's in to keep the skin aligned....anyone have a video?
Oh, I have been meaning to make a back rivet bucking bar for the places it's just not practical to use the plate. That said, I did not have one, and back riveted most of the accessible rivets on the emp fuselage skins.
Last edited:
Thanks for the info...Dr Dave recommended this ....I ordered....That is the point on the rivet tape. I cleco everything that I can, and remove just the clecos needed to allow the skin to rest on the plate. I load all the holes that don't have clecos with rivets and then keep them in with rivet tape. Some use masking or scotch tape, but I think the rivet tape works best. It's a bit more $, but in the long run, it's like going to the coffee shop vs a cup at home. Having all the rivets in place works a bit like a cleco to keep everything properly positioned. What you don't get, without the clecos is something to keep the rib and skin flat against each other, but the back rivet set has a spring loaded teflon bushing that keeps them in contact. I'm sure you know that from back riveting other components. good luck!
Oh, I have been meaning to make a back rivet bucking bar for the places it's just not practical to use the plate. That said, I did not have one, and back riveted most of the accessible rivets on the emp fuselage skins.

I have rivet tape. I use it solo. The Queen Bee likes the scotch removable tape better. I use an old graphics arts film stripper technique to fold one end over so it easy to remove after riveting. I come back later with a rag and MEK to clean any adhesive residue.That is the point on the rivet tape. I cleco everything that I can, and remove just the clecos needed to allow the skin to rest on the plate. I load all the holes that don't have clecos with rivets and then keep them in with rivet tape. Some use masking or scotch tape, but I think the rivet tape works best. It's a bit more $, but in the long run, it's like going to the coffee shop vs a cup at home. Having all the rivets in place works a bit like a cleco to keep everything properly positioned. What you don't get, without the clecos is something to keep the rib and skin flat against each other, but the back rivet set has a spring loaded teflon bushing that keeps them in contact. I'm sure you know that from back riveting other components. good luck!
Oh, I have been meaning to make a back rivet bucking bar for the places it's just not practical to use the plate. That said, I did not have one, and back riveted most of the accessible rivets on the emp fuselage skins.
One is going to need know how to do all forms of riveting building these aircraft. Luckily my Wife learned to drive and buck rivets on a first date back in 1990 when we flew a Grumman tiger to OSH. Knew she was a keeper, that and her game bird cooking.


 Smoking!