Van's Air Force

The definitive Van's Aircraft support community! Buying, building or flying an RV? Join our exclusive family of mentors and enthusiasts!

Wing started leaking fuel

jtrollin

Well Known Member
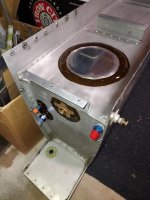
So the circled area is the only place it is wet and the sealant is all tacky there like its gone bad. Trying to think through the best way to repair (I need to still take the bottom cover off to see if it is leaking in front of the spar as well, but this is what I saw today.

Wanted to get thoughts on an approach to repairing the leak.

Plane has been flying for 10 years now and I just noticed this a few weeks ago.

2026-04-27_14-50-46_082.jpeg


thanks,

John
 
I am not sure which RV model this is from. The picture does not give enough detail to know where on the tank this is leaking. Can you fill us in on more details?

As for the repair, no amount of sealant on the outside of a fuel tank will seal a seam (or a leak). Any sealant on the outside of the tank is simply adding more weight to the tank. You will need to remove the tank and do the pressure test with soapy water. Vans has a fuel tank test kit for doing this. Keep in mind when testing that the balloon is NOT used to determine a leak. It is only a “relief valve” for the pressure test. The spraying of soapy water on the tank seams, rivets, etc. is the leak test.

Vans also sells TANK REPAIR KITS. Here is that kit:
https://store.vansaircraft.com/fuel-tank-leak-repair-kit-fuel-tank-repair-kit.html
 
Well, you have built it so you know the process. I imagine that you already know you have two options, one try a repair it from outside which is easier be remove the proseal that is on the outside, clean and apply a new proseal in the same manner and see if that will give you a few more leak free years. If this approach didn't work, then the harder way is the only way by removing the tank and fixing it from inside.
 
I see blue staining left of the red circle as well. As mentioned, the only long term fix is to get inside and repair. Not a lot of fun, but not terribly difficult with some guidance. Once the leak area is confirmed and a hole cut, you need to emove all existing sealant, clean, abrade and reapply sealant.

Once the tank is off, i would put 1 psi in it and use soapy water to identify all leak areas.
 
It’s a 10 and it’s the forward tank spar.
As mentioned above you built it so you likely remember that this exact place is quite tricky to seal properly (especially the forward side of the spar) even when you have building access.
Unfortunately it’s equally possible that it’s coming from the front of that spar as well.
IMHO there’s no chance of doing an adequate repair on that in situ.

Even with the tank off and access hole cut I imagine you will still have your work cut out for you if you need to be resealing the forward face of that spar.
I’d be interested to hear what the factory has to say about it and whether some non standard access holes may be worth investigating.
Good luck!
 
I repaired a couple of RV14 tanks (same structure as RV10s) with similar leaks. He also had leaks along the rear baffles. I ended up drilling the rear baffles off, drilling off both inboard rib skins including sub spar assemblies. This was the only way I could insure all degraded sealant was cleaned off before any new sealant was applied & riveted back together.
Truly the toughest tank repair jobs I have been called to fix.
 
There is blue dye everywhere, but I think a lot of it is are blowing the fuel around, because I have blue dye no where near any rivets or sealant. I will get the tank off this weekend and see if I can identify where all the leaks are coming from. that one corner is the only "gummy" sealant I have found so far though.
 
I repaired a couple of RV14 tanks (same structure as RV10s) with similar leaks. He also had leaks along the rear baffles. I ended up drilling the rear baffles off, drilling off both inboard rib skins including sub spar assemblies. This was the only way I could insure all degraded sealant was cleaned off before any new sealant was applied & riveted back together.
Truly the toughest tank repair jobs I have been called to fix.
Shox, I probably would have built a whole new tank if it was that bad.
 
I got the tank off and cut an access hole, all the proseal inside the tank feels solid, there is no gummy or sticky proseal anywhere, I am not sure how to find out where on the inside the issue is. Anyone have any ideas?

I bought some plastic scrapers and probes and poked all around that forward tank spar and again on the inside all the proseal is solid. I would pressure test it, but now I have that giant hole in the rear baffle.

thanks,
Well, yes. You do need to pressure test it before you start cutting big (and little holes) in the tank. There are many posts on this forum detailing how to do so. It is really the only good way to find leaks. Read them, get some balloons, seal the tank back up, pressure it (very little pressure needed), get a spray bottle with some soapy water, spray it all over the tank where you think the leak is. Then you will find the leak and know where to start. I know this advice is a little late since you already jumped the gun with cutting a hole but you will have to do so to really find the leak (or leaks).
 
I know on the outside where the fuel comes out, I could see the fuel leaking, but on the inside of the tank all the pro seal feels solid where on the outside where the fuel was seen leaking was all gummy. What I am trying to figure out is where the pro seal failed on the inside of the tank so I can remove and replace it. My assumption was I could find the bad pro seal on the inside, I guess maybe the pro seal on the inside isn’t bad, but the seal wasn’t good and allowing the leak?
 
Leaks are insidious, sealant may ‘appear’ to be solid but obviously fuel is getting through it or under it to result in that external stain.
Scrape all visible sealant out at least 6” in all directions than prep & reseal with a generous, smooth fillet of new sealant.
 
Leaks are insidious, sealant may ‘appear’ to be solid but obviously fuel is getting through it or under it to result in that external stain.
Scrape all visible sealant out at least 6” in all directions than prep & reseal with a generous, smooth fillet of new sealant.
All good solid advice but getting to the front face of that stub spar up against the inside nose face of the inboard rib - from a hole in the rear baffle no less - is far from straightforward.
It’s hard to do even with the aft half of the rib removed during initial construction with no rear baffle.

I think this is a case where we need to hear from someone who has explicitly fixed this exact place on a completed 10/14 tank. Or advice from the factory.

I’ve built 4 of them and to be honest if I thought the leak was coming from there I’d almost be inclined to build a new tank from scratch rather than table my chances doing all that work with a borescope or mirrors. at a minimum I’d be considering removing the aft inner rib to get access.
 
Last edited:
A -10 tank I went into a couple years ago (quickbuild tank) , that had a bad flare on the vent line causing drips from the overflow/vent. Simple rear baffle cut-out/cover plate. installed w/ closed end rivets, topcoated all the seams and rivet heads with "A" sealant after installing with "B" on fay surfaces. I do all my leak checks with 100LL, cap the lines, put a couple gallons in and set it on a table L/E up overnight.
 

Attachments

  • TankRV10.jpg
    TankRV10.jpg
    1.4 MB · Views: 11
A -10 tank I went into a couple years ago (quickbuild tank) , that had a bad flare on the vent line causing drips from the overflow/vent. Simple rear baffle cut-out/cover plate. installed w/ closed end rivets, topcoated all the seams and rivet heads with "A" sealant after installing with "B" on fay surfaces. I do all my leak checks with 100LL, cap the lines, put a couple gallons in and set it on a table L/E up overnight.
Any tips for the OP on getting to the front face of the stub spar?
 
All good solid advice but getting to the front face of that stub spar up against the inside nose face of the inboard rib - from a hole in the rear baffle no less - is far from straightforward.
It’s hard to do even with the aft half of the rib removed during initial construction with no rear baffle.

I think this is a case where we need to hear from someone who has explicitly fixed this exact place on a completed 10/14 tank. Or advice from the factory.

I’ve built 4 of them and to be honest if I thought the leak was coming from there I’d almost be inclined to build a new tank from scratch rather than table my chances doing all that work with a borescope or mirrors. at a minimum I’d be considering removing the aft inner rib to get access.
Post #9 of this thread- I describe what I had to do to fix similar leaks in a pair of 14 tanks.
A tough pill to swallow for some…
 
Back
Top