
Van's Air Force
You are using an out of date browser. It may not display this or other websites correctly.
You should upgrade or use an alternative browser.
You should upgrade or use an alternative browser.
Show us the status of your RV-3 project!
- Thread starter DeltaRomeo
- Start date

Louise Hose
Well Known Member
Gotta get it drilled before the move in 2 weeks!!
What, Stephen, you getting kicked out of you apartment 'cause of all the noise?
What, Stephen, you getting kicked out of you apartment 'cause of all the noise?
Nah, no complaints from the neighbors! Just when it's time for the wings, I'd rather have a garage to build them in.
")
Louise Hose
Well Known Member
Follow our progress
The canoe is now flipped: http://www.vansairforce.com/community/showthread.php?t=56336
We are regularly updating our photo log at: http://picasaweb.google.com/DrKarst/JUNIOR#
The canoe is now flipped: http://www.vansairforce.com/community/showthread.php?t=56336
We are regularly updating our photo log at: http://picasaweb.google.com/DrKarst/JUNIOR#

rph142
Well Known Member
I just finished painting the interior with Rustoleum hammered light gray. It lays down much darker than the cap suggests, but I think it looks good. The throttle, mixture, rudder pedals, seat pan, and all fuel hoses are in for good. BTW the 3 on the seat is supposed to be set low...its helvetica font.


Last edited:
Louise Hose
Well Known Member
Looking very nice, Rob
Who did your seat?
Who did your seat?
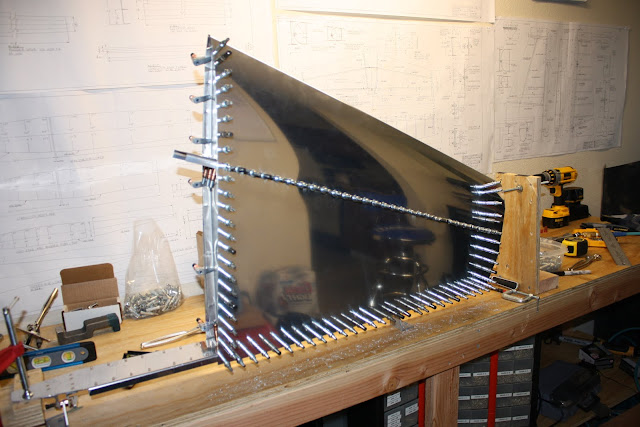
?Congratulations! You?ve finished the first major sub-assembly on your new airplane.?
I’ve read that sentence at the end of the Horizontal Stabilizer section in the RV-3 assembly manual probably 100 times since acquiring my kit last summer. Now, it’s finally true. There was a time a few months ago when I wondered if I could even get this far, that maybe an airplane like the RV-12 was more in line with my experience and skill level. But honestly, now that I’ve seen what I can do and I’ve felt the “extra” satisfaction that comes with the large amount of fabrication needed in the -3, I’m glad Van’s original design is my chosen path.
https://picasaweb.google.com/lh/photo/H-E_Ma7zOu2m9i68TOrmow?feat=directlink
Stop laughing, you can’t tell me you’ve never gone out into the workshop in your pajamas.
In addition to the basic fabrication and finishing of parts like measuring, cutting, filing, drilling, deburring, fluting, cleaning, priming and the like, these are a few new skills I learned or practiced while I built my stab. Items marked with * are things I got an extra hand, extra muscle or extra brain power for from Ben. If he’s in the shop when I am, he’s working on his RV-8’s instrument panel, engine rebuild, or some other task, but he will begrudgingly come over to my half of the garage if I ask him to help hold a piece while I dimple it, or give me an opinion on my craftsmanship, or hand-squeeze a 1/8” rivet. (I will also do the same for him—begrudgingly—except for things involving muscles.) Anyway, here’s the list:
Build a Jig*
Clamp skins to frame—After trying Van’s way and hating it, I’m audacious enough to think my way was better. (see blog)
Plot out rivet hole spacing around flutes, hinges, and other pitfalls. Then drill a straight rivet line.
Match drill framework to skin rivet holes without drilling too close to the edge of a piece.
Set up DRDT-2 with enough pre-load to make a distortion-free dimple. (Thank you VAF!)
Dimpling:
Dimple skin with DRDT-2*
Countersink skin in 4 spots to accept rivets
Countersink framework in 12 spots to accept skin dimples
Dimple frame with pneumatic squeezer ( bad idea, see blog)
Dimple frame with hand squeezer.
Rivet using:
Bucking bar and gun—visually*
Bucking bar and gun—blindly*
Pneumatic squeezer
Hand squeezer (which turned out better than the pneumatic, even with my weak little girl hands )
Drilled out a few rivets...Surprisingly few. None of the bucked rivets had to be removed; only a few that didn’t squeeze properly.
Difficult Rivets—Interference with structure*
I have several perfectly mis-aligned holes. Meaning, they look wonderful on top of the skin, but are too close to the hinge brackets to be bucked or squeezed properly. We ground down a bucking bar and tried bucking with marginal success. Then ground the squeezer yoke and dies oval-shaped to give them clearance from the hinge brackets with the squeezer. By no means are they perfect, but OK. (Note: When Van says you “may” move the rear spar rivet line slightly aft to make room for the spar doublers, he means you MUST move it aft, and it has to be more than 1/16”!! Especially near the hinge brackets!)
Now that I have a finished piece on the wall, I can take a break from figuring stuff out and worrying about riveting & finishing, and begin again with some peaceful, relaxing fabrication of parts for the Vertical Stab.
https://picasaweb.google.com/lh/photo/Ce4EqZHzM61cobf86xwqbA?feat=directlink
https://picasaweb.google.com/lh/photo/8Qyy4l5A_Sxs_qtlRbB8uQ?feat=directlink
I’ve read that sentence at the end of the Horizontal Stabilizer section in the RV-3 assembly manual probably 100 times since acquiring my kit last summer. Now, it’s finally true. There was a time a few months ago when I wondered if I could even get this far, that maybe an airplane like the RV-12 was more in line with my experience and skill level. But honestly, now that I’ve seen what I can do and I’ve felt the “extra” satisfaction that comes with the large amount of fabrication needed in the -3, I’m glad Van’s original design is my chosen path.
https://picasaweb.google.com/lh/photo/H-E_Ma7zOu2m9i68TOrmow?feat=directlink
Stop laughing, you can’t tell me you’ve never gone out into the workshop in your pajamas.
In addition to the basic fabrication and finishing of parts like measuring, cutting, filing, drilling, deburring, fluting, cleaning, priming and the like, these are a few new skills I learned or practiced while I built my stab. Items marked with * are things I got an extra hand, extra muscle or extra brain power for from Ben. If he’s in the shop when I am, he’s working on his RV-8’s instrument panel, engine rebuild, or some other task, but he will begrudgingly come over to my half of the garage if I ask him to help hold a piece while I dimple it, or give me an opinion on my craftsmanship, or hand-squeeze a 1/8” rivet. (I will also do the same for him—begrudgingly—except for things involving muscles.) Anyway, here’s the list:
Build a Jig*
Clamp skins to frame—After trying Van’s way and hating it, I’m audacious enough to think my way was better.
(see blog)Plot out rivet hole spacing around flutes, hinges, and other pitfalls. Then drill a straight rivet line.
Match drill framework to skin rivet holes without drilling too close to the edge of a piece.
Set up DRDT-2 with enough pre-load to make a distortion-free dimple. (Thank you VAF!)
Dimpling:
Dimple skin with DRDT-2*
Countersink skin in 4 spots to accept rivets
Countersink framework in 12 spots to accept skin dimples
Dimple frame with pneumatic squeezer (
bad idea, see blog)Dimple frame with hand squeezer.
Rivet using:
Bucking bar and gun—visually*
Bucking bar and gun—blindly*
Pneumatic squeezer
Hand squeezer (which turned out better than the pneumatic, even with my weak little girl hands
)Drilled out a few rivets...Surprisingly few. None of the bucked rivets had to be removed; only a few that didn’t squeeze properly.
Difficult Rivets—Interference with structure*
I have several perfectly mis-aligned holes. Meaning, they look wonderful on top of the skin, but are too close to the hinge brackets to be bucked or squeezed properly. We ground down a bucking bar and tried bucking with marginal success. Then ground the squeezer yoke and dies oval-shaped to give them clearance from the hinge brackets with the squeezer. By no means are they perfect, but OK. (Note: When Van says you “may” move the rear spar rivet line slightly aft to make room for the spar doublers, he means you MUST move it aft, and it has to be more than 1/16”!! Especially near the hinge brackets!)
Now that I have a finished piece on the wall, I can take a break from figuring stuff out and worrying about riveting & finishing, and begin again with some peaceful, relaxing fabrication of parts for the Vertical Stab.
https://picasaweb.google.com/lh/photo/Ce4EqZHzM61cobf86xwqbA?feat=directlink
https://picasaweb.google.com/lh/photo/8Qyy4l5A_Sxs_qtlRbB8uQ?feat=directlink
Last edited:
Michael White
Well Known Member
Congratulations on this big step, Katie! It looks good!
Louise Hose
Well Known Member
Update on Junior
Paul's doing a great job of posting on our milestones as separate threads but we (mostly, I) had fallen behind on keeping our photo album up-to-date. We've both put some time into it over the last couple of days. All photos are now posted albeit not very well organized. I/We'll work on that next. And, it does take a while to load now with 895 photos!
9/22/11 - Please see Post #3 on http://www.vansairforce.com/community/showthread.php?t=54500 for the updated, multiple URLs. We now have over 1000 photos.
Last edited:
Thank you!
Thanks Moose and Bruce! Your compliments mean a lot. Bruce, I owe you two thank-yous, because I learned a lot about how to set up the DRDT-2 from a great dimpling discussion you had in a temporary thread a while back.
Louise and Paul, I'm looking forward to studying all 800+ pictures of Junior in the years to come! I've slacked off on the blog a bit too-- seems that on building days, all my brain power is expended in the garage instead of on the computer.
Mike S
Senior Curmudgeon
seems that on building days, all my brain power is expended in the garage instead of on the computer.
This is a good thing, trust me, I know of what I speak.
I could have been done a long time ago, if I had tempered my time on the comp a bunch.

David Paule
Well Known Member
I can't tell whether that's a large Skyview or a small panel, but it's going to be a nice one when it's filled.
Thanks for going to all the trouble and posting such a great resource!
Dave
....All photos are now posted albeit not very well organized. I/We'll work on that next. And, it does take a while to load now with 895 photos!
https://picasaweb.google.com/DrKarst/JUNIOR#
Thanks for going to all the trouble and posting such a great resource!
Dave
Last edited:
The panel is looking good Rob - just clean up a bit of wiring, and fill that hole....
SnF tornado victim Tony Boy II update...
I'm happy to report that Tony Boy II's wings are now both structurally repaired! I'm probably going to build a new fuel tank for the left wing because it has a nasty dent, and the left aileron needs a new skin, but the "critical" stuff is fixed. New tips with lights will go on when the wings get refitted.
Next we're rebuilding the rear portion of the fuselage, replacing F310, the tailpost, rear deck, and all empennage attach parts. It will be good to get the fuselage back on the tailwheel & off the blocks.
Take that, Tornado!
Michael White
Well Known Member
Way to go, Katie!! Keep plugging away at it!
rph142
Well Known Member
Made it to the airport!
This past Thursday a few friends and I loaded up the 3 in a 26 foot Uhaul truck and drove it up to the airport. Aside from having to tilt the entire plane to get the tail to fit through the door opening, all went well. There was also that 1" interference problem I encountered while driving under a bridge (dont ask).
Its based at EAA chapter 1250s insanely nice hangar until I finish final assembly.
BTW, the paint isnt quite done yet.
Last edited:
Congratulations on the move Rob - the plane is looking great!
Did you change to the Raven inverted tank? Kinda looks like it.
Paul
Did you change to the Raven inverted tank? Kinda looks like it.
Paul
Andy Hill
Well Known Member
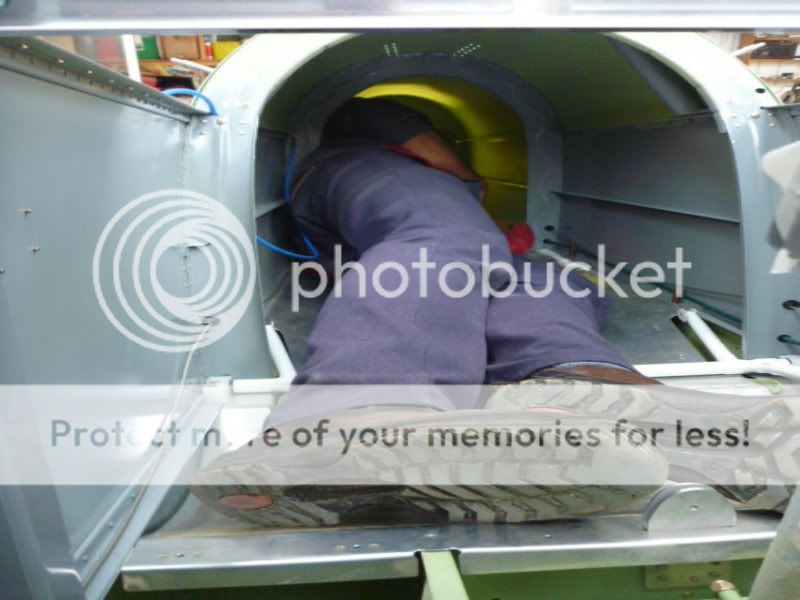
Fuselage Out of Jig
1 RV-3 Fuselage Jig now going spare

Andy & Ellie Hill
RV-8 G-HILZ
RV-3B G-HILI very slow build
RV8tors
1 RV-3 Fuselage Jig now going spare
Andy & Ellie Hill
RV-8 G-HILZ
RV-3B G-HILI very slow build
RV8tors
Louise Hose
Well Known Member
You're making me nostalgic!
I'm already missing the days of building.
Congratulations! I promise, it's worth it. But the -8 will never seem the same once you fly the -3.
I'm already missing the days of building.
Congratulations! I promise, it's worth it. But the -8 will never seem the same once you fly the -3.
My first RV project
Here are some of my project pics.
http://imageshack.us/g/210/1005069mediumsmall.jpg/
Here are some of my project pics.
http://imageshack.us/g/210/1005069mediumsmall.jpg/
Michael White
Well Known Member
Folks,
If you haven't taken a look recently at Katie B's project of resurrecting Tony Boy II to flying status, take a look...she's making good progress.
https://picasaweb.google.com/116664...rectionOfTonyBoyII?authuser=0&feat=directlink#
Giving you a big thumbs up, Katie. You deserve it!
If you haven't taken a look recently at Katie B's project of resurrecting Tony Boy II to flying status, take a look...she's making good progress.
https://picasaweb.google.com/116664...rectionOfTonyBoyII?authuser=0&feat=directlink#
Giving you a big thumbs up, Katie. You deserve it!
Michael White
Well Known Member
Thanks Moose!! Plugging away at the new tail. Finally time to start on the rudder & elevators! If all goes as planned, the metal work will be done just as Spring arrives to warm up the garage for canopy & glasswork.
Hope it all goes as planned, Katie. As a late friend of mine always used to say: "It's important to have a plan...it gives you something to deviate from!"
Looking good Andy! I can tell you are working the details for lightness - I like your rudder pedals!
David Paule
Well Known Member
Andy,
It looks great!
Keep posting photos for us - thanks!
Dave
It looks great!
Keep posting photos for us - thanks!
Dave
20 hours of wasted RV-3 building experience: Priceless.
Seems I remember someone saying on Paul's "Worst Sounds of Building" thread a while back that they hate the THUD that means you just missed the backriveting plate.
Yep, 3/4 of the rudder skin stiffeners are on and the rivets are beautiful. All but the last one, anyway. As Ben said when he heard the cussing and came to look at it:
"I'm sorry... it's cracked. There's nothing we can do."
Good thing I found a big piece of .016 just laying around the shop dreaming of becoming a new rudder skin. It's ok, I over-dimpled the last one anyway.
Bruce Stewart
I'm New Here
Panel
Parts of life's journey eh! think of it as 20 hours of meditation!........are you going to re do the panel while your at it?....Bruce ......Down under...
Parts of life's journey eh! think of it as 20 hours of meditation!........are you going to re do the panel while your at it?....Bruce ......Down under...
David Paule
Well Known Member
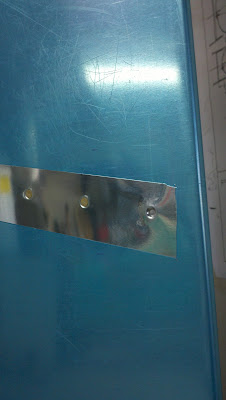
Good News Hole
I'm drilling and clecoing the skin to the horizontal stabilizer. This is the first skin on my RV-3B, and one of the first holes, in this case to the front spar.
I've gotta admit I was mighty glad to see that line through the hole!

Dave
I'm drilling and clecoing the skin to the horizontal stabilizer. This is the first skin on my RV-3B, and one of the first holes, in this case to the front spar.
I've gotta admit I was mighty glad to see that line through the hole!
Dave
ppilotmike
Well Known Member
Good job.
Dave,
I can only imagine. I felt that way when I was lining up stiffeners, and stiffeners are cheap compared to skins. Keep at it!
Dave,
I can only imagine. I felt that way when I was lining up stiffeners, and stiffeners are cheap compared to skins. Keep at it!
LifeofReiley
Well Known Member
Awesome...
Andy,
Absolutely Beautiful Craftsmanship!! Very nice...
Andy,
Absolutely Beautiful Craftsmanship!! Very nice...
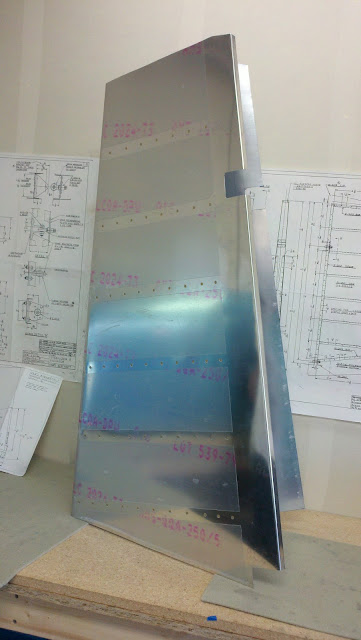
Some more progress


steve lenne
Member
90% finished 90% to go
Well done Pete that looks great. I am 50% finished 99% to go
Well done Pete that looks great. I am 50% finished 99% to go
RV-3 Moved into garage...
We just moved our RV-3 restoration project from a metal pole barn without electricity/insulation/heat into my garage which can provide all those missing elements. I'm planning on moving the engine into the garage as well (from my hanger) and get after the rebuild in earnest now and hope to marry up the two by Christmas time...
Doug
RV-3 "IRAN"
https://www.dropbox.com/s/cjih39zgn9ap5ix/RV-3 Moved to garage.jpg
Last edited:
Couldn't see the picture without a log-in Doug. Glad to hear that you will make progres over the winter!
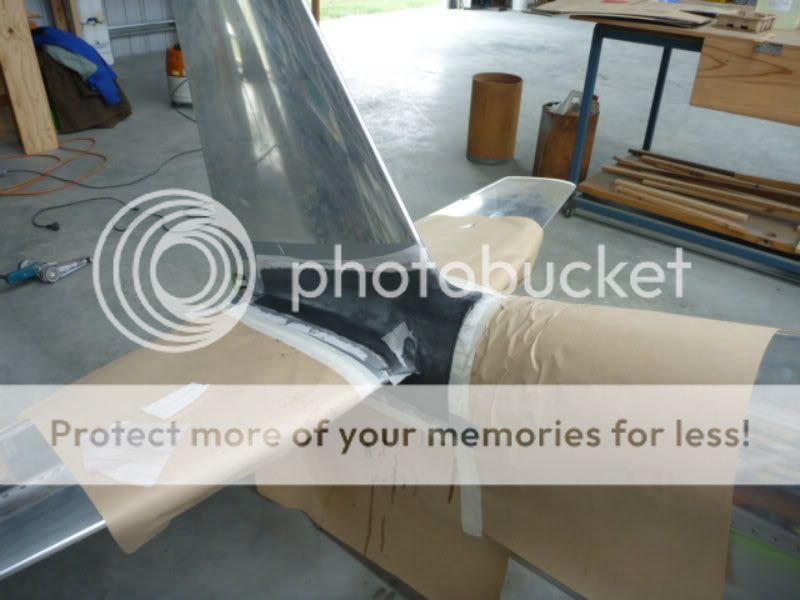
Carbon fiber fairings
Nice looking project Doug. Did you encounter any regrets for using carbon fiber ? What fabric did you use ?
Nice looking project Doug. Did you encounter any regrets for using carbon fiber ? What fabric did you use ?
Drop Box Not Working
Paul...I'll have to try that again with a better address...should be a way to allow you see it without requiring a log in, etc...
Couldn't see the picture without a log-in Doug.
Paul...I'll have to try that again with a better address...should be a way to allow you see it without requiring a log in, etc...
Carbon Fiber Fairings
Larry:
You need to ask Peter Pendergast since his pictures show the nice carbon fiber type fairings...mine are just simple low tech. fiberglass...
Doug
Nice looking project Doug. Did you encounter any regrets for using carbon fiber ? What fabric did you use ?
Larry:
You need to ask Peter Pendergast since his pictures show the nice carbon fiber type fairings...mine are just simple low tech. fiberglass...
Doug
Jumbo
Well Known Member
RV-3A - imported and ready to fly
Hi,
well, it is still a project as I am waiting for paperwork so it fits to post here - but ready to fly now!!!
EDIT mid April: paperwork came in and plane flies - having F U N !!!
Vans RV-3A (both spar mods) with 51 hrs TT & since TOP overhaul and 51 hrs on new Catto prop, wing tanks, Dynon D10-A, 2x 5" PocketFMS/Easy VFR.


It is a snug fit for me with 6.15 ft and 210 lb but it works (well, I could get used to this in the RV-4 I had). Can´t wait to fly it - waiting for paperwork.
EDIT September: ... got used to it, still having a blast!!
Best, Heinz
P.S. Again: many thanks Smokey, Ron, Jesse and Brad.
Hi,
well, it is still a project as I am waiting for paperwork so it fits to post here
- but ready to fly now!!!EDIT mid April: paperwork came in and plane flies - having F U N !!!
Vans RV-3A (both spar mods) with 51 hrs TT & since TOP overhaul and 51 hrs on new Catto prop, wing tanks, Dynon D10-A, 2x 5" PocketFMS/Easy VFR.
It is a snug fit for me with 6.15 ft and 210 lb but it works (well, I could get used to this in the RV-4 I had). Can´t wait to fly it - waiting for paperwork.
EDIT September: ... got used to it, still having a blast!!
Best, Heinz
P.S. Again: many thanks Smokey, Ron, Jesse and Brad.
Last edited:
Louise Hose
Well Known Member
Oh, you are about to have some serious fun!
Stay safe.
Stay safe.
Jumbo
Well Known Member
... will take a little while
Thanks, Louise. It will still take a little while for the paperwork to arrive however the Dutch authorities are nice to work with.
Will than explore the envelope step by step and take extra caution and conduct a ?semi phase I? even if not required.
Once flying I suppose I need to post in the ?Show us your FINISHED RV-3?section - can?t wait!!
Heinz

