
Van's Air Force
You are using an out of date browser. It may not display this or other websites correctly.
You should upgrade or use an alternative browser.
You should upgrade or use an alternative browser.
Show us the Status of your RV-12
- Thread starter Flyguytki
- Start date

MartySantic
Well Known Member
Drilling Out a Rivet
There is another video on the EAA website that shows you how to do it.
http://www.eaa.org/video/homebuilders.html?videoId=1485316077
There is another video on the EAA website that shows you how to do it.
http://www.eaa.org/video/homebuilders.html?videoId=1485316077
I just started my RV-12 wing kit about 3 days ago and I destroyed my first piece of aluminum!I was suppose to csk about 80 #30 holes to the size of a 1/4 " drilled hole (guide) which will be riveted to the leading edge of the wing and the wing skin is to be dimpled to fit the countersink. I have about 5-6 holes I countersunk way to much ...5/16 and some 5/16+ as a guide hole.
I think I didn't tighten the lock on the countersick bit and made the countersink too large in adjusting! The second piece I did came out very good. Guess I'll have to replace the first piece I ruined!
I now have to rivet 24-AN470AD4-4 rivets ... my first squeezed rivet ever. I have no extra rivets to practice on.
Jerry,
Just a suggestion...As it sounds like airplane construction is a new learning experience for you.
It is much less expensive in the long run if you spend a little bit of money to get some extra misc. aluminum material for practicing. Anytime you are doing a process that is new to you, first do it a bunch of times on scrap material (and keep practicing it until you are certain that the work is acceptable).
This will be much less expensive in the long run, than using your kit parts to learn on.
JerryG150
Well Known Member
so true ...
I just watched all the videos on the EAA site you suggested, learned quite a bit! I also watched (for a second time) a sheet metal DVD I purchased of building a Zenith 701 rudder and will buy some additional aluminum "structures" at Home Depot to practice my "techniques" on. It's been a long day ... I knew it wasn't going to be easy ... once I order a new part from Van's I'll be back on track ... still lots I can do till the replacement part arrives.
I think it would be prudent to order some extra rivets while I'm at it, in case (when) I mess up again. Better days ahead ...
JerryG150
Well Known Member
very slow for a 1st time builder
In manufacturing the W1212A hinge assemblies on pg. 14-02, I CSK the 4 holes for the AN426AD4-6 on each hinge. The machine head went into the countersink nice, but the shop head, no matter how much pressure I applied (I don't think I'm weak!) would not sink flush. I called Van's and they had me file the shop heads flush. Is it possible to squeeze that shop head into the countersink like the one on the other side for the machine head. I made the same countersink on BOTH external sides. (See pic in my blog below, in signature). I'd hate to have to make the same "mistake" again later.
(I'm waiting on delivery of my new W1208C-R that I messed up with several poor countersinks, extra rivets of several sizes, extra washers and some training aluminum from Van's ... those guys are very helpful! )
In manufacturing the W1212A hinge assemblies on pg. 14-02, I CSK the 4 holes for the AN426AD4-6 on each hinge. The machine head went into the countersink nice, but the shop head, no matter how much pressure I applied (I don't think I'm weak!) would not sink flush. I called Van's and they had me file the shop heads flush. Is it possible to squeeze that shop head into the countersink like the one on the other side for the machine head. I made the same countersink on BOTH external sides. (See pic in my blog below, in signature). I'd hate to have to make the same "mistake" again later.
(I'm waiting on delivery of my new W1208C-R that I messed up with several poor countersinks, extra rivets of several sizes, extra washers and some training aluminum from Van's ... those guys are very helpful!
)JerryG150
Well Known Member
the first 68 hours ...
The first 68 hours of my RV-12 wing kit build have been quite a learning experience. I've had many successes and a few failures . I took many picture as I progressed and thought I might share them with all of you ... especially those of you waiting for your delayed wing kits to arrive.
Sorry there are a few duplicate pictures & the pictures are not in exact chronological order but there is a date stamp on each picture ...
(Suggestion: Click on "reverse order" in the lower left hand corner when the slides appear ... that'll put the slides in better order.)
http://s258.photobucket.com/albums/hh257/JerryG150/RV-12%20Build%20Wing%20Kit/?albumview=slideshow
Once again, I've decided to share both my successes and failures ... corrections have been made, replacement parts have been ordered, received and the do-overs were successful.
I tend to believe what took me 68 hours to accomplish could have been done by a "master builder" in less than half that time. But that's OK ... I'll still have a correctly built and structurally sound RV-12 when I'm done!
A running dialog of my build is in my builder's log found in my signature below.
There are mistakes in some of the pictures ... all have been found and corrected ...
{REMEMBER: I'm a newbie builder ... be sure to check with Van's Aircraft before you do anything I do or I suggest or copy a method I use. I'm the furthest thing from an expert builder there is. I've never attended a workshop ... so readers & viewers beware ... and refer to my builder's web site with caution ... !! }
That said, kit #1 is starting to take shape. One day soon, it might even resemble airplane wings.
The first 68 hours of my RV-12 wing kit build have been quite a learning experience. I've had many successes
and a few failures . I took many picture as I progressed and thought I might share them with all of you ... especially those of you waiting for your delayed wing kits to arrive.Sorry there are a few duplicate pictures & the pictures are not in exact chronological order but there is a date stamp on each picture ...
(Suggestion: Click on "reverse order" in the lower left hand corner when the slides appear ... that'll put the slides in better order.)
http://s258.photobucket.com/albums/hh257/JerryG150/RV-12%20Build%20Wing%20Kit/?albumview=slideshow
Once again, I've decided to share both my successes and failures ... corrections have been made, replacement parts have been ordered, received and the do-overs were successful.
I tend to believe what took me 68 hours to accomplish could have been done by a "master builder" in less than half that time. But that's OK ... I'll still have a correctly built and structurally sound RV-12 when I'm done!
A running dialog of my build is in my builder's log found in my signature below.
There are mistakes in some of the pictures ... all have been found and corrected ...
{REMEMBER: I'm a newbie builder ... be sure to check with Van's Aircraft before you do anything I do or I suggest or copy a method I use. I'm the furthest thing from an expert builder there is. I've never attended a workshop ... so readers & viewers beware ... and refer to my builder's web site with caution ... !! }
That said, kit #1 is starting to take shape. One day soon, it might even resemble airplane wings.
Last edited:
N941WR
Legacy Member
Check out this thread in the Tips section on how to drill out rivets.I got the squeezed rivets in ... looks good, but I put one too many in!
Brooklands
I'm New Here
Jerry,
Nice pictures. One point I noticed though was that you're clamping some of the aluminium pieces in a steel jawed vice - I'm not sure that this is a good idea. If it were me I'd be protecting them with either a couple of bits of wood, or better a couple of lengths of Aluminium angle placed over the jaws.
Caveat - I've even less experience of building aeroplanes than you have, and its not likely to increase in the near future
Brooklands
JerryG150
Well Known Member
thanks ... good idea
That's a good idea ... I'll use some scrap pieces of wood to protect the aluminum in the vice next time. In my defense, I didn't torque the vice at all ... just lightly enough to hold the piece I was working on. I like your idea!
I just figured out what Jim Cone's, first RV-12 builder, construction pictures of "close in" rivet puller was. That puzzle took me 2 1/2 months to figure out!
I couldn't figure out how he was able to "pull" rivets with that little piece of angled metal with a hole drilled into it! Finally, I came across a rivet pulling video on EAA.
"Pulling Rivets in Tight Places".
Mystery Solved!
I could have used that tool in my building process ... will certainly buy or make something similar very, very soon. I've so much to learn!
That's a good idea
... I'll use some scrap pieces of wood to protect the aluminum in the vice next time. In my defense, I didn't torque the vice at all ... just lightly enough to hold the piece I was working on. I like your idea! I just figured out what Jim Cone's, first RV-12 builder, construction pictures of "close in" rivet puller was. That puzzle took me 2 1/2 months to figure out!
I couldn't figure out how he was able to "pull" rivets with that little piece of angled metal with a hole drilled into it!
Finally, I came across a rivet pulling video on EAA."Pulling Rivets in Tight Places".
Mystery Solved!
I could have used that tool in my building process ... will certainly buy or make something similar very, very soon. I've so much to learn!
JerryG150
Well Known Member
lap joggle tool???
Does anyone know if it is necessary to use a lap joggle tool in building the wings or any part of the RV-12?
I bought one of those tools but anticipate there are a thousand ways to mess up the process!
I used it on scrap aluminum in a vice ... have improved greatly in my "joggle" but realize no way to put skin in a vice.
Necessary or not??
http://www.averytools.com/p-233-lap-joint-joggle-tool.aspx
Jerry,
I believe the "joggle" tool is for making a recessed edge around an inspection hole so that the cover plate sets flush with the skin.
The joggle tool might be confused with the "edge rolling" tool seen here:
http://www.averytools.com/pc-45-70-edge-rolling-tool.asp
Which is used to slightly bend one the edge of a lap joint to prevent it from curling up when riveted with upset/solid rivets? If IRC, Jim Cones said he rolled one edge on his skins and then decided that it wasn't really necessary and didn't roll any others.
Checking the wing plans for the -12, mine won't be here for another couple of months now, there is only one "inspection" cover on the wings for access to the stall warning vane switch. The cover looks to rest on top of the skins rather than set flush in a recess. I guess Vans decided the cover sticking out in the breeze was no worse than all the rivet heads and chose not stamp in a recess for the cover plate into the skins. I don't think I'd mess with trying to roll a recess for the cover plate as I'm sure it would be VERY easy to mess up and ruin the skin.
Guess we'll all have to wait to see about the rest of the kit.
Scott - #85...patiently waiting
Last edited:
Does anyone know if it is necessary to use a lap joggle tool in building the wings or any part of the RV-12?
I bought one of those tools but anticipate there are a thousand ways to mess up the process!
I used it on scrap aluminum in a vice ... have improved greatly in my "joggle" but realize no way to put skin in a vice.
Necessary or not??
http://www.averytools.com/p-233-lap-joint-joggle-tool.aspx
The builder can use one where ever they want, but the RV-12 construction manual will tell you what skin edges are recommended. I believe it is primarily necessary during the fuselage construction.
Jerry,
I believe the "joggle" tool is for making a recessed edge around an inspection hole so that the cover plate sets flush with the skin.
The joggle tool might be confused with the "edge rolling" tool seen here:
http://www.averytools.com/pc-45-70-edge-rolling-tool.asp
Which is used to slightly bend one the edge of a lap joint to prevent it from curling up when riveted with upset/solid rivets? If IRC, Jim Cones said he rolled one edge on his skins and then decided that it wasn't really necessary and didn't roll any others.
Checking the wing plans for the -12, mine won't be here for another couple of months now, there is only one "inspection" cover on the wings for access to the stall warning vane switch. The cover looks to rest on top of the skins rather than set flush in a recess. I guess Vans decided the cover sticking out in the breeze was no worse than all the rivet heads and chose not stamp in a recess for the cover plate into the skins. I don't think I'd mess with trying to roll a recess for the cover plate as I'm sure it would be VERY easy to mess up and ruin the skin.
Guess we'll all have to wait to see about the rest of the kit.
Scott - #85...patiently waiting
This one access cover does have a recessed flange.
I would not use a flanging tool to put a rolled brake on a skin edge it is just for flanging unflanged lightening holes, of which there are none in an RV-12 kit.
This one access cover does have a recessed flange.
Scott - thanks for the clarification - That detail is not on the "plans" and that's what I get for inferring without the actual parts to look at!!!
Scott
JerryG150
Well Known Member
you guys are right ...
I acted too hastily when I bought the lap joggle tool. I finally have something I can try to sell on E-Bay. The tool is about 4 days old and only used on a couple of practice runs. Oh well ...
I'll reread the introductory instructions on the plans and talk to Van's Aircraft builder's assistance tomorrow morning and see what they recommend. That little edge bender might be all I need.
It could have been worse ... I could have ruined some skins. But I didn't !!
Thanks for all your advice.
(selling the lap joint joggle tool for $22.00 plus shipping on VAF classified section)
I acted too hastily when I bought the lap joggle tool.
I finally have something I can try to sell on E-Bay. The tool is about 4 days old and only used on a couple of practice runs. Oh well ...I'll reread the introductory instructions on the plans and talk to Van's Aircraft builder's assistance tomorrow morning and see what they recommend. That little edge bender might be all I need.
It could have been worse ... I could have ruined some skins. But I didn't !!
Thanks for all your advice.
(selling the lap joint joggle tool for $22.00 plus shipping on VAF classified section)
Last edited:
Alan Gilmore
Active Member
Wing Progress Photo
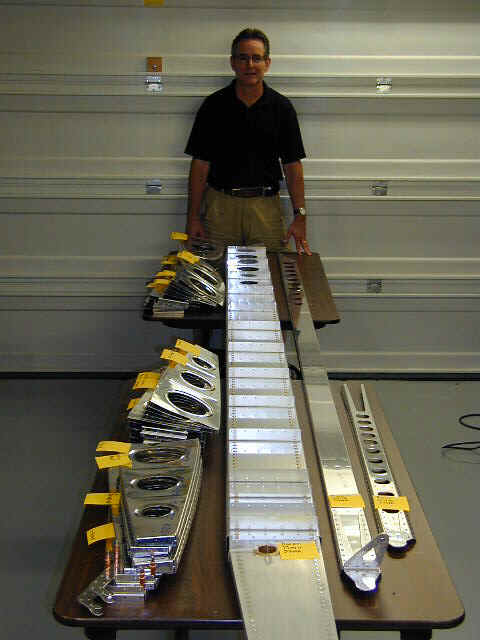
I thought that it would be good to post a photo of my wing parts before I start assembling them. I am focusing on the right wing since my garage would be rather busy with left and right wings both. Since the ribs are labeled R and L, I thought at first the R were for the right wing and L for the left wing...WRONG! The right wing uses some of the R and some of the L parts. So, I trimmed, debured, and fluted all the ribs just to make it a little easier. That means the photo shows all of the right wing parts plus the ribs from the left wing.
The next step will be the riveting of the ribs to the main spar. Then the rear spar and stub spar (short spar in front) will be riveted. The actual riveting goes so quick. I have to be careful I don't blink
I have more photos on my web site www.rv12info.com
Also I have a YouTube video that shows how I fluted my ribs. I wanted a method that is easy, consistant and predictable. To watch, click on the following web address:
http://youtube.com/watch?v=jqNoVAQLo0M
Here is my photo of the "pile of parts"
steve wyman
Well Known Member
Hi Alan- The rib fluting and deburring videos are great- thanks for taking the time to film them. I just got my wing kit this week, and I have a couple of questions for you, concerning the videos- first of all, where did you get the knife sharpener, and secondly, I'm not sure I understand the function of the third wheel, which you flatened withe the bench grinder. Since its the same diameter as the other two wheels, I'm not at all sure how it can affect the deburring process- I can be dense at times so be gentle with your explanation. Thanks again- Steve
I thought that it would be good to post a photo of my wing parts before I start assembling them. I am focusing on the right wing since my garage would be rather busy with left and right wings both. Since the ribs are labeled R and L, I thought at first the R were for the right wing and L for the left wing...WRONG! The right wing uses some of the R and some of the L parts. So, I trimmed, debured, and fluted all the ribs just to make it a little easier. That means the photo shows all of the right wing parts plus the ribs from the left wing.
The next step will be the riveting of the ribs to the main spar. Then the rear spar and stub spar (short spar in front) will be riveted. The actual riveting goes so quick. I have to be careful I don't blink
I have more photos on my web site www.rv12info.com
Also I have a YouTube video that shows how I fluted my ribs. I wanted a method that is easy, consistant and predictable. To watch, click on the following web address:
http://youtube.com/watch?v=jqNoVAQLo0M
Here is my photo of the "pile of parts"
Alan Gilmore
Active Member
where did you get the knife sharpener, and secondly, I'm not sure I understand the function of the third wheel, which you flatened withe the bench grinder.
Steve,
I bought the knife sharpener many years ago, so I am not sure what store it was from. I have seen them since then, usually in stores that carry kitchen supplies. Maybe Walmart, KMart, etc....
The third wheel is a little confusing...don't feel bad. The problem is that since the second wheel overlaps the first just a tad, it would not be flat and parallel to the first disk if I just used two disks. The first disk would be flat on the metal plate, the second disk would be sitting at an angle, touching the metal plate and the first metal disk. So the purpose of the third disk is to prop up the second disk so that it is parallel with the first disk.
I cut on side of the third disk so it would not overlap the first disk.
Hope this helps,
Alan
steve wyman
Well Known Member
Hi Alan- I now understand the use of the third wheel- its just a spacer. Thanks I have looked all over the place for one of those knife sharpeners- no luck. But I did find a couple of cheap can openers at Walmart that have a hardened cutting wheel. The wheels work just like the wheels from your knife sharpener. Thanks again for the idea. My wing kit inventory is now complete and I'm actually building an Rv-12 wing! This is more fun than a barrel of monkeys! Steve knife sharpener many years ago, so I am not sure what store it was from. I have seen them since then, usually in stores that carry kitchen supplies. Maybe Walmart, KMart, etc....
JerryG150
Well Known Member
a little help ... please
Anyone else have a problem with the match-drill #30 holes thru the 1201C and the super hard A-909 counterbalance on the flaperons pg. 18-03 steps 2 & 5? I didn't realize my drill bit was slipping south and I made a great big elongated hole where the #30 hole should be.
I was using a new drill bit and tried it with 2 different drills. After I messed up. I tried again and made a "mark" with an auto punch ... didn't help.
What's the secret?
I ordered a new A-1201 skin (only messed up the right one ... so far). This time $22.50 + priority shipping ... I could buy some body shop filler but decided that'll cost a few buck too, so why not just get another skin.
If you go to my build log in my signature you can see my error (8.08.08) ... might be lucky for the Chinese, not me ...
steve wyman
Well Known Member
show us the status of your RV-12
Jerry- The counter balance is stainless steel- a real bear to drill, as you have already found out. The secret is to use a lot of cutting oil and a very slow drill speed- less than 200 hundred RPM. Hope this helps. Steve
Jerry- The counter balance is stainless steel- a real bear to drill, as you have already found out. The secret is to use a lot of cutting oil and a very slow drill speed- less than 200 hundred RPM. Hope this helps. Steve
Drilling
Another technique that works for drilling hard metals is to use a #40 drill first and then enlarge the hole to #30. It is easier to drill slowly with high pressure with a smaller drill bit. Also, chuck the drill bit as far as it will go into the drill so that it will not wobble as much. Make sure that the work piece is well supported so that it cannot move.
I have cutting oil and never thought about using it.
Is there a #30 drill bit especially for stainless steel ... super sharp, maybe?
I'll try light trigger action next time too for slower RPM's.
Thanks
Another technique that works for drilling hard metals is to use a #40 drill first and then enlarge the hole to #30. It is easier to drill slowly with high pressure with a smaller drill bit. Also, chuck the drill bit as far as it will go into the drill so that it will not wobble as much. Make sure that the work piece is well supported so that it cannot move.
Need a little help
I want to make sure that I am reading the plans and using the rivet squeezer correctly.
1. Page 13-03, Steps 3 and 5
All I have to do is use the LP4-3 rivets in the areas specified, correct? There are no other parts that need to be attached to these open holes. My brother-in-law (a good guy) and I are in disagreement.
2. Page 14-02, Step 7
I don't see the type of countersink specified in Figure 5. 120 degree?
3. Tatco Rivet Squeezer
In the yoke, does it matter which end I insert the flush rivet squeezer set and which end the cup rivet squeezer set? Does it make it easier one way or the other?
Cupped:

Flush:

Yoke:

Thanks.
Jim, #28
I want to make sure that I am reading the plans and using the rivet squeezer correctly.
1. Page 13-03, Steps 3 and 5
All I have to do is use the LP4-3 rivets in the areas specified, correct? There are no other parts that need to be attached to these open holes. My brother-in-law (a good guy) and I are in disagreement.
2. Page 14-02, Step 7
I don't see the type of countersink specified in Figure 5. 120 degree?
3. Tatco Rivet Squeezer
In the yoke, does it matter which end I insert the flush rivet squeezer set and which end the cup rivet squeezer set? Does it make it easier one way or the other?
Cupped:
Flush:
Yoke:
Thanks.
Jim, #28
Last edited:
sam richards
Member
Tatco Squeezer
Jim,
I don't yet have the RV-12 plans, so I can't answer your first two
questions.
Regarding the third, if you are setting AN470 (universal
head) rivets, it does not matter which part of the squeezer holds
either set. Ease of access is probably your main concern as well as keeping
the manufactured head:
1. centered in the cup set and
2. bearing on the clamped or clecoed parts being joined.
Cheers,
Sam
sam richards
Member
Tatco Squeezer
If you are new to squeezing rivets, try some test pieces made from
your waste or trim bundle bits. Check to make sure you are keeping the
cup set centered by looking for 'smiles' in the Al adjacent to the
manufactured head. When you are confident of your results, then it's onward to the aircraft. SR
JerryG150
Well Known Member
Maybe an answer ...
Jim ... (answer # 2) I was told I could make that countersink with my tool for deburring a rivet hole and it worked in that instance. Be sure to check with Van's builder's assistance just to be sure. They're very helpful.
Thanks to everyone who offered advice on my problem with match-drilling thru the flaperon skin and stainless steel counterweight. I took everyone's suggestions and added one of my own. Rather than rewriting and explaining what I did, it's in today's blog (in signature) with pictures. Thanks again for all the advice.
steve wyman
Well Known Member
Well I finally finished my 12 wings! 7and 1/2 weeks and I'm not sure how many hours. It took me a little longer than I expected, but part of that was because my compressor crapped out on me and had to get repaired- luckily, it was still under warrenty. My overall impression of the kit was that it was very well engineered- the parts fit , I thought was fantastic. I can't wait until the fuselage kit arrives! Steve
rv7boy
Forum Peruser
Congratulations, Jerry!
Congratulations, Jerry! You made the headlines today on Doug's VAF web site with your video of the delivery of your wings which I believe occurred back in May.
You are doing a fantastic job of documenting your build with your blog and postings here. Thanks so much; even though I'm not building the 12 now, I do have an interest in possibly building one after the 7. (Don't tell my wife I have this secret desire!)
I particularly liked the way you framed in your video the action when you laid the camera down to help the truck driver. May have been serendipity or just plain luck or even skill, but you caught the action just right.
And the music in your garage...Norah Jones is one of my favorites. I'm guessing it's XM radio or maybe your iPod.
Anyway... great job and keep up the good work!
Don
I've posted hundreds of additional wing kit build pictures on my blog ... GO TO August 15, 2008 ... Part II 6/26/2008 - 8/13/2008.
Link in signature below.
(Part I was posted on VAF previously.)
Congratulations, Jerry! You made the headlines today on Doug's VAF web site with your video of the delivery of your wings which I believe occurred back in May.
You are doing a fantastic job of documenting your build with your blog and postings here. Thanks so much; even though I'm not building the 12 now, I do have an interest in possibly building one after the 7. (Don't tell my wife I have this secret desire!)
I particularly liked the way you framed in your video the action when you laid the camera down to help the truck driver. May have been serendipity or just plain luck or even skill, but you caught the action just right.
And the music in your garage...Norah Jones is one of my favorites. I'm guessing it's XM radio or maybe your iPod.
Anyway... great job and keep up the good work!
Don
Last edited:
MartySantic
Well Known Member
Completed the Wings-On to the Flaperons
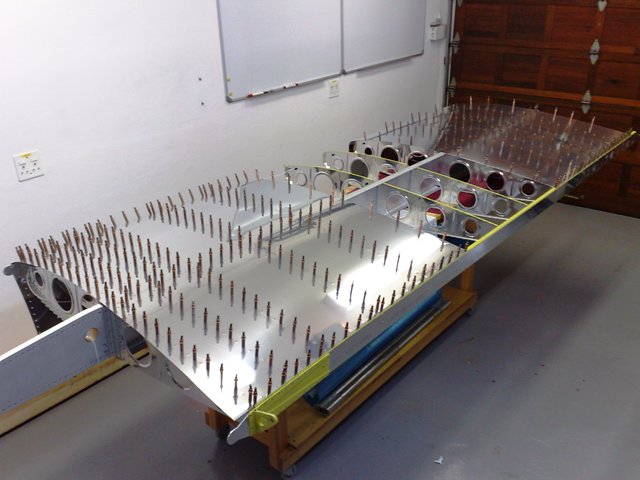
Completed the 2nd wing today and will start the flaperon section in the next day or so. Total time for both wings was 139 hours. Very happy with the form, fit and overall engineering of the kit. The last step has you check and ensure that the aft trailing edge of the wingtip is parallel to the aft edge of the wing skin. It was perfect. I cannot imagine how it could be any different.
Where is my fuselage? Getting close. This is addicting, gonna go into withdrawal if it does not show up soon.
sam richards
Member
Wing Kit arrives in Temora
Fellow RV-12 Builders,
After following ALL of your postings since April, I finally have something
to work on. The wing kit came yesterday. All parts are accounted for
and in perfect condition.
Thanks for paving the way with your generous input.
Cheers for now,
Sam
Temora Australia
Fellow RV-12 Builders,
After following ALL of your postings since April, I finally have something
to work on. The wing kit came yesterday. All parts are accounted for
and in perfect condition.
Thanks for paving the way with your generous input.
Cheers for now,
Sam
Temora Australia
Wings have arrived
Hello Fellow RV12 peoples.
My wings also arrived yesterday. I also got the tools with the kit so the only excuse I have for not building is 2 years of age and the proptector that monitors me very closely.
Sam, send me a PM with your local email and we can keep in contact as to the build. Im located in Geelong, Vic.
Cheers to all with the advice and pics. Should make everything musch easier for this first time builder.
Jim.
TT-RhinoRestorations
Member
Not too far along - fuselage, tail and rivets on order for a mid-January delivery.
I have taken care of one important thing though. I received confirmation from the FAA-OK City just today that I have my new N number reserved:
N512RV
Tom Tyson - AMT-Airframe (Powerplant to follow in July)
I have taken care of one important thing though. I received confirmation from the FAA-OK City just today that I have my new N number reserved:
N512RV
Tom Tyson - AMT-Airframe (Powerplant to follow in July)
Last edited:
TT-RhinoRestorations
Member
Not yet, Dave. I expect to get the official builder confirmation sometime next week (if Thanksgiving doesn't slow down the USPS too much.)
I'm planning on building the wings last. Ken Scott at Vans assures me that they will fit even if the fuselage is built first.
- TT
I'm planning on building the wings last. Ken Scott at Vans assures me that they will fit even if the fuselage is built first.
- TT
Last edited:
Not yet, Dave. I expect to get the official builder confirmation sometime next week (if Thanksgiving doesn't slow down the USPS too much.)
I'm planning on building the wings last. Ken Scott at Vans assures me that they will fit even if the fuselage is built first.
- TT
I'm sure Ken means well, but doesn't yet know that the construction manual for the fuselage expects/assumes you have already built the wings. There is a fitting process you are instructed to do while building the fuselage that requires you to check fit some mating fuselage parts to the finished wings.
I would recommend you follow the construction processes/order suggested in the construction manual


RudiGreyling
Well Known Member
Rudi's RV 12 Progress
48 Hours and started skinning the wings.
PS: More pictures on my website build log...
Regards
Rudi
48 Hours and started skinning the wings.
PS: More pictures on my website build log...
Regards
Rudi
TT-RhinoRestorations
Member
How Many RV-12 Builders So Far?
I just received confirmation that my order, placed on 11/10/08 was #163.
- TT (Tom Tyson - N512RV reserved)
I just received confirmation that my order, placed on 11/10/08 was #163.
- TT (Tom Tyson - N512RV reserved)
48 Hours and started skinning the wings.
PS: More pictures on my website build log...
Regards
Rudi
WOW! Fast progress Rudi!
I think I've spent nearly that amount of time just trimming, deburring and finishing parts. Very little assembled yet. Makes me wonder if i'm doing a lot of unneccessary work (even though I don't claim to be a speed demon) or maybe just making it harder than it should be. I've been trimming, deburring, using 3-M wheel, and ScotchBrite every edge on EVERY part.
What is your process for trimmning/smoothing the Wing Ribs, for example?
Thanks!
Dave.
RudiGreyling
Well Known Member
DaveWelch said:WOW! Fast progress Rudi!
I think I've spent nearly that amount of time just trimming, deburring and finishing parts. Very little assembled yet. Makes me wonder if i'm doing a lot of unneccessary work (even though I don't claim to be a speed demon) or maybe just making it harder than it should be. I've been trimming, deburring, using 3-M wheel, and ScotchBrite every edge on EVERY part.
What is your process for trimmning/smoothing the Wing Ribs, for example?
Thanks!
Dave.
Thanks Dave, I don't add the time studying plans, I do it during lunch at work or evening in bed, so time quoted is workshop time.
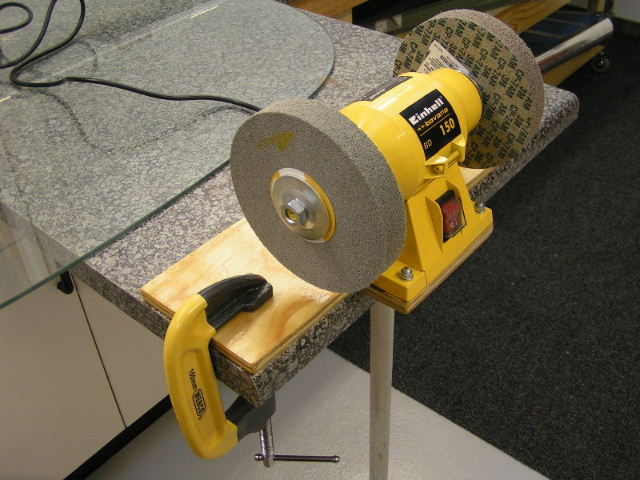
Every part is deburred, trimmed, and mating surface primed. Rib flange trimming with Snips, then on 6" Deburing Wheel, followed by 6" Polishing wheel all round both sides of edge. Then onto 2" Deburing wheel in Die Grinder for the rib lightning holes.
My 6" bench grinder with Deburing and Polishing wheels combined with 2" and 1" Deburing wheels in the Die Grinder wheel makes light work of most Deburing Tasks.
PS: Below is a picture of my bench grinder, when it was still new, get one with a very small narrow motor body, and try and fit it with as much as possible overhang, so that you easily maneuver parts while deburing around it.
Last edited:
Thanks Rudi! Appreciate the confirmation, sounds like were following the same "program" just like we were taught at Alexander. Appreciate the grinder overhang idea. That'll be my next workbench project while I wait for my little compressor to come back up to pressure. Hoping Santa will have a BIG one in his bag!
Take care friend, Dave.
Take care friend, Dave.

