
Van's Air Force
You are using an out of date browser. It may not display this or other websites correctly.
You should upgrade or use an alternative browser.
You should upgrade or use an alternative browser.
RV horizontal stab crack reporting thread
- Thread starter CF86301
- Start date

Now that's being a good friend!
Dan trained me well, so he's actually complementing himself!
fieldbaren
I'm New Here
elevator removal
Any hints on removing the RV6 elevator from the stabilizer? Like how to get to the nut and bolt through the tiny inspection hole?
Any hints on removing the RV6 elevator from the stabilizer? Like how to get to the nut and bolt through the tiny inspection hole?
D Weisgerber
Well Known Member
I use hemostats to fish the bolt out.
Last edited:
Ex172Owner
Member
A little data analysis
CF86301, I hope I'm not stepping on your toes here by reporting a little analysis of the data in your Google spreadsheet.
Total responses posted: 255 -- Taildraggers 156, Nosedraggers 99
Total with cracks 38, without cracks 217
Of the 38 with cracks: 33 taildraggers, 5 nosedraggers
RV-3: 2, RV-3B 1, RV-4: 3, RV-6: 4, RV-6A: 1, RV-7: 7, RV-7A: 2, RV-8: 16, RV-8A: 2
Total time reported: minimum 270, max. 3382, avg 1257, median 1000
Factory rivet heads: FWD 2, AFT 23, not reported 13
Tailwheel without cracks: 123. Factory heads FWD 30, AFT 50 (remainder not reported)
Nosewheel without cracks: 94. Factory heads FWD 17, AFT 41 (remainder not reported)
Last edited:
Davea320
Well Known Member
Worked great
Was able to use your idea to install the repair doubler with only 10 rivets removed from the rear spar, since I had just closed in the end of the end rib with foam and epoxy.
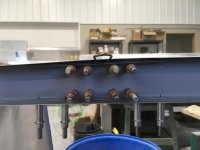
I recently completed the repair for a crack in the left horizontal stabilizer rear spar on mt RV-8 as detailed in SB-00036 Rev3. I devised a tool for holding the repair doubler on the front side of the spar while all pieces were Clecoed in place.
This was the easiest part of the whole repair. Removing three rivets from the outer rib, and seven rivets from the rear spar will permit installation of the repair doubler. After removing the 10 rivets from the top skin and the rivets from the hinge brackets, and stop drilling the cracks, the nested spar doubler and hinge brackets were positioned.
A single Cleco was placed through each bracket, nested spar doubler, and spar. The skin was then flexed up and the repair doubler (attached to the doubler positioning tool) was slid over the top of the spar and rotated down into position. It is important that the wire holder clearance between the top of the repair doubler and the handle portion of the tool permits vertical alignment of the rivet holes in the doubler with the Clecos. This can easily be adjusted to get the right clearance.
Once the doubler rivet holes are aligned with the Clecos the tool handle can be pulled aft to hold the doubler in place while the Clecos are squeezed to permit them to engage the doubler. It should be possible to verify that the Clecos have engaged the doubler by viewing the repair doubler from the space between the flexed skin and the end rib. Once the Clecos have engaged the doubler you can contine Clecoing the rest of the rivet holes and proceed with riveting.
The 10 rivets can be removed from either the top or the bottom of the horizontal stabilizer. I believe from the top is easier, the positioning tool can be reversed to work from the underside. The only difference is the side which is opened up and flexed will have four addional rivets removed.
Was able to use your idea to install the repair doubler with only 10 rivets removed from the rear spar, since I had just closed in the end of the end rib with foam and epoxy.
Attachments
Last edited:
SwimmingDragonfly96
Well Known Member
RV7a 280 hours hobbs TT no cracks
Title says it all. Found a 0 compression cylinder instead
Title says it all. Found a 0 compression cylinder instead
Jpm757
Well Known Member
CF86301, I hope I'm not stepping on your toes here by reporting a little analysis of the data in your Google spreadsheet.
Total responses posted: 255 -- Taildraggers 156, Nosedraggers 99
Total with cracks 38, without cracks 217
Of the 38 with cracks: 33 taildraggers, 5 nosedraggers
RV-3: 2, RV-3B 1, RV-4: 3, RV-6: 4, RV-6A: 1, RV-7: 7, RV-7A: 2, RV-8: 16, RV-8A: 2
Total time reported: minimum 270, max. 3382, avg 1257, median 1000
Factory rivet heads: FWD 2, AFT 23, not reported 13
Tailwheel without cracks: 123. Factory heads FWD 30, AFT 50 (remainder not reported)
Nosewheel without cracks: 94. Factory heads FWD 17, AFT 41 (remainder not reported)
Nice work Doug.
I think propeller balancing is a factor to be considered in your analysis.
engineerorange
Well Known Member
No cracks
332 hrs. RV7A.
Light Acro
Balanced prop
factory heads on fwd side
no cracks
332 hrs. RV7A.
Light Acro
Balanced prop
factory heads on fwd side
no cracks
Skykingbob
Well Known Member
Familiar airplane......
Hey......I think I have seen that airplane before!!!! Beautiful RV-8!
First flight not yet done on my build....ordered kit and was installed anyway....better safe than sorry! A great fellow airport buddy Rob Brooks did the SB while I was gallivanting in Anchorage for 18 days for work!!! What a great community these RV folks are!!!
2004 RV-8 TD
1000 hours
Counterbalanced IO360
Balanced Whirlwind prop
Minimal aerobatics and rough field opns
No cracks
Hey......I think I have seen that airplane before!!!! Beautiful RV-8!
First flight not yet done on my build....ordered kit and was installed anyway....better safe than sorry! A great fellow airport buddy Rob Brooks did the SB while I was gallivanting in Anchorage for 18 days for work!!! What a great community these RV folks are!!!
No Cracks!
2000 RV6A
860 Hrs. Tach Time
Light Aero
Factory Heads Forward, shop heads aft
5 Rivets on inboard brackets
4 Rivets on outboard brackets
Oversized tooling hole to 3/8" to Borescope
Sensenich Fixed Pitched Aluminum, Dynamically Balanced to 0.002 IPS
Almost exclusively on asphalt, some good grass
NO CRACKS
Shop head location and crack relationship.
I would suggest that a pie chart or graph would be nice to see if there is a correlation between the factory head and the shop head location and cracks.
Once the rivet swells and the shop head begins to form there are additional compressive loads under the shop head on the spar. If the shop head is on the aft side (forming on the steel bracket) the steel bracket can handle much higher stresses than the aluminum spar.
Good rule to follow-
If you have the option, shop heads on the thicker or stronger material, factory heads on the thinner and weaker material.
...
If you have the option, shop heads on the thicker or stronger material, factory heads on the thinner and weaker material.
Sounds reasonable. I built my tail kit at a build center in Griffin, GA, with a very talented young man guiding me - and a few other guys on the forum - and I recall him giving advice on this exact thing, but honestly can't recall the details. In the end my shop head is towards the rear, which is where the steel bracket is.
Me too
My RV7A Empennage was built with the help of the Tech at Griffin GA. I was told that the upset head should be on the thickest or harder material.. not sure if that is from AC 43 .. but we did our that way too.. No Cracks
Sounds reasonable. I built my tail kit at a build center in Griffin, GA, with a very talented young man guiding me - and a few other guys on the forum - and I recall him giving advice on this exact thing, but honestly can't recall the details. In the end my shop head is towards the rear, which is where the steel bracket is.
My RV7A Empennage was built with the help of the Tech at Griffin GA. I was told that the upset head should be on the thickest or harder material.. not sure if that is from AC 43 .. but we did our that way too.. No Cracks
SB-00036- small diameter borescope (no need to enlarge tooling hole)
Not sure if this was discussed and I may have missed it, but I found a borescope with a head diameter small enough to insert through the tooling hole in the outboard rib without enlarging it.
I know enlarging the hole isn't a big deal, but if this helps anyone I thought I'd pass it along.. 3.9mm head easily passed through on my H-Stab. Found on that big behemoth online retailer
Best part- No cracks!
Last edited:
[email protected]
Well Known Member
No cracks but it looked like there might have been
2,700 hours, all kinds of aerobatics... no cracks.
Visual inspection with a wee bitty camera showed several small black lines that could possibly be cracks but my suspicion was that they were formed from lubricant penetration and air pressure.
Removed the brackets and performed a dye penetration test finding no cracks.
Oh well, lots of effort to litter the inside structure with drilled out rivet debris, might as well install the new reinforcement parts. The new stiffener ties the bracket loads across the spar flanges into the skins and is significantly stronger. I also added the interior doubler.
Peel back the bottom skin to clean up and reach in to drive solid rivets, put it all back together, go pull 5 gees. Works the same as before
A full 8 hours of work… it’s still quite a bit of fun doing maintenance even though this does not appear to have been needed.
What borescope?
Can you share what borescope you used?
Not sure if this was discussed and I may have missed it, but I found a borescope with a head diameter small enough to insert through the tooling hole in the outboard rib without enlarging it.
I know enlarging the hole isn't a big deal, but if this helps anyone I thought I'd pass it along.. 3.9mm head easily passed through on my H-Stab. Found on that big behemoth online retailer
Best part- No cracks!
Can you share what borescope you used?
Can you share what borescope you used?
https://depstech.com/collections/endoscopes/products/wifi-endoscope-wf070
This version, while not "articulating", was small enough to navigate into and through the existing tooling holes as well as the corner gaps between flanges and webbing.
I used this one, you've got to do a little manipulation to get the camera aimed just right, but at $50 I think time/effort saved vs opening up the tooling hole was worth it for me.
https://www.amazon.com/gp/product/B08R9V32VY/ref=ox_sc_act_title_1?smid=A3ILCX3MAOSUNM&psc=1
https://www.amazon.com/gp/product/B08R9V32VY/ref=ox_sc_act_title_1?smid=A3ILCX3MAOSUNM&psc=1
I used this one, you've got to do a little manipulation to get the camera aimed just right, but at $50 I think time/effort saved vs opening up the tooling hole was worth it for me.
https://www.amazon.com/gp/product/B08R9V32VY/ref=ox_sc_act_title_1?smid=A3ILCX3MAOSUNM&psc=1
Also makes it easier to look deeper inside your own ear.
[email protected]
Well Known Member
RV10 horizontal Srab rear spar
400 hours and no cracks. I always install my gust lock when parked outside, even for lunch. This is very important for the rudder bottom mounts, but I am uncertain how much difference it makes for the horizontal stab rear spar.
400 hours and no cracks. I always install my gust lock when parked outside, even for lunch. This is very important for the rudder bottom mounts, but I am uncertain how much difference it makes for the horizontal stab rear spar.
Christopher Murphy
Well Known Member
Sb 36
Rv4
1212 hours
Buck tails fwd
Lots of acro
No cracks
SB kit installed
Cm
Rv4
1212 hours
Buck tails fwd
Lots of acro
No cracks
SB kit installed
Cm
TeroKaipio
I'm New Here
RV-4 No cracks
1995
RV-4
980 hours
Lycoming O-360-A1A
Hartzell c/s
No dynamic balancing
Over 200 aerobatic flights
No cracks
1995
RV-4
980 hours
Lycoming O-360-A1A
Hartzell c/s
No dynamic balancing
Over 200 aerobatic flights
No cracks
I don't know but would guess that the HS designs are similar enough between the older and newer models that Vans has reason to believe it could occur in the newer model fleet as it ages.Just like every other RV-9, -10, and -14 ever made….no cracks.
Why list a plane with no known issues on a SB ? Caution is appreciated but zero dot zero is not caution, it’s paranoia.
Mconner7
Well Known Member
I don't know but would guess that the HS designs are similar enough between the older and newer models that Vans has reason to believe it could occur in the newer model fleet as it ages.
It is a different tail altogether, not a matter of older vs newer. The mothership says “an over abundance of caution”.

