
Van's Air Force
You are using an out of date browser. It may not display this or other websites correctly.
You should upgrade or use an alternative browser.
You should upgrade or use an alternative browser.
RV-7A JCarne
- Thread starter jcarne
- Start date

Dude....throw a towel on those beautiful AL skins. Ha haha
haha nothing a blast of air doesn't cure. I am however very careful to not sand the skins!

May I borrow your form when your done!
haha only if you can get it off in one piece lol
Bob Martin
Well Known Member
Happy
I installed a new -7 tail with a -8 rudder on my -6.........
The store bought fairing was not a good fit. I did what you are doing.
You will be very happy and proud of your work!
Looking ahead....if you curve the layup around the HS leading edge, the fit will be so good, you only have to install screws in the trailing edge so it appears to be a screwless install.
Great pictures.......I made way more of a mess!
Glad to hear I'm not the only one Bob. I do think in the end I will be happier with the results. I was also planning on extending the bottom a few inches to go with less screws. I'm also thinking about doing fiberglass bottom sections too but we will see on that one.
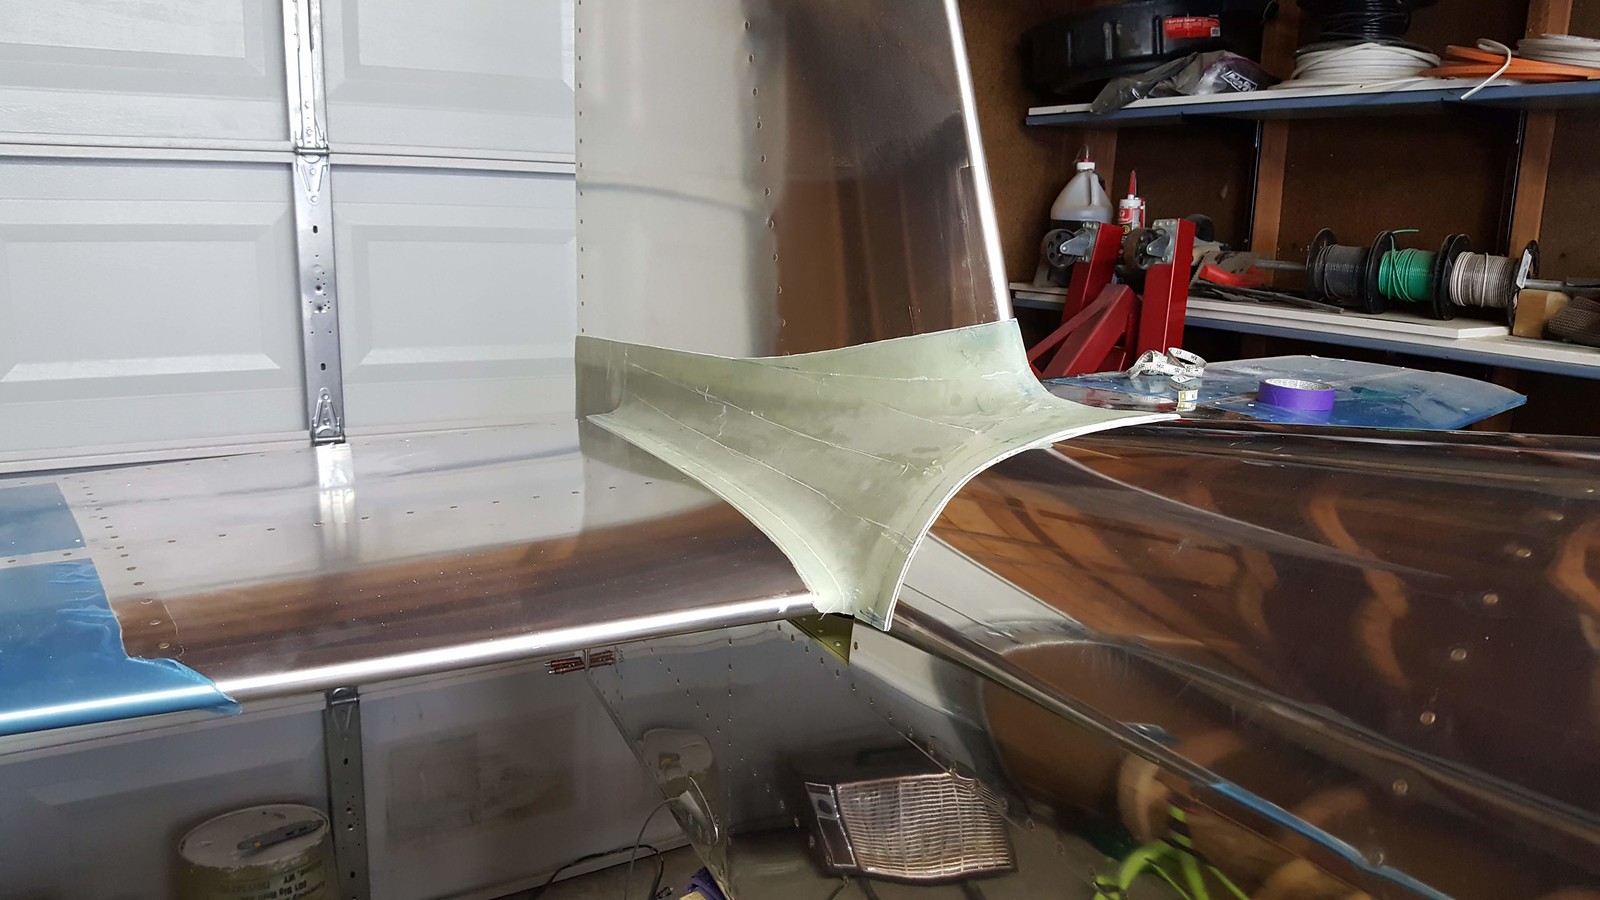
Just a couple of small divots to fill in and a little more smoothing around the base of the hs but I think it's ready for lay up. It looks rough around the edges but I assure you it's smooth.
 20190426_064308 by Jereme Carne, on Flickr
I'm waiting for my West Systems epoxy and Sika to show up so I can't do anything on the canopy or the fairing. I'm in fiberglass mode right now so I figured mind as well start the tips. I think I am going to blend the tips to the control surfaces as well, I don't mind doing fiberglass work. The elevators are somewhat of a pain as you have to trim some fiberglass, as well as trim the lead counterweight a fair amount. I used my carbide die grinder attachment which made it a lot faster than just using a file.
 20190427_152842 by Jereme Carne, on Flickr
20190426_064308 by Jereme Carne, on FlickrI'm waiting for my West Systems epoxy and Sika to show up so I can't do anything on the canopy or the fairing. I'm in fiberglass mode right now so I figured mind as well start the tips. I think I am going to blend the tips to the control surfaces as well, I don't mind doing fiberglass work. The elevators are somewhat of a pain as you have to trim some fiberglass, as well as trim the lead counterweight a fair amount. I used my carbide die grinder attachment which made it a lot faster than just using a file.
20190427_152842 by Jereme Carne, on Flickr
Last edited:
I see some waves there in the plaster. That will require filling - extra work and extra weight. Get a flexible sanding block of some kind and drag it at 45 deg each way to highlight the high spots. Much easier to fix in the plaster than in the final fairing. A true surface is more important than a smooth surface since this is a male mold. I know this is a ton of work to get to this stage, I've done it. That extra 2% at the end makes all the difference.
Will you coat the plaster with anything?
Will you coat the plaster with anything?
I see some waves there in the plaster. That will require filling - extra work and extra weight. Get a flexible sanding block of some kind and drag it at 45 deg each way to highlight the high spots. Much easier to fix in the plaster than in the final fairing. A true surface is more important than a smooth surface since this is a male mold. I know this is a ton of work to get to this stage, I've done it. That extra 2% at the end makes all the difference.
Will you coat the plaster with anything?
Thanks for the feedback, I'll go ahead and touch things up a bit. I know I'm probably going to have put a thick layer of micro on after the fact but mind as well get it as close as possible before hand. The picture may look a little different than in person as well as the multiple coats have somewhat of a different color as well.
I was planning on waxing what you see (and taping a little more) before laying the fiberglass but would also like some recommendations if you have em.
Last edited:
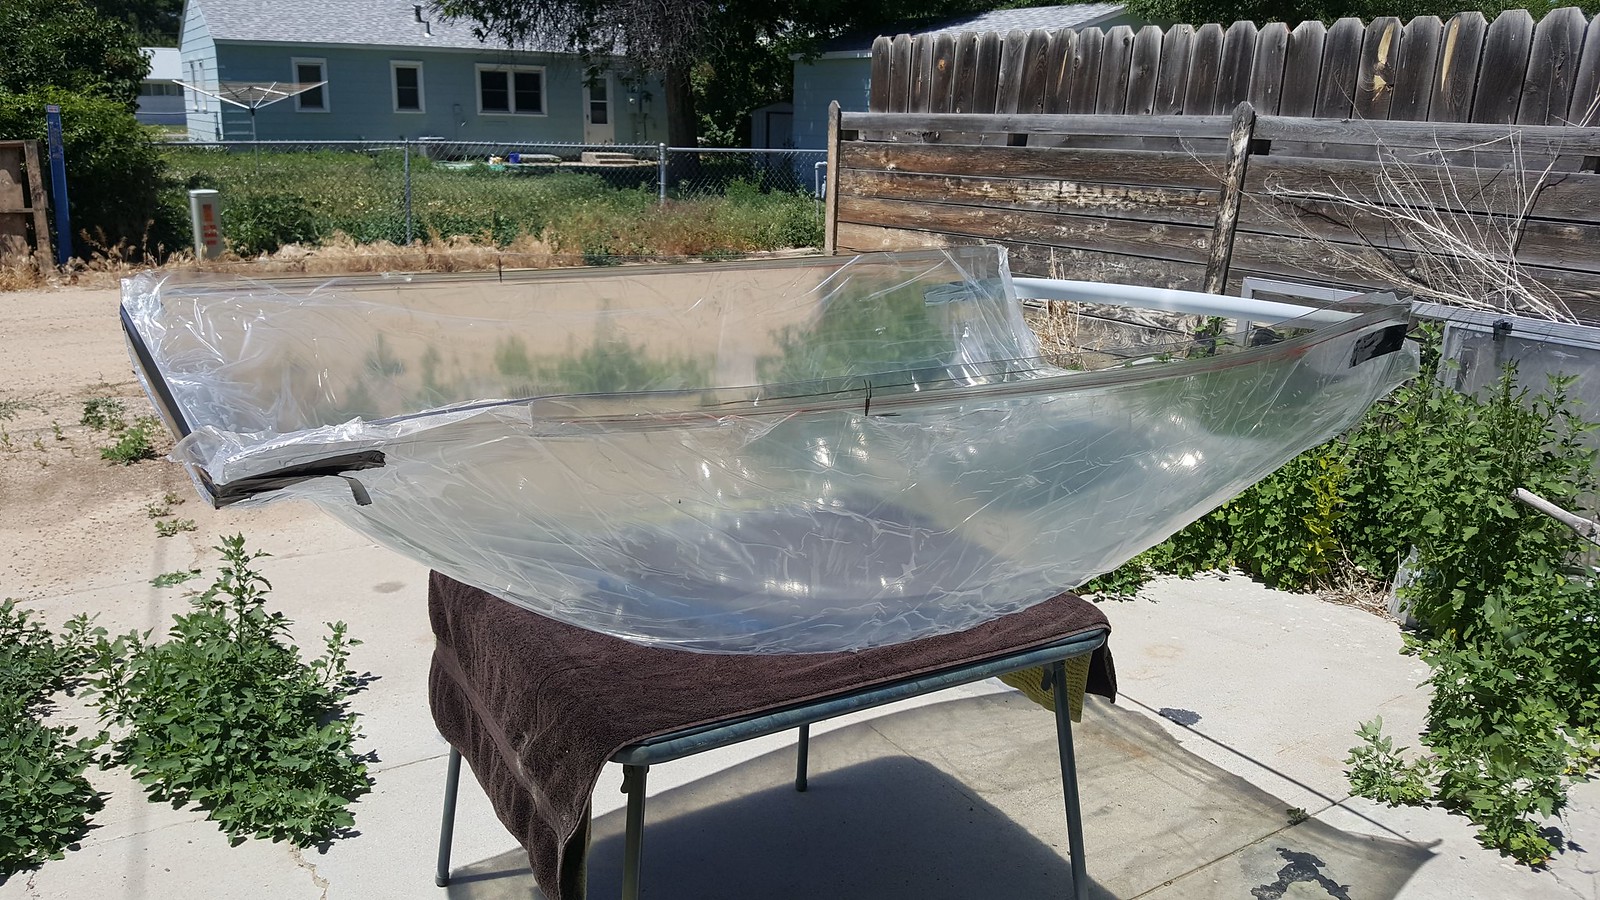
After making a little plastic hut around the tail of the plane it was time to layup the fiberglass. I first ran some tests and let them cure for a day so I didn't screw my large hours on making the mold because I knew it wasn't going to make it two rounds of layup. I used 4 plies of 7781 from Spruce for the layup, the part is quite strong after the fact. I waxed the mold after some more tape work and went to town. I used 4 mil plastic and wet the fiberglass between two layers of the plastic. Then I cut the pieces to size (a little larger than needed) and laid them on the plane. I overlapped in the middle by a few inches, it didn't leave as much of a hump as I thought it would, sanding and micro will take care of it no problem. Finally, I applied the only peel ply I had which was two inch (man I wish I had wider for this one!) The next day I popped the part off, the wax I used worked perfect and let the part go like it was no big deal.
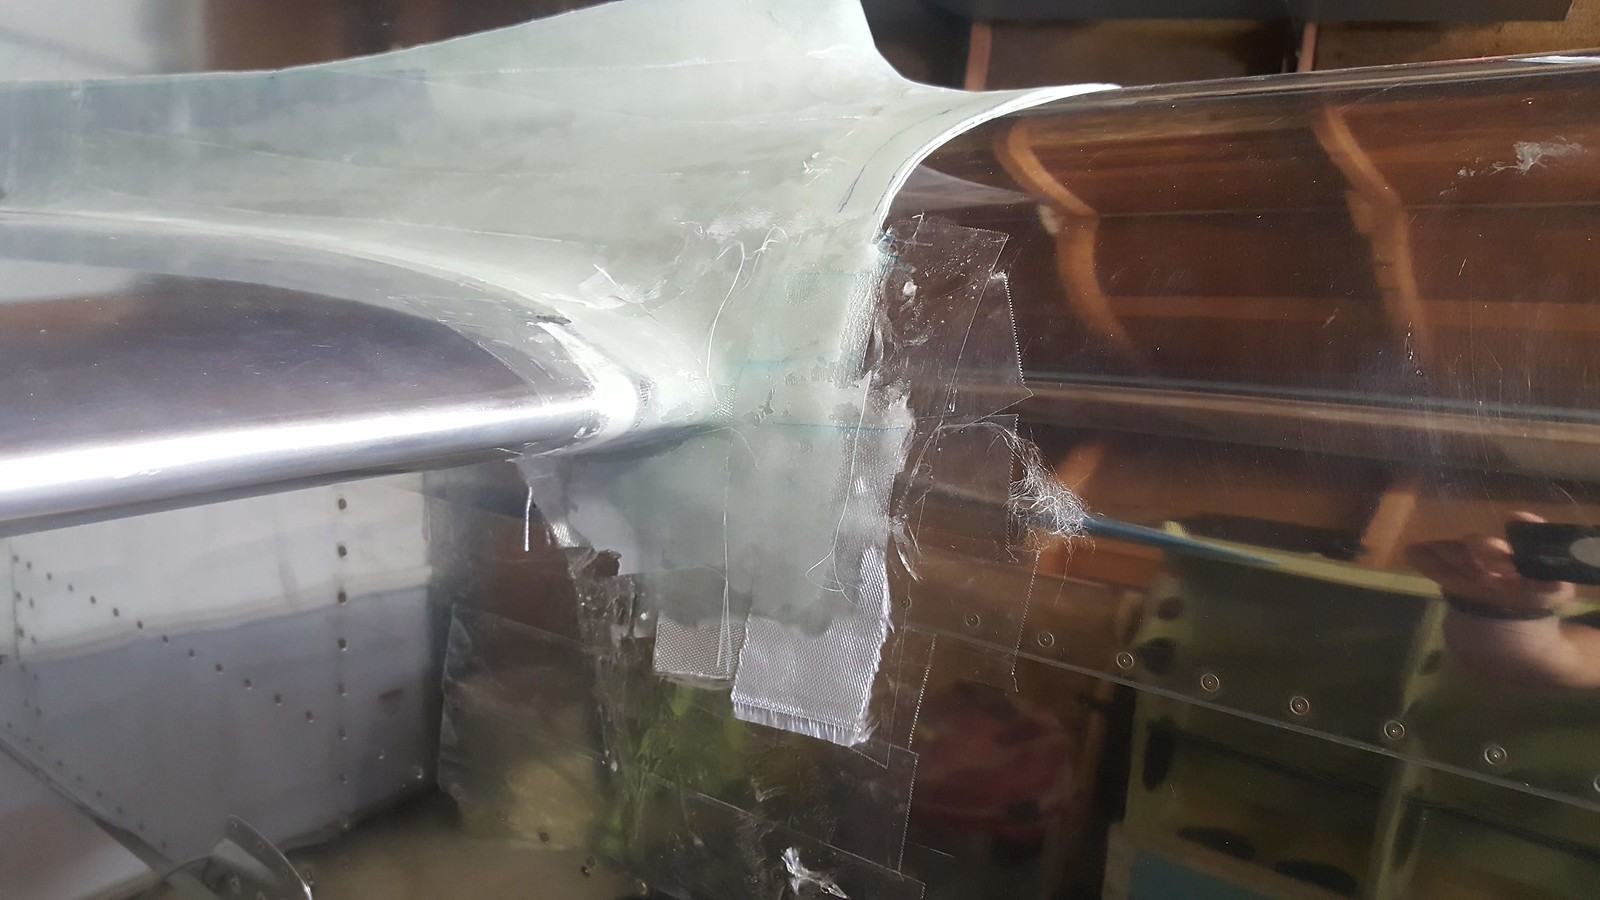
Here it is all laid up. If you look closely you can see a bubble towards the top, it came off the VS about 1/16-1/8", I will fill the back a little and sand it down, no big deal. This was the only spot that it didn't fit perfectly to the fuse.
On a side note, it sure looks ugly at this point. haha
 20190504_153458 by Jereme Carne, on Flickr
Here is the part after some trimming was done. As you can see I still have to extend the forward parts down and aft a few inches to really close it up. I simply couldn't get the fiberglass to lay down in this area nicely as one large sheet (probably because there was four plies in one?).
 20190505_165526 by Jereme Carne, on Flickr
Overall I am really happy so far with how the part came out, it may not look like it yet but the contour is pretty dang good! The flat sections in the back came out a little wavy for my liking and I don't think I can use micro alone to fix it so I may have to do some trimming and re-glassing of that area but that's no big deal, it is nice and flat back there; or at least it will be.
It's starting to look like something, long ways to go in finishing it but it's cruising right along.
Let me know what you guys and gals think.
Here it is all laid up. If you look closely you can see a bubble towards the top, it came off the VS about 1/16-1/8", I will fill the back a little and sand it down, no big deal. This was the only spot that it didn't fit perfectly to the fuse.
On a side note, it sure looks ugly at this point. haha
20190504_153458 by Jereme Carne, on FlickrHere is the part after some trimming was done. As you can see I still have to extend the forward parts down and aft a few inches to really close it up. I simply couldn't get the fiberglass to lay down in this area nicely as one large sheet (probably because there was four plies in one?).
20190505_165526 by Jereme Carne, on FlickrOverall I am really happy so far with how the part came out, it may not look like it yet but the contour is pretty dang good! The flat sections in the back came out a little wavy for my liking and I don't think I can use micro alone to fix it so I may have to do some trimming and re-glassing of that area but that's no big deal, it is nice and flat back there; or at least it will be.
It's starting to look like something, long ways to go in finishing it but it's cruising right along.
Let me know what you guys and gals think.
Last edited:
Cool beans!
Very nice! We attached the Vans part to the other 7 and like you said the fit was horrible. I wonder if I should just delete the part and save the money on my fuselage order... your looks much better even before sanding. Keep up the good work and thanks for sharing!
Very nice! We attached the Vans part to the other 7 and like you said the fit was horrible. I wonder if I should just delete the part and save the money on my fuselage order... your looks much better even before sanding. Keep up the good work and thanks for sharing!
Nicely done! Interested in the final product.
Thanks Vern!
Very nice! We attached the Vans part to the other 7 and like you said the fit was horrible. I wonder if I should just delete the part and save the money on my fuselage order... your looks much better even before sanding. Keep up the good work and thanks for sharing!
No problem at all. It will definitely be faster to just chop up the Van's fairing and reglass certain areas if you decide to go that route. However, if you want to learn how to do a bit of fiberglass in the process it seems like a good way of doing it. If you ever have questions just drop me a line!
Hey Jereme, I suggest you pull a mold off of it after you have completed it.
I would be more than happy to help you do that. That way I can get a better product for my plane!
haha I bet you would! Pulling a mold off of this guy would be a real treat as it is pretty springy at the back when it is not on the plane, it would be tough to get it in the right spot to make a mold.
Well after taking a month off for trips and sickness I'm back at it! My summer is in full swing and I'm planning on logging 8ish hours a day. My goal for the summer is to get as much of the fiber glass and canopy done as possible.
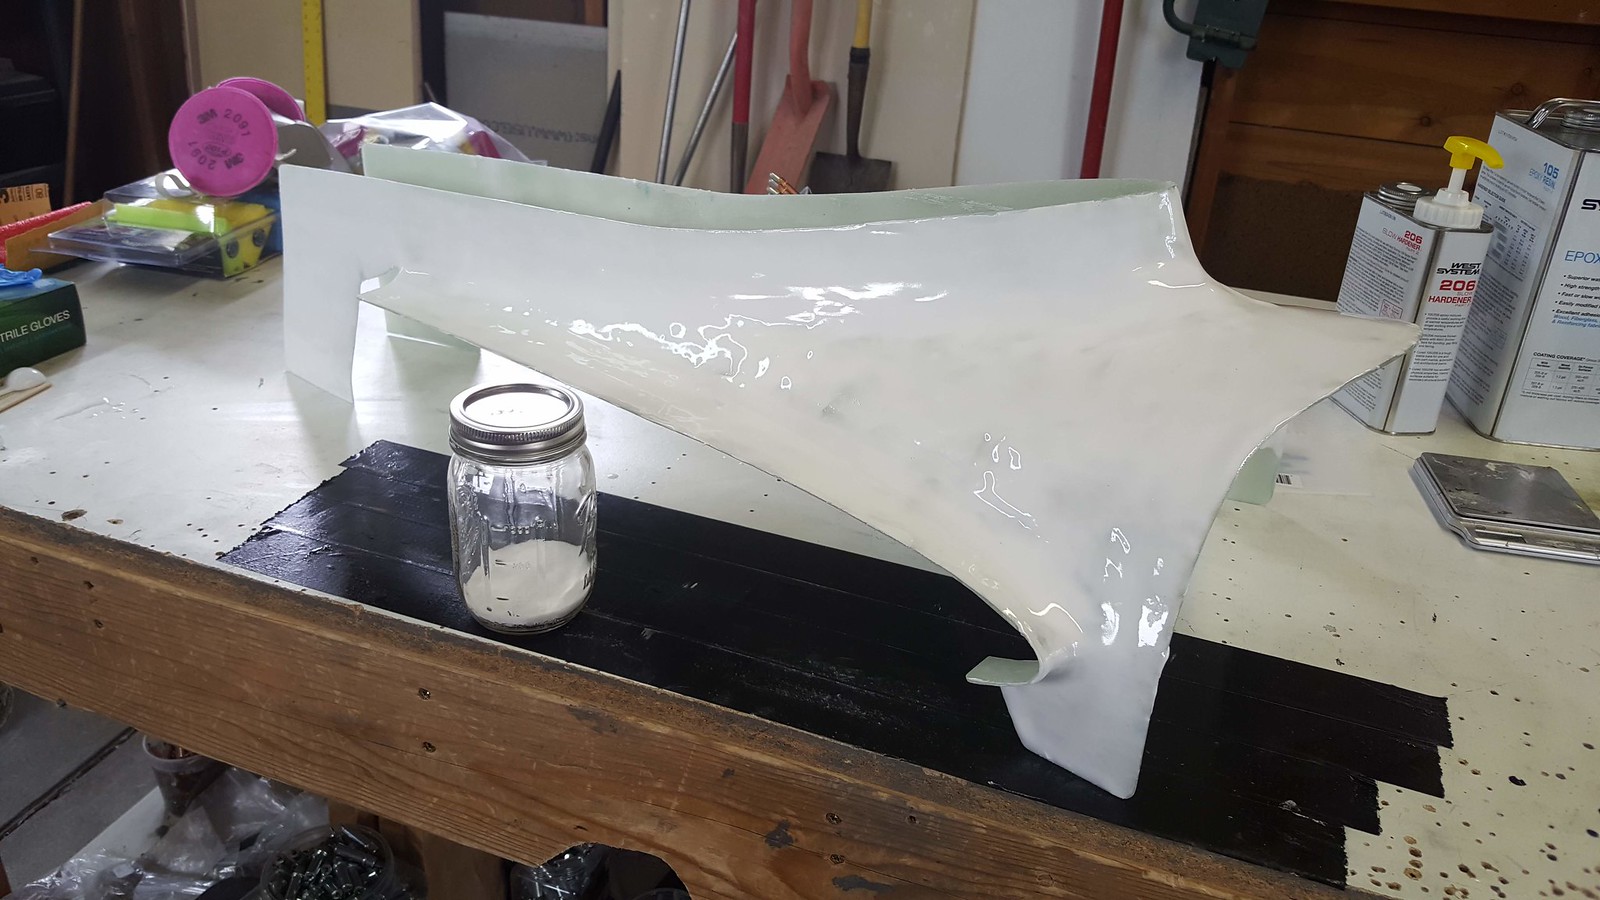
First up, I continued working on the empennage fairing. This thing is turning out to be emensly time consuming but oh well, good practice and I should get superior results. I did not like how the tails of the fairing came out on the first lay up so I did some sanding, forming, and layed up some new ones. These ones came out so much better!
 20190608_141814 by Jereme Carne, on Flickr
Next I had to extend the front portions down and aft an inch or so.
Fiber glass is quite fun when you take an ugly beast like this...
 20190610_140304 by Jereme Carne, on Flickr
...to this! That Dremel Saw Max I got works great on fiberglass!
 20190610_143508 by Jereme Carne, on Flickr
I also continued working on the tips for the elevators and rudder. I sanded the gel coat off of part of the tips since I plan on bonding them to control surfaces. Extra work? Absolutely! Personal preference that bonding looks better? Yup!
I also made backer strips out of 0.025 and bonded them in with epoxy.
 20190610_140248 by Jereme Carne, on Flickr
Finally, I am slowly working off and on on the canopy. I made the C-791 canopy skirt braces. These took a fair amount of time with deburring.
 20190608_163510 by Jereme Carne, on Flickr
Glad to be back in the garage getting things done! A few more days on tips and fairing and I will be in full swing on the canopy.
First up, I continued working on the empennage fairing. This thing is turning out to be emensly time consuming but oh well, good practice and I should get superior results. I did not like how the tails of the fairing came out on the first lay up so I did some sanding, forming, and layed up some new ones. These ones came out so much better!
20190608_141814 by Jereme Carne, on FlickrNext I had to extend the front portions down and aft an inch or so.
Fiber glass is quite fun when you take an ugly beast like this...
20190610_140304 by Jereme Carne, on Flickr...to this! That Dremel Saw Max I got works great on fiberglass!
20190610_143508 by Jereme Carne, on FlickrI also continued working on the tips for the elevators and rudder. I sanded the gel coat off of part of the tips since I plan on bonding them to control surfaces. Extra work? Absolutely! Personal preference that bonding looks better? Yup!
I also made backer strips out of 0.025 and bonded them in with epoxy.
20190610_140248 by Jereme Carne, on FlickrFinally, I am slowly working off and on on the canopy. I made the C-791 canopy skirt braces. These took a fair amount of time with deburring.
20190608_163510 by Jereme Carne, on FlickrGlad to be back in the garage getting things done! A few more days on tips and fairing and I will be in full swing on the canopy.
Last edited:
The fiberglass work continues! After the empennage fairing was all laid up how I liked it it was time to lay on some micro. As you can see in the pic I should have got it a bit more on the dry side but it worked out just fine.
 20190611_123511 by Jereme Carne, on Flickr
Once the micro was cured it was off to the races with sanding blocks. I used these blocks with great results. Spray adhesive and sandpaper of choice was used (mostly 80 grit).
This is it after sanding, pretty ugly so far eh?
 20190614_215244 by Jereme Carne, on Flickr
After the main sanding I located and drilled the screw holes I wanted and went ahead with countersinking. Then I laid down a bead of epoxy with cab-o-sil on all the seams after taping the tail yet again. The epoxy mixture squeezes out and bingo bango you got a perfect conforming edge. Next I did four coats of epoxy brushed on and squeegeed off with a credit card to fill pinholes. Once cure there was a bunch more sanding to make it perfectly smooth and get rid of any marks/pinholes.
...and finally the day had arrived, priming.
 20190618_145531 by Jereme Carne, on Flickr
All in all it came out great and I'm really happy with it! It was a great learning experience and I feel I am now fairly competent with fiberglass. A big shout out to Dan Horton for his awesome posts on how to do fiberglass!
One more shot of the fairing on the plane.
 20190619_122951 by Jereme Carne, on Flickr
P.S. I also got the tips bonded and primed onto the rudder and elevators but I will just let this post sink in for a few days first.
20190611_123511 by Jereme Carne, on FlickrOnce the micro was cured it was off to the races with sanding blocks. I used these blocks with great results. Spray adhesive and sandpaper of choice was used (mostly 80 grit).
This is it after sanding, pretty ugly so far eh?
20190614_215244 by Jereme Carne, on FlickrAfter the main sanding I located and drilled the screw holes I wanted and went ahead with countersinking. Then I laid down a bead of epoxy with cab-o-sil on all the seams after taping the tail yet again. The epoxy mixture squeezes out and bingo bango you got a perfect conforming edge. Next I did four coats of epoxy brushed on and squeegeed off with a credit card to fill pinholes. Once cure there was a bunch more sanding to make it perfectly smooth and get rid of any marks/pinholes.
...and finally the day had arrived, priming.
20190618_145531 by Jereme Carne, on FlickrAll in all it came out great and I'm really happy with it! It was a great learning experience and I feel I am now fairly competent with fiberglass. A big shout out to Dan Horton for his awesome posts on how to do fiberglass!
One more shot of the fairing on the plane.
20190619_122951 by Jereme Carne, on FlickrP.S. I also got the tips bonded and primed onto the rudder and elevators but I will just let this post sink in for a few days first.
That looks like nice work!
Thanks good sir!
Alright! Are you making me one also? Looks like you are having way to much fun
haha thank for the compliments! I'm gonna need a few years off before I even think about more mold-less fiberglass work.
Ok I finally finished all the tips and here are the results. I strongly recommend to people to do the tips when the weather is warm (unless you have a heated shop) and don't wait until the plane is almost done. The tips take a lot of time, way more than a person thinks. If my plane was almost done and I had to drop this many hours to finish them I might have cried. haha However, if you aren't blending them in like I did it will take way less time.
First, I laid fiberglass anywhere it was needed (elevators).
 20190612_155246 by Jereme Carne, on Flickr
After curing and sanding the elevator tips I laid down a 2" wide layer of fiberglass that is only 0.003" thick, very thin stuff indeed.
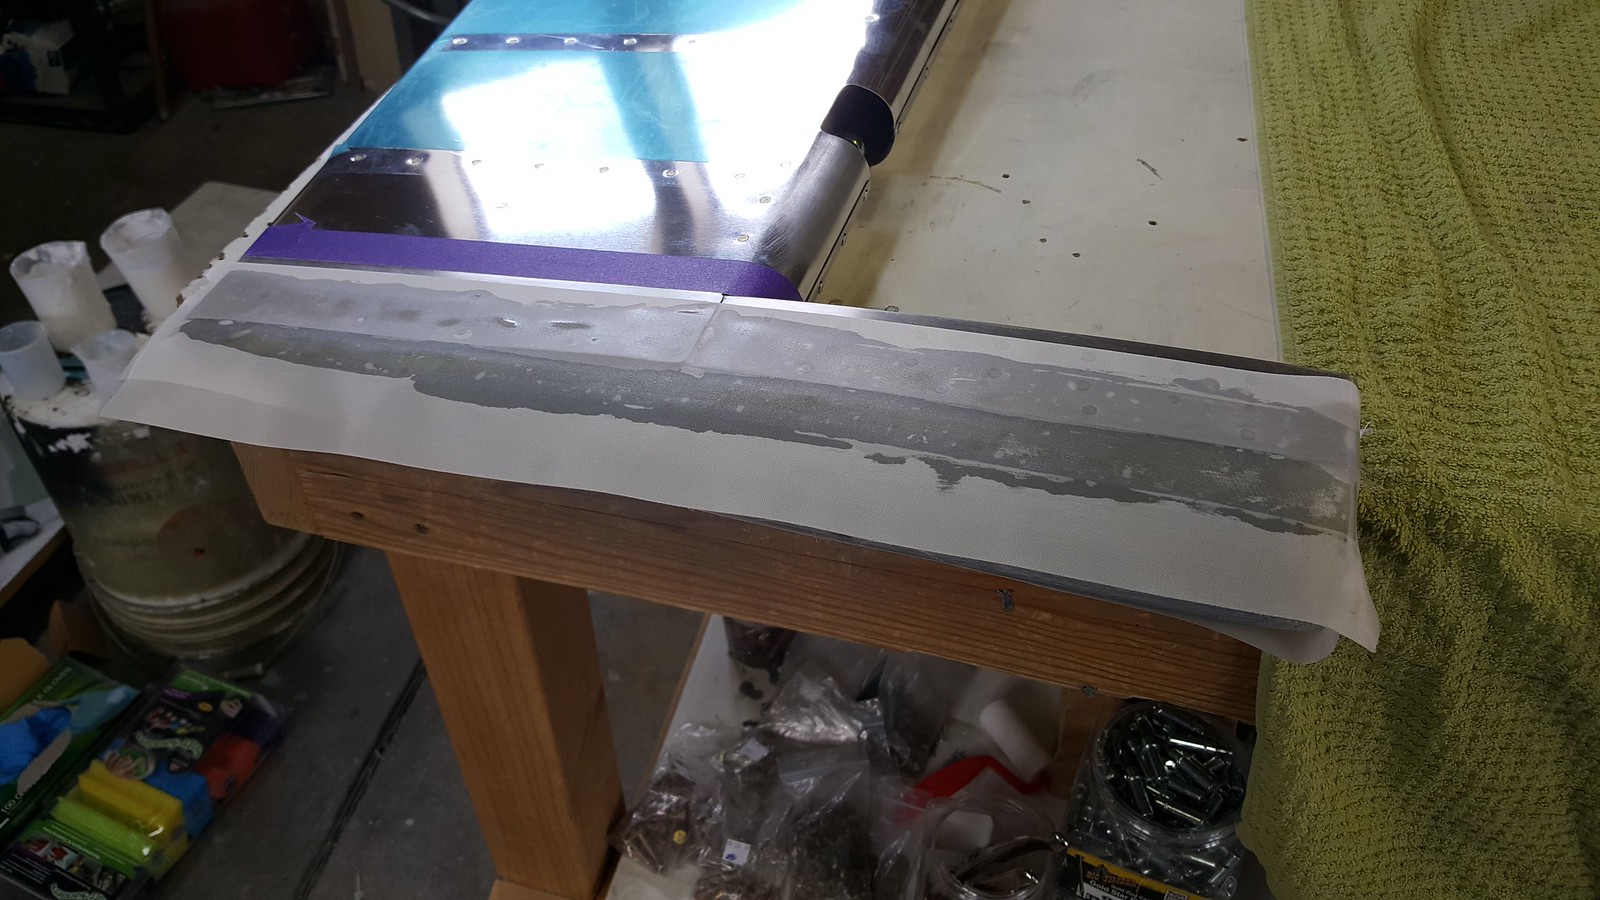 20190611_161559 by Jereme Carne, on Flickr
After curing and sanding the taped seam I then put a nice coat of micro on the whole thing.
 20190612_155238 by Jereme Carne, on Flickr
After curing and sanding the micro I switched to Evercoat Rage Gold. This stuff is ready for sanding in about 20-30 minutes instead of a day as with micro. Some may scoff at using this stuff but I know many people that have used this and there planes have been flying with it for a long time. To be honest I don't even know why a few peeps have beef with this stuff? I personally would highly recommend it and it's meant for fiberglass too.
 20190617_101139 by Jereme Carne, on Flickr
Here sanding is almost finished. Looking pretty good.
 20190617_180404 by Jereme Carne, on Flickr
Next it was on to the VS and HS tips. First you need to close out the tips. There are many different ways to do this but I chose to use some flat layup I had out of 4 plies of 8.9 ounce. Shape it to fit, 5 min epoxy it in the correct spot and then I put a bead of flox on the inside with two more layers on top of that to really seal it up.
 20190624_141921 by Jereme Carne, on Flickr
Nice I put a coat of micro on the area shown and epoxied in the metal backing strips. Van's doesn't tell you to put a metal strip there but after countersinking the fiberglass it is quite thin where the rivets go through.
 20190624_212039 by Jereme Carne, on Flickr
After curing and sanding I put a layer of Rage Gold on. Almost all of this got sanded off in the end.
 20190625_110728 by Jereme Carne, on Flickr
First, I laid fiberglass anywhere it was needed (elevators).
20190612_155246 by Jereme Carne, on FlickrAfter curing and sanding the elevator tips I laid down a 2" wide layer of fiberglass that is only 0.003" thick, very thin stuff indeed.
20190611_161559 by Jereme Carne, on FlickrAfter curing and sanding the taped seam I then put a nice coat of micro on the whole thing.
20190612_155238 by Jereme Carne, on FlickrAfter curing and sanding the micro I switched to Evercoat Rage Gold. This stuff is ready for sanding in about 20-30 minutes instead of a day as with micro. Some may scoff at using this stuff but I know many people that have used this and there planes have been flying with it for a long time. To be honest I don't even know why a few peeps have beef with this stuff? I personally would highly recommend it and it's meant for fiberglass too.
20190617_101139 by Jereme Carne, on FlickrHere sanding is almost finished. Looking pretty good.
20190617_180404 by Jereme Carne, on FlickrNext it was on to the VS and HS tips. First you need to close out the tips. There are many different ways to do this but I chose to use some flat layup I had out of 4 plies of 8.9 ounce. Shape it to fit, 5 min epoxy it in the correct spot and then I put a bead of flox on the inside with two more layers on top of that to really seal it up.
20190624_141921 by Jereme Carne, on FlickrNice I put a coat of micro on the area shown and epoxied in the metal backing strips. Van's doesn't tell you to put a metal strip there but after countersinking the fiberglass it is quite thin where the rivets go through.
20190624_212039 by Jereme Carne, on FlickrAfter curing and sanding I put a layer of Rage Gold on. Almost all of this got sanded off in the end.
20190625_110728 by Jereme Carne, on FlickrHere are all the parts being worked on. A full bench for sure.
 20190625_164614 by Jereme Carne, on Flickr
Finally it was on to primer. I busted out the Kirker epoxy primer and sprayed any remaining parts. Here you can see one of HS tips. I still need to do a little detail sanding and fill a few tiny pinholes but they are all good to go.
 20190627_230640 by Jereme Carne, on Flickr
Finally it is warm enough to start working on the canopy. I had my dad come over to help me move it around. All we did was put a centerline on the outside and mark for the hole to be drilled for the handle. Tomorrow I will start cutting the canopy.
 20190628_184244 by Jereme Carne, on Flickr
20190625_164614 by Jereme Carne, on FlickrFinally it was on to primer. I busted out the Kirker epoxy primer and sprayed any remaining parts. Here you can see one of HS tips. I still need to do a little detail sanding and fill a few tiny pinholes but they are all good to go.
20190627_230640 by Jereme Carne, on FlickrFinally it is warm enough to start working on the canopy. I had my dad come over to help me move it around. All we did was put a centerline on the outside and mark for the hole to be drilled for the handle. Tomorrow I will start cutting the canopy.
20190628_184244 by Jereme Carne, on FlickrMay the force be with you Jereme!
Kent glad to hear from you again man! I was just thinking a couple of days ago that I should text you and tell you to get your butt in the garage.
Last edited:
I spent quite a bit of productive time in the garage today. It was finally time to start cutting the canopy. I have dreaded this step as many other have before me. In the end it wasn't too bad. I still have plenty of cuts to make but this was a big one.
First I started off by cutting the molding flange of the bottom of the canopy. This was no big deal and seemed like kind of a waste of time other than to get used to the tools and process. Good practice.
 20190629_131311 by Jereme Carne, on Flickr
 20190629_132241 by Jereme Carne, on Flickr
After sanding the edges up to 240 grit I drilled and sanded the hole for the canopy latch handle. I thought drilling a hole in the middle of my canopy would make me feel all frightened inside but this was the easiest part of today. I used a unibit and it went through it no problem at all.
 20190629_155635 by Jereme Carne, on Flickr
Next I clamped the canopy frame in the plexi bubble so that I could mark the cut line for the "big cut". After the line was drawn on the inside of the canopy I put lines of tape on the outside so that I could easily follow it with the saw.
 20190629_161139 by Jereme Carne, on Flickr
Finally, it was time for the "big cut". It wasn't as stressful as I thought it was going to be and it didn't take as long either. The Dremel Saw Max with the SM500 blade goes through plexiglass like a hot knife through butter. Tip: spend as much time as it takes to make the canopy sit with as little stress as possible and install stops to prevent it from wanting to spread out.
What a beautiful sight; I mean not as good as it being completely finished but I'll take this victory!
 20190629_170938 by Jereme Carne, on Flickr
After the cut I busted out my variable speed belt sander and cleaned it up with 120 grit followed by 240. This is smooth enough to start moving the pieces (so I've been told). Once I moved the pieces I spent some time on the windscreen wet sanding it with 400 grit and rounding the edges a bit since I won't be cutting this piece for a little while.
I also placed the canopy frame back in the large half and clamped it down. I made marks for my next cut. I will try and cut the aft bow section tomorrow and hopefully finish up all my cutting on Monday.
Took this next pic just for fun. It seemed like the best place to store the windscreen temporarily.
 20190629_181617 by Jereme Carne, on Flickr
P.S. can you tell I neglect my house duties from time to time based on the weeds growing? Haha I call it priorities and I don't think mine are mixed.
First I started off by cutting the molding flange of the bottom of the canopy. This was no big deal and seemed like kind of a waste of time other than to get used to the tools and process. Good practice.
20190629_131311 by Jereme Carne, on Flickr20190629_132241 by Jereme Carne, on FlickrAfter sanding the edges up to 240 grit I drilled and sanded the hole for the canopy latch handle. I thought drilling a hole in the middle of my canopy would make me feel all frightened inside but this was the easiest part of today. I used a unibit and it went through it no problem at all.
20190629_155635 by Jereme Carne, on FlickrNext I clamped the canopy frame in the plexi bubble so that I could mark the cut line for the "big cut". After the line was drawn on the inside of the canopy I put lines of tape on the outside so that I could easily follow it with the saw.
20190629_161139 by Jereme Carne, on FlickrFinally, it was time for the "big cut". It wasn't as stressful as I thought it was going to be and it didn't take as long either. The Dremel Saw Max with the SM500 blade goes through plexiglass like a hot knife through butter. Tip: spend as much time as it takes to make the canopy sit with as little stress as possible and install stops to prevent it from wanting to spread out.
What a beautiful sight; I mean not as good as it being completely finished but I'll take this victory!
20190629_170938 by Jereme Carne, on FlickrAfter the cut I busted out my variable speed belt sander and cleaned it up with 120 grit followed by 240. This is smooth enough to start moving the pieces (so I've been told). Once I moved the pieces I spent some time on the windscreen wet sanding it with 400 grit and rounding the edges a bit since I won't be cutting this piece for a little while.
I also placed the canopy frame back in the large half and clamped it down. I made marks for my next cut. I will try and cut the aft bow section tomorrow and hopefully finish up all my cutting on Monday.
Took this next pic just for fun. It seemed like the best place to store the windscreen temporarily.
20190629_181617 by Jereme Carne, on FlickrP.S. can you tell I neglect my house duties from time to time based on the weeds growing? Haha I call it priorities and I don't think mine are mixed.
Last edited:
kentlik
Well Known Member
Kent glad to hear from you again man! I was just thinking a couple of days ago that I should text you and tell you to get your butt in the garage.
I just finished a marathon run of two films and part of a TV show and am happily unemployed as of yesterday. I have a short trip to get behind me then I am full steam ahead Jereme!
Great work brother!
I just finished a marathon run of two films and part of a TV show and am happily unemployed as of yesterday. I have a short trip to get behind me then I am full steam ahead Jereme!
Great work brother!
Thanks Kent. Glad to hear things are good and the project will be underway again! I figured summers are probably your busy time.
The canopy work is going strong in this garage. After making another big cut on the aft end and a couple on the sides the canopy was almost ready to be glued on. I sanded the edge of the plexi all the way up to 600 grit which took me most of a day but you want it smooth! After the sanding was done I clamped it to the frame, took some measurements to make sure I didn't need anymore pre-bend, and masked off the canopy.
Here is the canopy ready for masking.
 20190701_165520 by Jereme Carne, on Flickr
All masked and ready to go. I used 3M fineline tape followed by electrical to the same edge and then painters where appropriate.
 20190701_224826 by Jereme Carne, on Flickr
Soon it was time to start the Sika process. I first scuffed everything with maroon scotchbrite and some 150 grit here and there. I then used a damp microfiber cloth to wipe up any dust. Then the aktivator was applied (Sika 205). After waiting 10 minutes it was onto the primer (Sika 209D).
Here are the parts primed and ready to go.
 20190702_120505 by Jereme Carne, on Flickr
 20190702_120510 by Jereme Carne, on Flickr
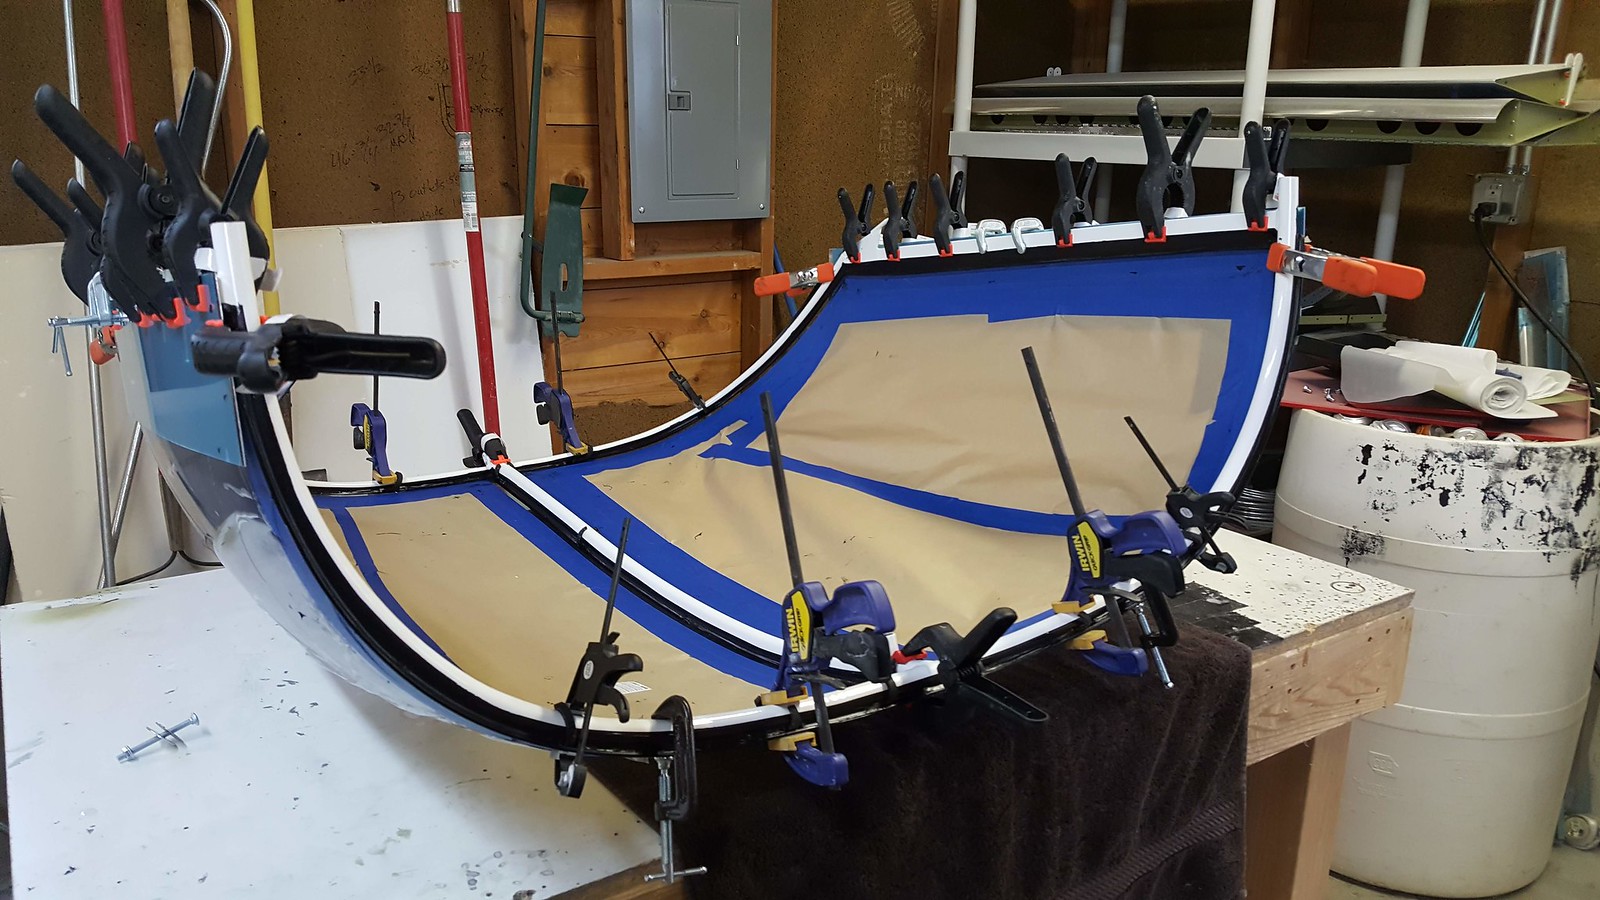
After 30 minutes from primer being applied I clamped the frame on with spacers and started running the Sika 295 UV beads. In the pic below you will notice I used hand clamps and not spring clamps on the forward and aft bows. If you use spring clamps the canopy gets distorted in areas which also locks stress in. I used these clamps with light pressure to try and avoid that as much as I could.
 20190702_131834 by Jereme Carne, on Flickr
Here it is after tape removal.
 20190702_140704 by Jereme Carne, on Flickr
Here you can see the first bead is held just off of the spacers so you can pull them out easy.
 20190702_131840 by Jereme Carne, on Flickr
This is the elusive side bow area. I say that because I had a HECK of a time trying to find out how people addressed this area. Some use the C-759 inside canopy skirt and some don't and opt for a big bead. I took the ladder route. To be honest at 160PSI for Sika it wouldn't surprise me if this method is stronger too. (although both are plenty strong)
 20190702_131854 by Jereme Carne, on Flickr
Lastly, here is one of my first coat beads. I read a lot of people say that Sika is hard to get a nice bead with; I did not get the same feeling. It just seems about the same as your typical Alex caulk that you use for trim, relatively easy to spread nicely.
 20190702_131848 by Jereme Carne, on Flickr
This is all just a first coat and I have to do another "pretty" coat in a few days.
Here is the canopy ready for masking.
20190701_165520 by Jereme Carne, on FlickrAll masked and ready to go. I used 3M fineline tape followed by electrical to the same edge and then painters where appropriate.
20190701_224826 by Jereme Carne, on FlickrSoon it was time to start the Sika process. I first scuffed everything with maroon scotchbrite and some 150 grit here and there. I then used a damp microfiber cloth to wipe up any dust. Then the aktivator was applied (Sika 205). After waiting 10 minutes it was onto the primer (Sika 209D).
Here are the parts primed and ready to go.
20190702_120505 by Jereme Carne, on Flickr20190702_120510 by Jereme Carne, on FlickrAfter 30 minutes from primer being applied I clamped the frame on with spacers and started running the Sika 295 UV beads. In the pic below you will notice I used hand clamps and not spring clamps on the forward and aft bows. If you use spring clamps the canopy gets distorted in areas which also locks stress in. I used these clamps with light pressure to try and avoid that as much as I could.
20190702_131834 by Jereme Carne, on FlickrHere it is after tape removal.
20190702_140704 by Jereme Carne, on FlickrHere you can see the first bead is held just off of the spacers so you can pull them out easy.
20190702_131840 by Jereme Carne, on FlickrThis is the elusive side bow area. I say that because I had a HECK of a time trying to find out how people addressed this area. Some use the C-759 inside canopy skirt and some don't and opt for a big bead. I took the ladder route. To be honest at 160PSI for Sika it wouldn't surprise me if this method is stronger too. (although both are plenty strong)
20190702_131854 by Jereme Carne, on FlickrLastly, here is one of my first coat beads. I read a lot of people say that Sika is hard to get a nice bead with; I did not get the same feeling. It just seems about the same as your typical Alex caulk that you use for trim, relatively easy to spread nicely.
20190702_131848 by Jereme Carne, on FlickrThis is all just a first coat and I have to do another "pretty" coat in a few days.
Last edited:
Canopy work continues. The main focus the past few days has been to get the canopy ready for layup of the fiberglass skirt. I think I may be able to start that tomorrow.
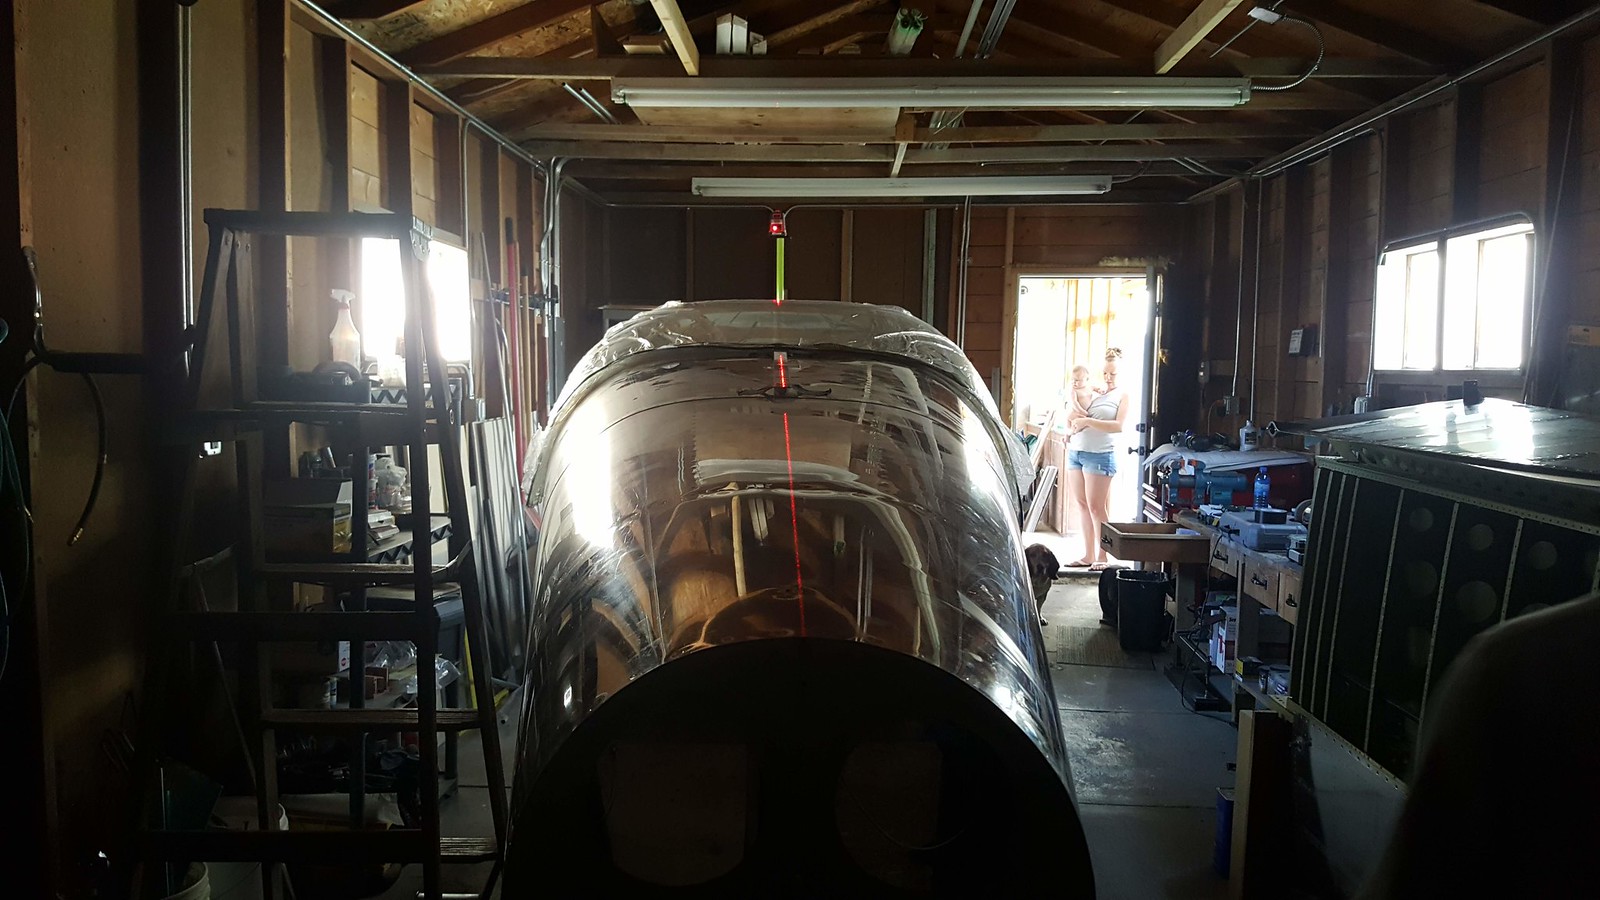
After putting a finish coat of Sika on it was time to put it on the plane and see how it all lines up. Overall I am very pleased with it. The only squawk is that the front is a little narrow by about 1/8" of an inch. No big deal, it still slides nicely, I may shave off a 1/16th from the rollers eventually but right now I'm happy. When I put the canopy on the plane I also put the windscreen on with the proper spacers so I could measure how much of the forward roller tubes needed trimmed. I needed to trim a 1/4" to get the canopy down enough to perfectly line up with the windscreen. After that I installed the roll bar bolts and the support. I also installed the track after positioning it such that the aft side of the canopy lines up nicely with the turtle deck.
 20190707_135249 by Jereme Carne, on Flickr
Here are some pics of how it conforms to the turtle deck skin, quite happy indeed.
 20190706_152750 by Jereme Carne, on Flickr
 20190706_152756 by Jereme Carne, on Flickr
 20190706_152808 by Jereme Carne, on Flickr
I also followed the directions on installing the C-677 pin mounts. It wasn't as difficult as I thought it was going to be. (yes I know they still need countersunk) The aft lower bolts that hold the block in doesn't have much clearance to the pin so watch out for this when you install them.
 20190707_164410 by Jereme Carne, on Flickr
Bonus: When the wife says watch the kid for a moment and there is no dust/chemicals flying in the garage it's time for a teachable moment.
 20190706_145016 by Jereme Carne, on Flickr
After putting a finish coat of Sika on it was time to put it on the plane and see how it all lines up. Overall I am very pleased with it. The only squawk is that the front is a little narrow by about 1/8" of an inch. No big deal, it still slides nicely, I may shave off a 1/16th from the rollers eventually but right now I'm happy. When I put the canopy on the plane I also put the windscreen on with the proper spacers so I could measure how much of the forward roller tubes needed trimmed. I needed to trim a 1/4" to get the canopy down enough to perfectly line up with the windscreen. After that I installed the roll bar bolts and the support. I also installed the track after positioning it such that the aft side of the canopy lines up nicely with the turtle deck.
20190707_135249 by Jereme Carne, on FlickrHere are some pics of how it conforms to the turtle deck skin, quite happy indeed.
20190706_152750 by Jereme Carne, on Flickr20190706_152756 by Jereme Carne, on Flickr20190706_152808 by Jereme Carne, on FlickrI also followed the directions on installing the C-677 pin mounts. It wasn't as difficult as I thought it was going to be. (yes I know they still need countersunk)
The aft lower bolts that hold the block in doesn't have much clearance to the pin so watch out for this when you install them. 20190707_164410 by Jereme Carne, on FlickrBonus: When the wife says watch the kid for a moment and there is no dust/chemicals flying in the garage it's time for a teachable moment.
20190706_145016 by Jereme Carne, on FlickrLooks Great! As a fellow 7A slider builder, I can highly recommend the Super Tracks- and you are at a great stage to add them. Makes access to the baggage compartment so much better- night and day better.
Not to spend your money or time- but something to consider.
Thanks Dan!
I REALLY want to install the Super Tracks mod and was planning on it but at this point there are soooooo many flight critical things that I still need to buy that I'm going to delay the Super Tracks until after I am flying already.
This was a fairly recent decision as I was always planning on installing it during the build; but hey, the first few hours I won't be lugging around baggage anyways. hahaWell it's finallly time to do the canopy skirt dance. The plan all along was just to take the time to do a skirt for the whole shebang but I held up the aluminum side skirts and said "daaaaang those fit too good to throw away!"
Therefore, I started by putting the aluminum skirts on and painting the inside of them except where Sika will go just for a little extra. Then it was time to start taping things off for the rear skirt layup.
 20190709_111537 by Jereme Carne, on Flickr
Another picture or two of taping.
 20190709_124105 by Jereme Carne, on Flickr
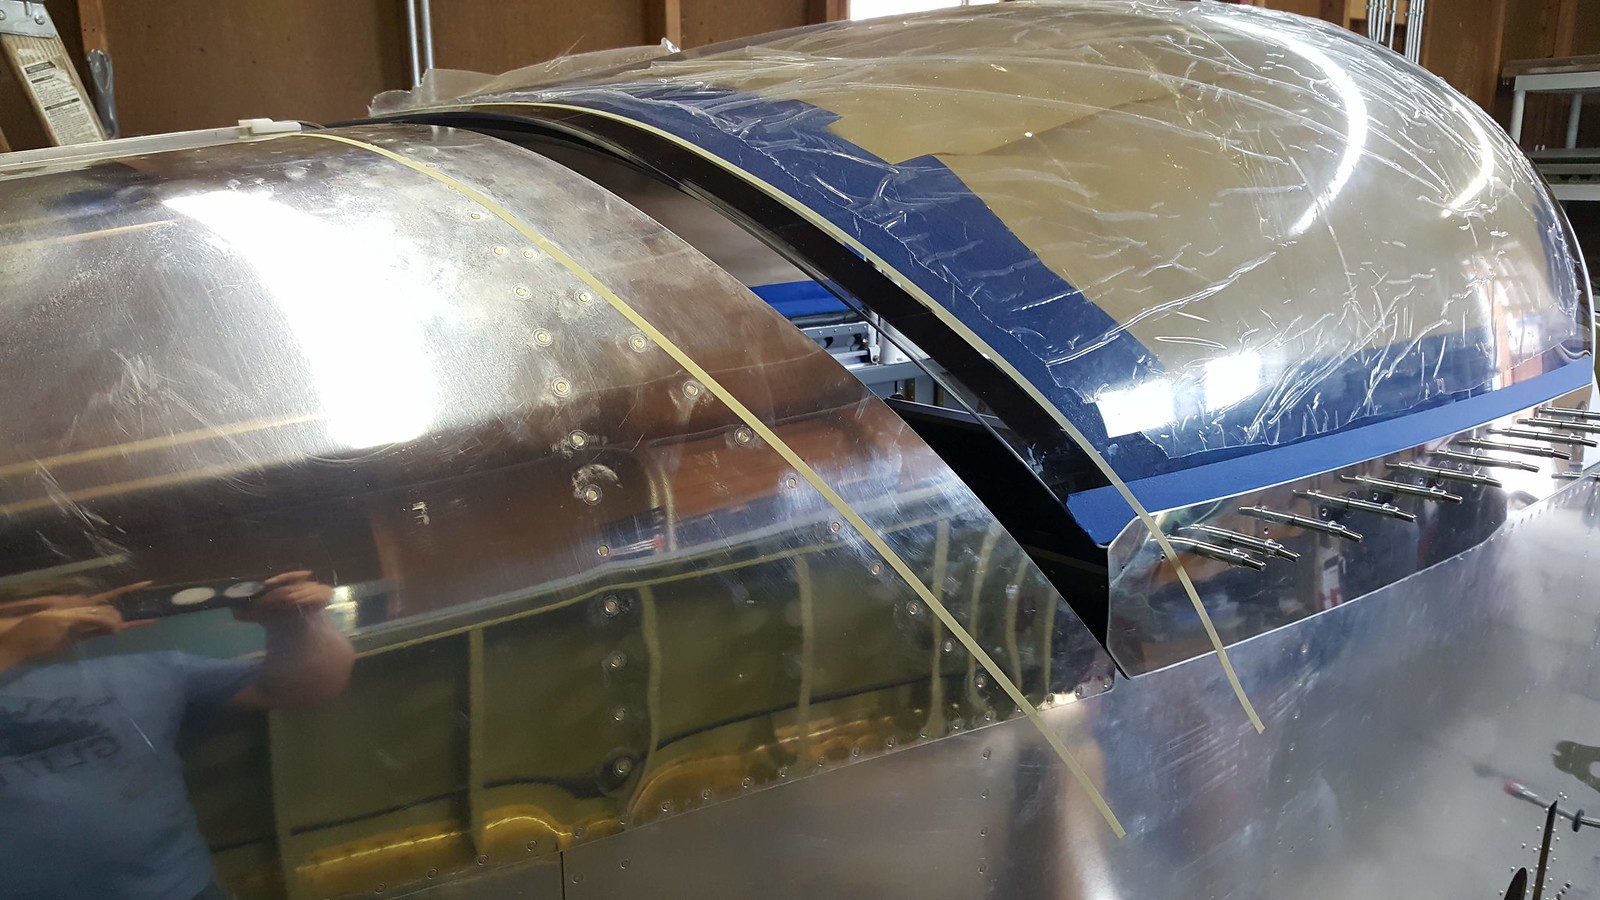
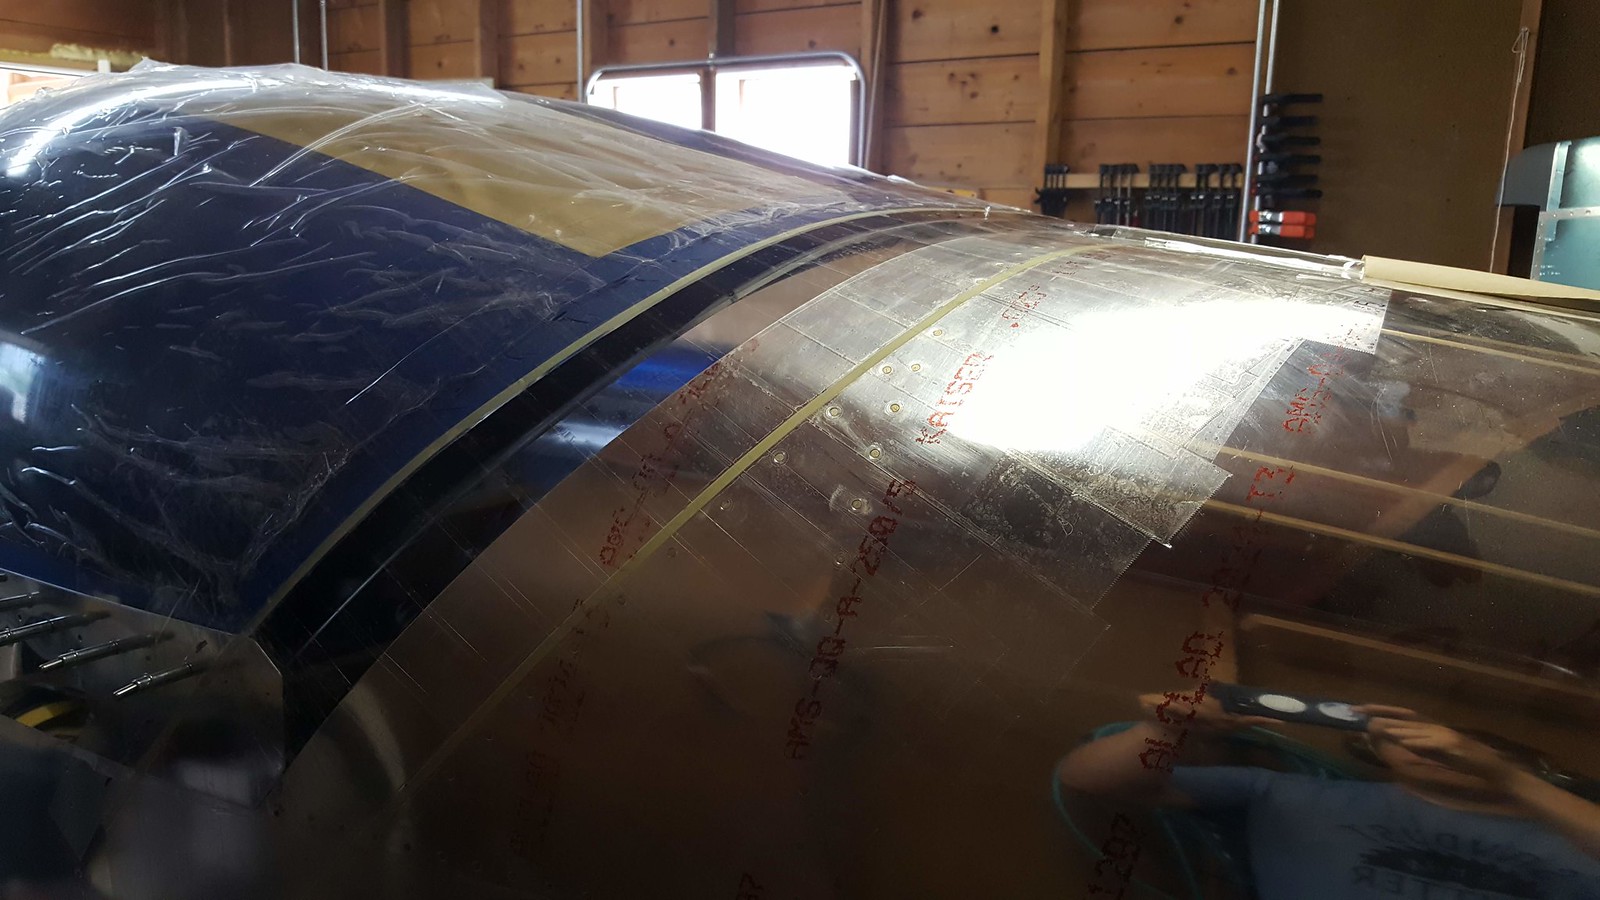
As you can see in this next pic the tape gets a little saggy where the gap is. I put another tighter layer on and it seemed to help quite a bit. If I could do it again I might even consider putting some quick setting stuff over the first layer where the gap is and taping again.
Also, make a mental note of the side skirt and how well it fits the fuse and canopy.
 20190709_124404 by Jereme Carne, on Flickr
Remember that mental note you made? In the next pic it looks like the layup is really being pushed out by the side skirt. It is a little fatter there but for the most part the picture is playing tricks on you.
 20190709_165326 by Jereme Carne, on Flickr
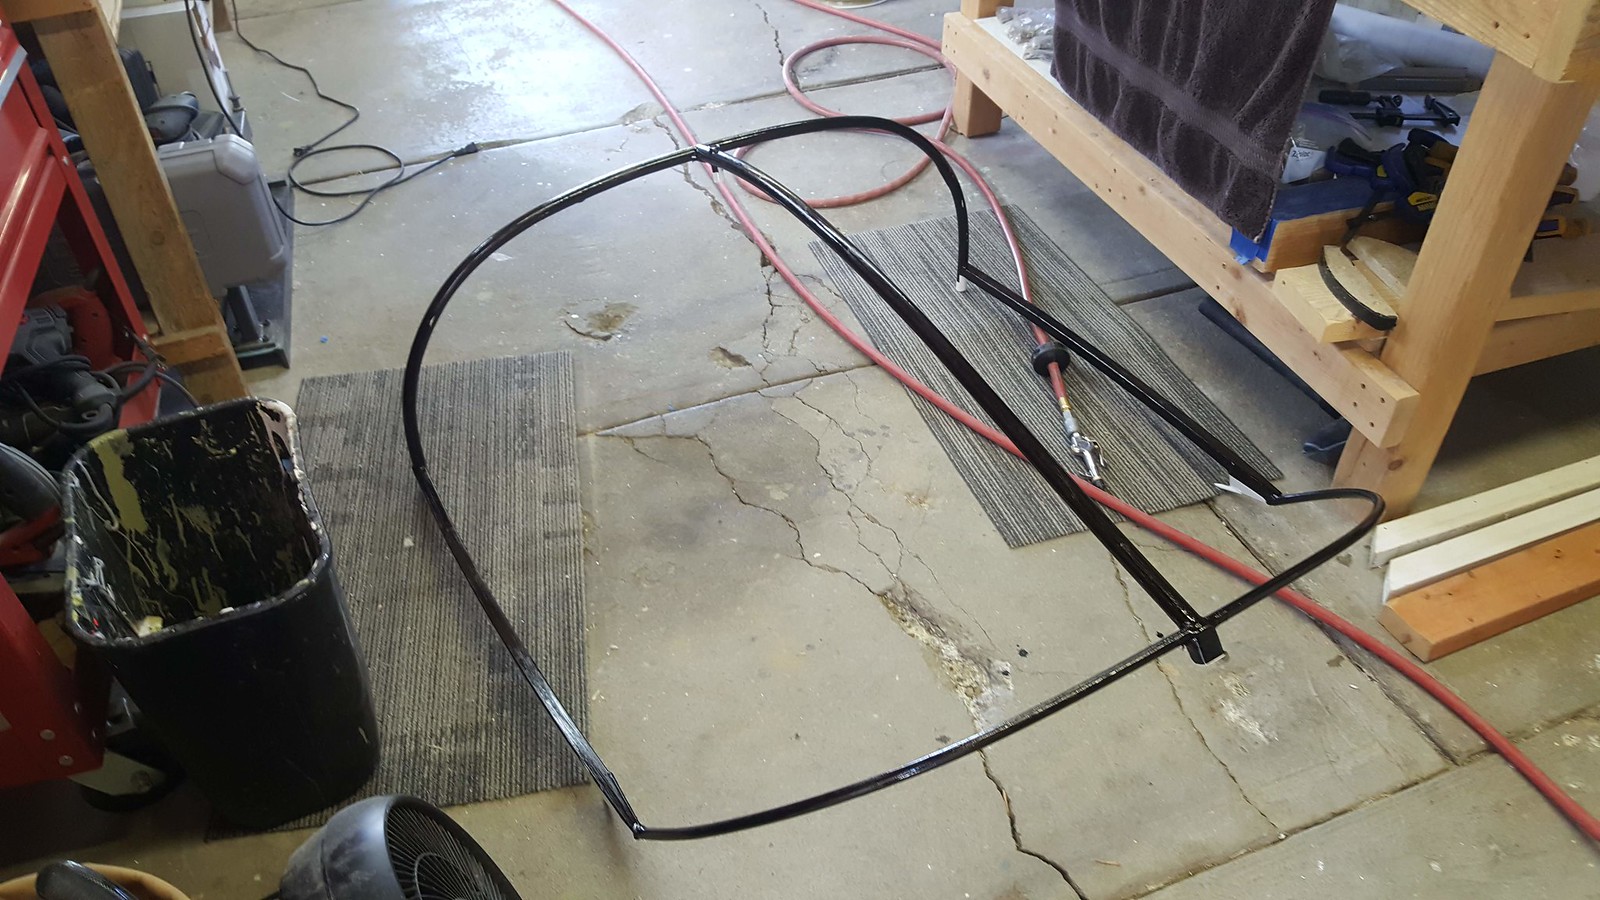
Next up since I still had some time to play with I fabricated a couple of handles to rivet to the canopy for easier opening.
 20190709_165315 by Jereme Carne, on Flickr
Stay tuned for mass quantities of sanding.
Therefore, I started by putting the aluminum skirts on and painting the inside of them except where Sika will go just for a little extra. Then it was time to start taping things off for the rear skirt layup.
20190709_111537 by Jereme Carne, on FlickrAnother picture or two of taping.
20190709_124105 by Jereme Carne, on FlickrAs you can see in this next pic the tape gets a little saggy where the gap is. I put another tighter layer on and it seemed to help quite a bit. If I could do it again I might even consider putting some quick setting stuff over the first layer where the gap is and taping again.
Also, make a mental note of the side skirt and how well it fits the fuse and canopy.
20190709_124404 by Jereme Carne, on FlickrRemember that mental note you made? In the next pic it looks like the layup is really being pushed out by the side skirt. It is a little fatter there but for the most part the picture is playing tricks on you.
20190709_165326 by Jereme Carne, on FlickrNext up since I still had some time to play with I fabricated a couple of handles to rivet to the canopy for easier opening.
20190709_165315 by Jereme Carne, on FlickrStay tuned for mass quantities of sanding.
kentlik
Well Known Member
Wow! Those side skirts fit awesome. Mine do not fit that snug to the side skin, despite all my efforts to remedy. I will have to work mine a bit more, there is a twist in the sidebar that under that compound bend was beyond effort to take out. So you think there was no way to do AL on the back Jereme?
How many layers are you applying to that rear area?
How many layers are you applying to that rear area?
Last edited:
Looks Great! My side skirts were a nice tight fit too, but I wasted far too much time trying to get the rear ones to fit well. I even purchased a cheap english wheel thinking I could do some magic (Jesse James style). Should have done glass from the start.
Your build looks fantastic! That is going to be a heck of and RV!
Your build looks fantastic! That is going to be a heck of and RV!
Last edited:
Wow! Those side skirts fit awesome. Mine do not fit that snug to the side skin, despite all my efforts to remedy. I will have to work mine a bit more, there is a twist in the sidebar that under that compound bend was beyond effort to take out. So you think there was no way to do AL on the back Jereme?
How many layers are you applying to that rear area?
Interesting Kent, mine required very little tweaking on the sides. There is no way in heck I would even attempt to do metal on the rear. I'm sure it would be way harder to do with the Sika method as well since there is a fair amount of preload in the metal by the sounds of it. I know a guy here that did metal on his -6A and he described the torture it was to accomplish it. I went with four plies of 8.9 oz 8-harness satin found here.
Looks Great! My side skirts were a nice tight fit too, but I wasted far too much time trying to get the rear ones to fit well. I even purchased a cheap english wheel thinking I could do some magic (Jesse James style). Should have done glass from the start.
Your build looks fantastic! That is going to be a heck of and RV!
Thanks for the compliments Dan! Ya doing it in metal never even crossed my mind. The only thing I used the metal for was a template to cut the glass haha.
So did you end up going with glass in the end if I understand correct?Doing the glass as we speak Well, not this very second but that is what I'm working on.
I ordered the new mount/nose gear and this is one of the bigger projects that I've been avoiding. I think by the time it gets here that will hopefully be one of the last remaining projects before she heads off to paint.
Well, not this very second but that is what I'm working on. I ordered the new mount/nose gear and this is one of the bigger projects that I've been avoiding. I think by the time it gets here that will hopefully be one of the last remaining projects before she heads off to paint.
kentlik
Well Known Member
Interesting Kent, mine required very little tweaking on the sides. There is no way in heck I would even attempt to do metal on the rear. I'm sure it would be way harder to do with the Sika method as well since there is a fair amount of preload in the metal by the sounds of it. I know a guy here that did metal on his -6A and he described the torture it was to accomplish it. I went with four plies of 8.9 oz 8-harness satin found here.
Thanks for the compliments Dan! Ya doing it in metal never even crossed my mind. The only thing I used the metal for was a template to cut the glass haha.
How much glass will I need to do the rear skirt do you think Jereme?
Jereme! you will be flying in no time! Great work all around.
Thanks for the compliments! I sure do want to start flying this thing!
Hopefully in less than a year.Doing the glass as we speak
I ordered the new mount/nose gear and this is one of the bigger projects that I've been avoiding. I think by the time it gets here that will hopefully be one of the last remaining projects before she heads off to paint.
Ya I hear ya, I ordered the new mount/nose gear as well and unless it ships relatively soon I think it is going to start holding me up. After the canopy which probably is only another week max, I was planning on putting her on gear and mounting the engine. Sounds like you're getting close if she is ready for paint!
How much glass will I need to do the rear skirt do you think Jereme?
Kent my records on Spruce show that I ordered two yards of the 60" wide stuff. But honestly it was close man! With how cheap it is I would honestly order you up four or even five yards, this fabric has come in real handy on other stuff. I used a couple yards from another order already too on various things.
Fiberglass work continues on the rear skirt. First I popped it off and trimmed the edges. Don't do anything with that tape just yet though, more to do.
Tip: I'm not sure how you guys and gals are doing it but I have found that skipping any wax and PVA and laying up right on top of clear packing tape has always resulted in the EASIEST way to pop the fiberglass off (easier than when I used to use wax). Seriously the part releases so well it's satisfying to watch. However, disregard that comment if you are doing fiberglass in molds, different ballgame as I understand.
 20190710_111626 by Jereme Carne, on Flickr
After sanding the inside a bit and exposing any trapped air bubbles it was time to start doing a bit of filling. I had one section on the right side that got a little saggy. I filled this region with a flox mixture. You can see all the area I had to fill on the whole fairing, not too bad, just make sure to get that tape nice and tight! The valley was not very deep at all, I probably could of just used micro but why not go with flox.
 20190710_111632 by Jereme Carne, on Flickr
After doing some work around the doghouse area I put on a nice thick coat of micro on the whole fairing. Time for some sanding tomorrow.
 20190710_180039 by Jereme Carne, on Flickr
While I wait for epoxy to cure I figured I could work on the main gear. Glad I did as this does take a few hours to do. First bolt the brake flange on. I ordered shorter bolts and AN363 nuts as recommended by some on these forums to hold the brake bracket on. I figured I mind as well do this since first flight will probably be without wheel pants but who knows, I will cross that bridge when I get there.
 20190710_181928 by Jereme Carne, on Flickr
Next, mount the tires. Slap some tire talc in there and put things together. I can already tell that this is the part of the build that is going to get fun!
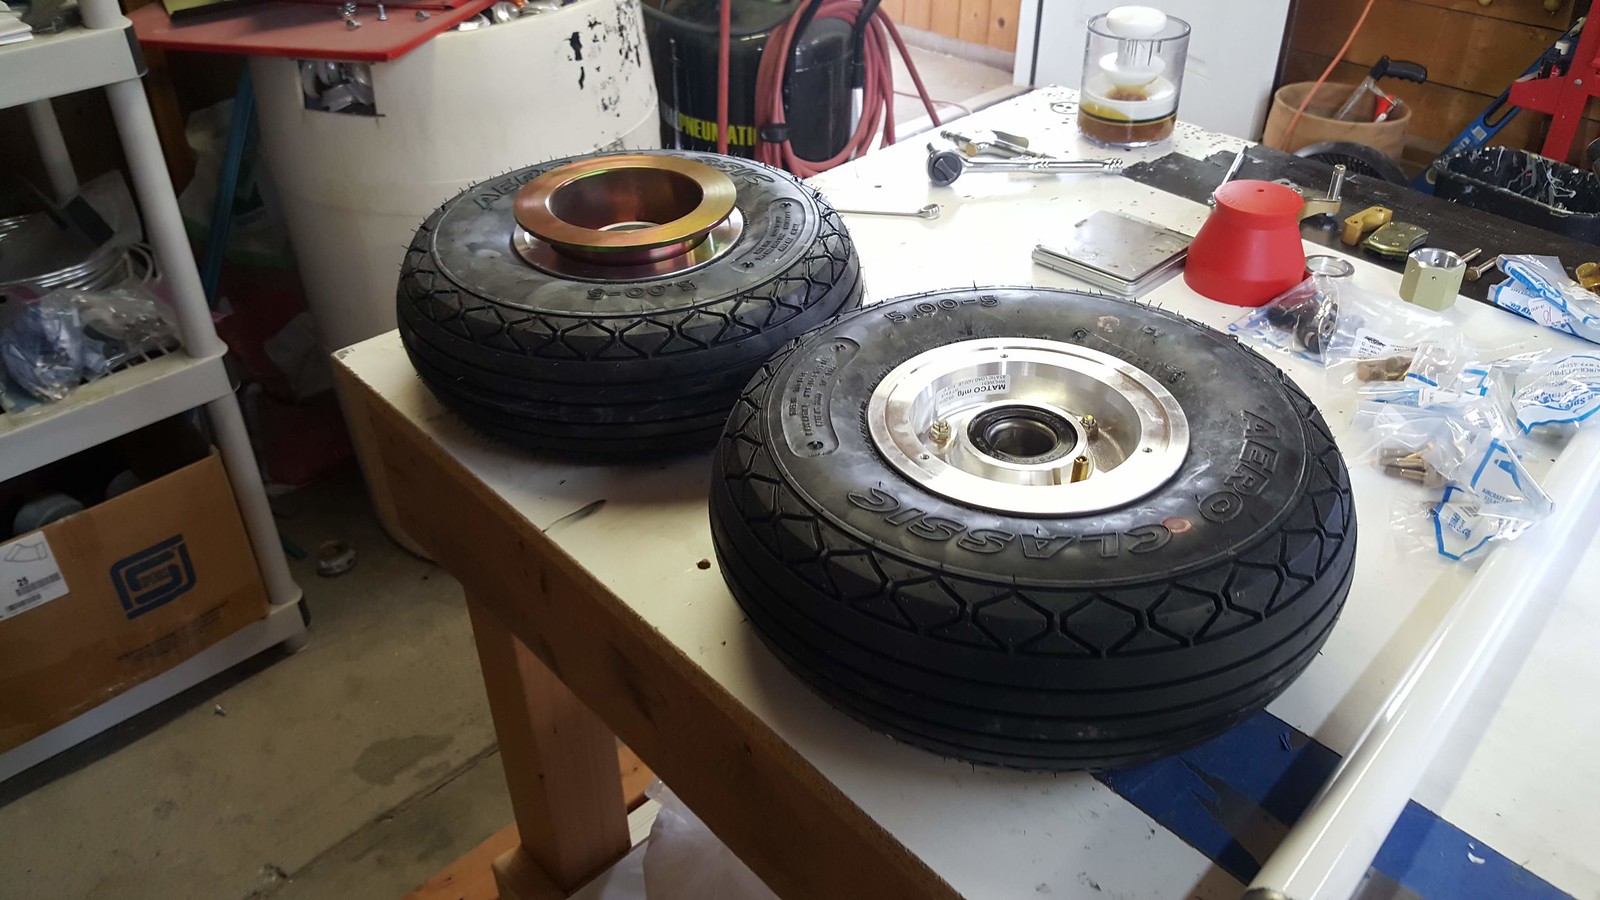 20190710_181922 by Jereme Carne, on Flickr
After packing and seating the bearings I got the axle nut set right per the Matco instructions and drilled the gear leg for the cotter pin. Drilling through that hard steel is a bear! Put the brakes back on and on to the next side.
 20190710_201551 by Jereme Carne, on Flickr
Tip: I'm not sure how you guys and gals are doing it but I have found that skipping any wax and PVA and laying up right on top of clear packing tape has always resulted in the EASIEST way to pop the fiberglass off (easier than when I used to use wax). Seriously the part releases so well it's satisfying to watch. However, disregard that comment if you are doing fiberglass in molds, different ballgame as I understand.
20190710_111626 by Jereme Carne, on FlickrAfter sanding the inside a bit and exposing any trapped air bubbles it was time to start doing a bit of filling. I had one section on the right side that got a little saggy. I filled this region with a flox mixture. You can see all the area I had to fill on the whole fairing, not too bad, just make sure to get that tape nice and tight! The valley was not very deep at all, I probably could of just used micro but why not go with flox.
20190710_111632 by Jereme Carne, on FlickrAfter doing some work around the doghouse area I put on a nice thick coat of micro on the whole fairing. Time for some sanding tomorrow.
20190710_180039 by Jereme Carne, on FlickrWhile I wait for epoxy to cure I figured I could work on the main gear. Glad I did as this does take a few hours to do. First bolt the brake flange on. I ordered shorter bolts and AN363 nuts as recommended by some on these forums to hold the brake bracket on. I figured I mind as well do this since first flight will probably be without wheel pants but who knows, I will cross that bridge when I get there.
20190710_181928 by Jereme Carne, on FlickrNext, mount the tires. Slap some tire talc in there and put things together. I can already tell that this is the part of the build that is going to get fun!
20190710_181922 by Jereme Carne, on FlickrAfter packing and seating the bearings I got the axle nut set right per the Matco instructions and drilled the gear leg for the cotter pin. Drilling through that hard steel is a bear! Put the brakes back on and on to the next side.
20190710_201551 by Jereme Carne, on FlickrWhat type if resin and such are you using? I am interested in getting it in the shop for later.
I use West System epoxy. Get it from here. Looks like there is a couple of stores in the Portland area too. I got mine from Merrit supply when I ordered Sika only to find out the next day that West Marine has free shipping.
You want the 105 resin and the 206 hardner (I bought the gal. size for 105 and 27 oz. for 206) The 206 resin has to be used in temps above 60. I also have the pumps that you can get but I don't really use them other than to dispense as they are not accurate. I weigh everything in a 5 to 1 ratio.
kentlik
Well Known Member
I use West System epoxy. Get it from here. Looks like there is a couple of stores in the Portland area too. I got mine from Merrit supply when I ordered Sika only to find out the next day that West Marine has free shipping.
You want the 105 resin and the 206 hardner (I bought the gal. size for 105 and 27 oz. for 206) The 206 resin has to be used in temps above 60. I also have the pumps that you can get but I don't really use them other than to dispense as they are not accurate. I weigh everything in a 5 to 1 ratio.
Copy that. Thanks for the info! I need to get some flox I guess which is from Spruce I would imagine...
Copy that. Thanks for the info! I need to get some flox I guess which is from Spruce I would imagine...
Ya you probably want to lock down some flox, micro, and cab-o-sil from spruce. Probably get some peel ply too. Flox is strustural to some degree, micro is mainly used on cosmetic things and is easy to sand. Cab-o-sil basically makes it so it doesn't flow/fall when on vertical surfaces.
wjb
Well Known Member
You want the 105 resin and the 206 hardner (I bought the gal. size for 105 and 27 oz. for 206) The 206 resin has to be used in temps above 60. I also have the pumps that you can get but I don't really use them other than to dispense as they are not accurate. I weigh everything in a 5 to 1 ratio.
The 5:1 ratio is by volume; by weight it's 5.36:1 for the 206 slow hardener and 5:19:1 for the 205 Fast hardener ... though the data sheet calls out a large range around these for an acceptable mix (5:1 is in the middle of the range). I use a 0.1g scale to measure mine as well; the pumps are not particularly accurate. I never had a batch not cure rock hard doing it this way.
kentlik
Well Known Member
7 ounces of hardener is $22 shipped on eBay.
Back many years ago I was a model maker for industrial design and I still have my vacuum pump and scales...glad I kept them.
Not much experience with glass I will admit. Do I need to roll out the extra resin between a plastic sheet before applying the glass? I saw someone on here doing that. I will have to brush up on this stuff before I get in to it...
wjb
Well Known Member
Back many years ago I was a model maker for industrial design and I still have my vacuum pump and scales...glad I kept them.
Not much experience with glass I will admit. Do I need to roll out the extra resin between a plastic sheet before applying the glass? I saw someone on here doing that. I will have to brush up on this stuff before I get in to it...
If you were building a Lancair or VariEze -- an all-glass plane -- yes, you should be concerned with the proper ratio of glass to resin. However, there are not very many glass components on an RV, and none are structural (maybe the cowl, but that comes from Vans pre-molded from a pro shop), so a little extra resin won't hurt much in weight or strength. It is good practice to wet out the glass and squeeze off any grossly extra resin; that's just wasted weight. You can pre-wet the glass on plastic before applying, or paint the resin on and stipple it into the weave, depending on the application.
Best tip: read every post by DanH on this forum; you'll learn a ton! (and might get a free plenum out of the deal ;-)
And, experiment! It's easy to do, relatively cheap and fast. After reading and experimenting, I was able to totally crush the mis-fit of my IO-360 snorkel. See http://www.vansairforce.com/community/showpost.php?p=1340414&postcount=54. It was very educational and recreational (and fun!)
Last edited:
kentlik
Well Known Member
If you were building a Lancair or VariEze -- an all-glass plane -- yes, you should be concerned with the proper ratio of glass to resin. However, there are not very many glass components on an RV, and none are structural (maybe the cowl, but that comes from Vans pre-molded from a pro shop), so a little extra resin won't hurt much in weight or strength. It is good practice to wet out the glass and squeeze off any grossly extra resin; that's just wasted weight. You can pre-wet the glass on plastic before applying, or paint the resin on and stipple it into the weave, depending on the application.
Best tip: read every post by DanH on this forum; you'll learn a ton! (and might get a free plenum out of the deal ;-)
And, experiment! It's easy to do, relatively cheap and fast. After reading and experimenting, I was able to totally crush the mis-fit of my IO-360 snorkel. See http://www.vansairforce.com/community/showpost.php?p=1340414&postcount=54. It was very educational and recreational (and fun!)
Thanks, Bill! I have read closely Dan's stuff on many aspects of construction and it has helped me get up the curve with less pain and suffering...lol
So I got all that ordered and on its way. Started back with the fuel lines and bulkhead fittings and going along again but still ready to be done with this part...Return lines are a bit of challenge.
Heck ya, keep the train rollin!
The 5:1 ratio is by volume; by weight it's 5.36:1 for the 206 slow hardener and 5:19:1 for the 205 Fast hardener ... though the data sheet calls out a large range around these for an acceptable mix (5:1 is in the middle of the range). I use a 0.1g scale to measure mine as well; the pumps are not particularly accurate. I never had a batch not cure rock hard doing it this way.
Interesting where did you find this ratio by weight? West System website says 5 to 1 for weight or volume. Whoops, never mind, I see it in the TDS. Ya you right though, there is a really large range which makes sense to me because before I started doing any fiberglass work I did a few samples that were purposely mixed wrong and put in about 45 degree weather and I never had anything not cure.
If you were building a Lancair or VariEze -- an all-glass plane -- yes, you should be concerned with the proper ratio of glass to resin. However, there are not very many glass components on an RV, and none are structural (maybe the cowl, but that comes from Vans pre-molded from a pro shop), so a little extra resin won't hurt much in weight or strength. It is good practice to wet out the glass and squeeze off any grossly extra resin; that's just wasted weight. You can pre-wet the glass on plastic before applying, or paint the resin on and stipple it into the weave, depending on the application.
Best tip: read every post by DanH on this forum; you'll learn a ton! (and might get a free plenum out of the deal ;-)
And, experiment! It's easy to do, relatively cheap and fast. After reading and experimenting, I was able to totally crush the mis-fit of my IO-360 snorkel. See http://www.vansairforce.com/community/showpost.php?p=1340414&postcount=54. It was very educational and recreational (and fun!)
Kent, I will second reading all of the stuff DanH has posted, his posts are really what got me going as well as a few PMs to him. I also had some fiberglass experience but it's been a long time. The best method I have found is to sandwich the plies between two sheets of plastic and wet them out (a lot easier if you put epoxy below and above the plies). Peel one side off, start putting on your part/plane and peel the other side off as you go. Then get air bubbles out, make it how you want and put peel ply on when you are done. Drop me a call Kent when you get to doing your fiberglass and I'll explain it better.

