Van's Air Force
You are using an out of date browser. It may not display this or other websites correctly.
You should upgrade or use an alternative browser.
You should upgrade or use an alternative browser.
RV-15 #150046 (Empennage Kit)
- Thread starter MCA
- Start date


 great news Marc.
I just got a phone call too from Vans. Tail kit shipping tomorrow. Wing kit still not definite on a 6/01 ship date.
I still remember when I got my -8 tail kit. Came via FedEx in a couple of not too large cardboard boxes. This one looks a lot bigger.
Last edited:
Congratulations Marc! Quick keyboard skills!
Looks like the two Northern Nevada tail kits will be ready for pickup this Friday. (We both ordered in the first four minutes.)
simpsontl48
Active Member
Best of luck to all the new builders. Hopefully you can find reasonably priced engines. I had to terminate for that reason. Joining many others in that group with that very serious problem.
Curious about this as well ... with kits out there now, there is nothing on the web store?Any word on when the KAI’s will get published?
Unpacking. Took about 45 minutes to inventory everything. 100% of parts accounted for.
HS front and aft spars, upper and lower HS skins.

Various sub-kits, including the LE skins just below the tackle box.

HS skins

Rudder and VS skin

Elevator subkit:

HS kit:

Rudder kit:

Misc hardware:


HS front and aft spars, upper and lower HS skins.
Various sub-kits, including the LE skins just below the tackle box.
HS skins
Rudder and VS skin
Elevator subkit:
HS kit:
Rudder kit:
Misc hardware:
Attachments
Finally got started in earnest on the tail kit. I'm doing them in the order that Louise suggests: easiest to less easiest. They all appear to be pretty straightforward. So... the first kit is the rudder, then the VS.
The rudder and VS parts were prepped together. I like to do all the countersinking, drilling, reaming, etc. - where able - at the start, prior to priming.
Countersinking the spar (without the cage installed due to clearance issues).

Added the roll (edge break) to the front of the rudder before installing any stringers.

Test fitting the countersinks for the rear spar caps on the VS:

I use a handy jig to test the countersink depth, which is slightly larger than a countersink for a 426 rivet.

And prepping the rear spar doubler for the VS:

The holes in the powder-coated parts need to be drilled out to full size. For some reason, the four mounting holes here are #30 but are called out for #19 drill. No big deal as it is easy to drill them larger.

Parts are prepped for priming using PreKote.


Got the notice from Van's about possible issues with a small batch of the rudder skins. The notice lists the trailing edge and bend on the front of the rudder skin. Both checked out OK.

And I now check all the rivets for proper length before using:

The rudder and VS parts were prepped together. I like to do all the countersinking, drilling, reaming, etc. - where able - at the start, prior to priming.
Countersinking the spar (without the cage installed due to clearance issues).
Added the roll (edge break) to the front of the rudder before installing any stringers.
Test fitting the countersinks for the rear spar caps on the VS:
I use a handy jig to test the countersink depth, which is slightly larger than a countersink for a 426 rivet.
And prepping the rear spar doubler for the VS:
The holes in the powder-coated parts need to be drilled out to full size. For some reason, the four mounting holes here are #30 but are called out for #19 drill. No big deal as it is easy to drill them larger.
Parts are prepped for priming using PreKote.
Got the notice from Van's about possible issues with a small batch of the rudder skins. The notice lists the trailing edge and bend on the front of the rudder skin. Both checked out OK.
And I now check all the rivets for proper length before using:
For the rudder spar, the factory rivet heads are on the outside (forward facing side). They are somewhat visible, and the shop heads match the nut plates' location.

I used a micrometer and eyeball measurements to set the bearing center distance. Is there a better way to do this?

For both the rudder and VS, it was easier to buck many of the rivets than to constantly readjust the squeezer. The rudder horn had some tight clearances, which made bucking (for me) a necessity.

Following Louise's advice, my wife helped to hold the rudder open while I added Dowsil 737 to the ends of the internal stringers. The idea is to use a small blob of goop (Proseal, etc.) to minimize vibration and reduce the chance of cracking. Put the goop at very deepest part where the two strings almost meet.


Rudder was done in less than a day!


I used a micrometer and eyeball measurements to set the bearing center distance. Is there a better way to do this?
For both the rudder and VS, it was easier to buck many of the rivets than to constantly readjust the squeezer. The rudder horn had some tight clearances, which made bucking (for me) a necessity.
Following Louise's advice, my wife helped to hold the rudder open while I added Dowsil 737 to the ends of the internal stringers. The idea is to use a small blob of goop (Proseal, etc.) to minimize vibration and reduce the chance of cracking. Put the goop at very deepest part where the two strings almost meet.
Rudder was done in less than a day!
Last edited:
The VS went together just as easily. I was a little confused reading the instructions ahead of time, but once you have the parts, it all lines up nicely. The long, thin rear spar caps (two of them) have a bend to them, but straighten out once installed.

The KAIs did not call out for any fluting on the ribs, but there is some curvature and warped metal, so it made sense to lightly flute the main rib and nose rib flanges.

It was almost silly how easily all this went together. Kudos to the engineers and manufacturing folks at Van's.
There are many different sizes of solid rivets used, and again, I found it easier to just buck the rivets rather than repeatedly adjust and test the squeezer. YMMV. As with the rudder, the factory rivet heads were aligned on the aft side of the VS where they can be seen.

The KAIs did not call out for any fluting on the ribs, but there is some curvature and warped metal, so it made sense to lightly flute the main rib and nose rib flanges.
It was almost silly how easily all this went together. Kudos to the engineers and manufacturing folks at Van's.
There are many different sizes of solid rivets used, and again, I found it easier to just buck the rivets rather than repeatedly adjust and test the squeezer. YMMV. As with the rudder, the factory rivet heads were aligned on the aft side of the VS where they can be seen.
Last edited:
Frog Hobson
Active Member
I have a neumatix squeezer and it is awesome as I don't have to change the depth for squeezing rivets. 80 PSI for 4- rivets, and 38 PSI for the 3- rivetsThe VS went together just as easily. I was a little confused reading the instructions ahead of time, but once you have the parts, it all lines up nicely. The long, thin rear spar caps (two of them) have a bend to them, but straighten out once installed.
View attachment 119622
The KAIs did not call out for any fluting on the ribs, but there is some curvature and warped metal, so it made sense to lightly flute the main rib and nose rib flanges.
View attachment 119624
It was almost silly how easily all this went together. Kudos to the engineers and manufacturing folks at Van's.
There are many different sizes of solid rivets used, and again, I found it easier to just buck the rivets rather than repeatedly adjust and test the squeezer. YMMV.
View attachment 119625
And on the second day, the VS was finished. Really, these go fast. You could get both done in two days. Priming added another day to the build.
There aren't many learnings to share; this was pretty straightforward. So, below are some images, if it helps anyone, and a few thoughts on a few things.


The KAIs describe a sequence for clecoing on the skin. It seemed odd to me at first but it works.


And... done!

The forward rivet does pinch a bit on both sides, leading me to believe a tighter LE bend would be good.

This is the squeezer yoke that works for all the perimeter rivets on the skin.


We'll fill the rivet holes with SuperFil, then on to the elevators and HS.
There aren't many learnings to share; this was pretty straightforward. So, below are some images, if it helps anyone, and a few thoughts on a few things.
The KAIs describe a sequence for clecoing on the skin. It seemed odd to me at first but it works.
And... done!
The forward rivet does pinch a bit on both sides, leading me to believe a tighter LE bend would be good.
This is the squeezer yoke that works for all the perimeter rivets on the skin.
We'll fill the rivet holes with SuperFil, then on to the elevators and HS.


Next was the elevators. These were really straightforward and I don't have any meaningful insights to share. So, here are some pics and hopefully you'll find them useful.
I built both elevators at the same time because the KAIs did not include instructions for the right side. Interestingly, the L and R sides are identical until you install the bellcranks and ultimately the skin.
Parts ready after prep and prime.

The bellcrank stops were installed before the bellcranks were installed on the elevator. It was slightly easier to do it this way.


The dark green is some touch up with rattle-can primer.

Factory heads on the most visible side.


I built both elevators at the same time because the KAIs did not include instructions for the right side. Interestingly, the L and R sides are identical until you install the bellcranks and ultimately the skin.
Parts ready after prep and prime.
The bellcrank stops were installed before the bellcranks were installed on the elevator. It was slightly easier to do it this way.
The dark green is some touch up with rattle-can primer.
Factory heads on the most visible side.
Attachments
Last edited:
Elevators (part 2)


Those rivets at the trailing edge were tricky, but worked out ok with the sqeezer angled a bit like this. I carefully squeezed, ensuring the rivet head was pressed down before fully engaging the press.


Front halves went together easier than I thought they would.


Those rivets at the trailing edge were tricky, but worked out ok with the sqeezer angled a bit like this. I carefully squeezed, ensuring the rivet head was pressed down before fully engaging the press.
Front halves went together easier than I thought they would.


The final part of the empennage kit is materially complete - the horizontal stabilizer.
This was a fun and straightforward assembly to build. The most challenging part, IMO, was riveting the angled ribs. Take a bit of extra time and figure out the best way for you to rivet these ribs. The HS is also pretty sexy by Van's standards, with all the machined aluminum parts. Below are a bunch of pics to help look ahead.
Everything was prepped and primed prior to any assembly. I spent 6 hours on spar and rib assembly (solo) , and 4 hours on riveting the skins (with my wife).

This squeezer worked well and reached the middle rivets.
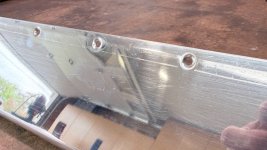
Be sure to mark the spars with L/R, TOP/BOTTOM. The aft spar *does* have a bottom and a top. The front spar is symmetrical.


This was some of the easiest riveting in the whole kit!


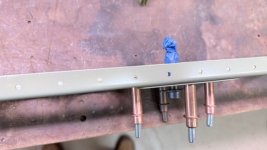
Aft spar with the elevator mounts installed.

Made a simple jig to hold the spar upright while riveting.

These can all be squeezed.

This was a fun and straightforward assembly to build. The most challenging part, IMO, was riveting the angled ribs. Take a bit of extra time and figure out the best way for you to rivet these ribs. The HS is also pretty sexy by Van's standards, with all the machined aluminum parts. Below are a bunch of pics to help look ahead.
Everything was prepped and primed prior to any assembly. I spent 6 hours on spar and rib assembly (solo) , and 4 hours on riveting the skins (with my wife).
This squeezer worked well and reached the middle rivets.
Be sure to mark the spars with L/R, TOP/BOTTOM. The aft spar *does* have a bottom and a top. The front spar is symmetrical.
This was some of the easiest riveting in the whole kit!
Aft spar with the elevator mounts installed.
Made a simple jig to hold the spar upright while riveting.
These can all be squeezed.
I took some extra time to make sure the ribs were installed correctly and in the right direction.

Ribs and spars cleco'd together, prior to riveting. The ribs do have a front and aft - it's not obvious until you install them. Fluting is called out indirectly in the KAI section introduction, but not called out explicitly when prepping the ribs.

After riveting the "straight" ribs in, the angled ribs are installed. Take some time to angle the front/aft flanges properly and figure out the best way to rivet. I used a combination of squeezing and bucking the solid rivets.

Be careful to note the top and bottom (as indexed by the aft spar) so you install the brackets with the correct end up/down.

A washer holder made a big difference here.

Be sure to drill out the powder coat on the #12 holes as called out in the KAIs. More difficult to do here without a 90 deg stub drill.

Final inspection of the rivets, flanges, nuts, etc. before installing skins.


Ribs and spars cleco'd together, prior to riveting. The ribs do have a front and aft - it's not obvious until you install them. Fluting is called out indirectly in the KAI section introduction, but not called out explicitly when prepping the ribs.
After riveting the "straight" ribs in, the angled ribs are installed. Take some time to angle the front/aft flanges properly and figure out the best way to rivet. I used a combination of squeezing and bucking the solid rivets.
Be careful to note the top and bottom (as indexed by the aft spar) so you install the brackets with the correct end up/down.
A washer holder made a big difference here.
Be sure to drill out the powder coat on the #12 holes as called out in the KAIs. More difficult to do here without a 90 deg stub drill.
Final inspection of the rivets, flanges, nuts, etc. before installing skins.
Last edited:
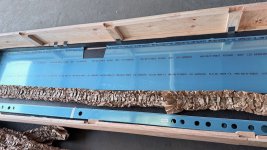
It made sense to me to prime the area underneath the doubler. This is called out in the KAIs for skin overlap in the wings, but not here.


My wife kindly helped out with riveting the skins. We cranked through it fairly quickly with two rivet guns.

Bottom skin on.

Top skin cleco'd on.

Top skin complete.

I'm leaving LE skins off for now. They will likely be painted a different color than the HS.

Fire Fully moving HS.

My wife kindly helped out with riveting the skins. We cranked through it fairly quickly with two rivet guns.
Bottom skin on.
Top skin cleco'd on.
Top skin complete.
I'm leaving LE skins off for now. They will likely be painted a different color than the HS.
Fire
Fully moving HS.
LE skins are primed on the inside. I have yet to figure out how to break the long edges due to interference from the dimpled holes. A guy at the airport has a large brake, we may explore how to do this. Any ideas are appreciated!
View attachment 121668
I’ve thought about ordering two more of these and asking them not to dimple them. I’d like to have a couple replacements anyway and I could use the ones I already have as spares.
Another option is 3D printing a round, beveled edge piece that would fit under the dimple, then use a rubber mallet to create the break around it. If you did the normal full width break between the dimples, then blend that in with the narrower break from that 3D piece, it might look ok.
Let me know if they are willing to sell LE without dimples pls.I’ve thought about ordering two more of these and asking them not to dimple them. I’d like to have a couple replacements anyway and I could use the ones I already have as spares.
Another option is 3D printing a round, beveled edge piece that would fit under the dimple, then use a rubber mallet to create the break around it. If you did the normal full width break between the dimples, then blend that in with the narrower break from that 3D piece, it might look ok.
I used the standard edge break roller tool but obviously the dimples interfere with the rollers. As part of the empennage kit Vans shipped a "skin edge break block" and I followed the guidance in section 5.10. I cut a groove in the middle of one of the edges of the block in the band saw and used it to bend those trailing edges at every dimple location. It doesn't look pretty in the picture as you can see the wave in the skin but you can see that when it's installed the skin lays flush along the screw line.LE skins are primed on the inside. I have yet to figure out how to break the long edges due to interference from the dimpled holes. A guy at the airport has a large brake, we may explore how to do this. Any ideas are appreciated!
View attachment 121668


Let me know if they are willing to sell LE without dimples pls.
They are "unable to produce custom fabricated parts."
Last edited:
Seems like one of the companies that makes fiberglass parts has an opportunity here? I may play around with making a mold. Should have plenty of time before the fuselage kit arrivesThey are "unable to produce custom fabricated parts."
") .
.
Finally decided to roll the edges with my existing tool, and leave the areas around the screws untouched. I'm not sure if this is the right answer as the LE parts haven't been painted and mounted, but overall it looks ok IMO.


For reference, the thread on the wing construction is here.
For reference, the thread on the wing construction is here.
Attachments