How did you drill the #40 holes perpendicular to the cord of the wedge?

Van's Air Force
You are using an out of date browser. It may not display this or other websites correctly.
You should upgrade or use an alternative browser.
You should upgrade or use an alternative browser.
Rudder Trailing Edge Wedge
- Thread starter Tiger28760
- Start date

I used the extra length that was cut off and reversed it putting the two pieces together so it created a flat surface.
If you reference to the surface of the extra wedge, you would not be drilling perpendicular to the center line of the trailing edge wedge. You would be drilling perpendicular to the opposite side of the trailing edge wedge.
EDIT I misread the original post. As Scott explains below, the tool I list in the link should only be used when countersinking the holes of the trailing edge and not for final drilling the #40 holes perpendicular to the chord line. Sorry for the misinformation.
http://www.cleavelandtool.com/Drill-Jig-for-RV-Trailing-Edge-Wedge/productinfo/DJ25/#.WpRnhWinHrc
http://www.cleavelandtool.com/Drill-Jig-for-RV-Trailing-Edge-Wedge/productinfo/DJ25/#.WpRnhWinHrc
Last edited:
I used this on my "second" rudder.
http://www.cleavelandtool.com/Drill-Jig-for-RV-Trailing-Edge-Wedge/productinfo/DJ25/#.WpRnhWinHrc
I didn't even know Mike was selling this tool, but it is not made in a way that it should be used to final drill the wedge. Only for doing the machine countersinking.
The desire is for the holes to be final drilled perpendicular to the cord center line. Not one of the sides
This tool is aligning the side of the wedge square to the chuck (if used in a drill press), so it is fine to use in place of the simple method described in Section 5 of the construction manual, for doing the machine countersinking of the wedge, but not for final drilling.
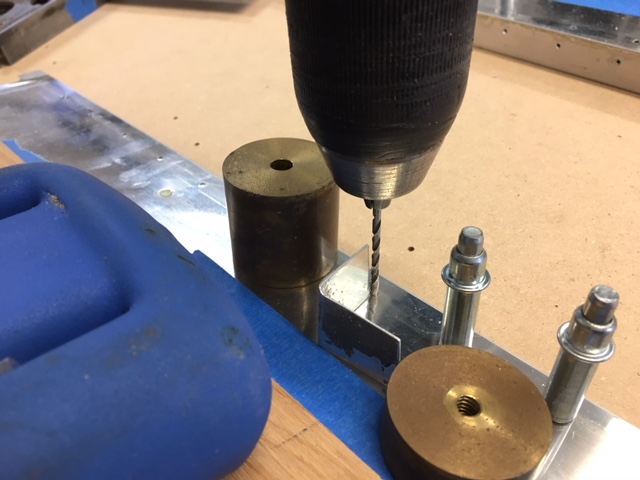
I used a wooden block cut to the angle that would make the drilling 90 to the cord and the back side of the block is set for flush for the counter sinking which needs to be 90 to the surface and not the cord. I have no use for it anymore and if you were nearby, I could just send it out to you.
I may have the measurements (angle) for the cut and will look it up tonight.
I may have the measurements (angle) for the cut and will look it up tonight.
If you reference to the surface of the extra wedge, you would not be drilling perpendicular to the center line of the trailing edge wedge. You would be drilling perpendicular to the opposite side of the trailing edge wedge.
As azflyer21 hinted, I used the extra cut-off wedge as a guide clamped to the drill press. The aft (pointed end) of the TE wedge inserted into the fwd of the cut-off wedge should get you close to the chord line for drilling.
When counter sinking, as azflyer21 & Scott mentioned, I reversed the extra cut-off wedge placed under the TE wedge should provides a perpendicular to the TE wedge surface.
PilotjohnS
Well Known Member
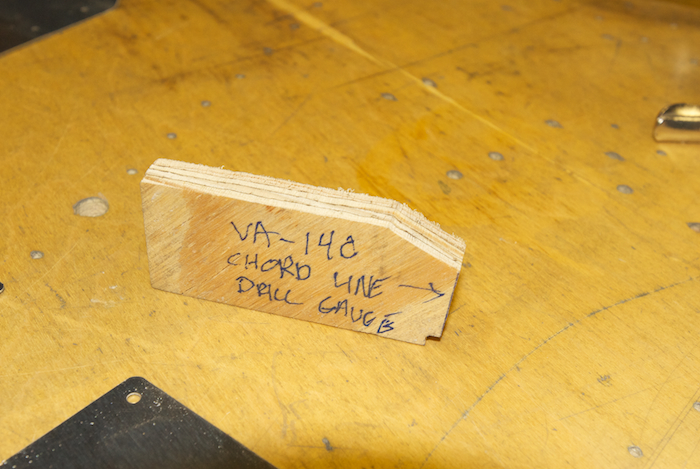
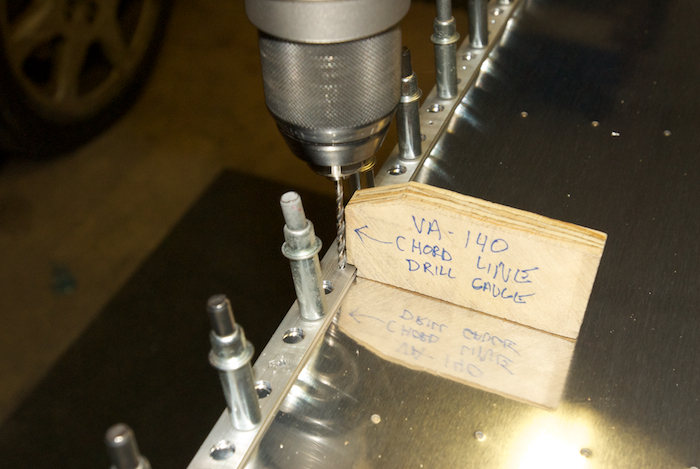
This template is cut to the angle specified in section 5.

StressedOut
Well Known Member
Hey guys, hate to be persnickety, but the mid-line through an airfoil that bisects the trailing edge angle is the chord line, not spelled cord.
A cord is a rubber thing with wires in it to supply electrical power. Or a load of firewood.
Nothing wrong with using the correct term. Now if I can only get people to start using "lose" and "loose" correctly.

mountainride
Well Known Member
My setup
Because I swear nothing in my shop is. On the quest for a flat trailing edge on my rudder....
I first match drilled my 1.5 in aluminum angle to one of my skins. The rudder skins were very thin so instead of running a bit, I clamped the skin to the angle and used a 3/32 punch. By rotating the punch I was able to create a perfect circle imprint on the angle. I then went back with the skin removed and center punched every hole imprinted.
I drilled each hole in the aluminum angle #30 instead of #40 so it wouldn't create any waviness if my holes weren't perfect, Silver Clecos will hold in a #30 hole, especially wedgelocks. This helps keep the angle as a flat reference, not as a locator for the holes.
I then clecoed the assembly together with both rudder skins and match drilled both skins and the wedge perpendicular to the chord line of the wedge. I did this freehand. I started in the middle and worked out, clecoing every hole as I went. Disassembled and then countersink each side of the wedge perpendicular to each side face. I did this with metal rulers and a square clamped to the drill press, while being sure to keep the wedge flat while drilling. Broke the edge on both rudder skins. Dimpled the skins.
I used the adhesive 3M tape recommended by Vans in the -14 manual. I bought a 5 yard roll for $5 on Amazon. I taped my angle to my worked bench, held up with washers. The aluminum angle actually wasn't completely flat so I used aluminum sheet and nuts underneath the angle to both make space for the clecos and shim the angle completely flat. I used tape to attach that to the bench.
I then 3m taped both the right rudder skin and both sides of the wedge (3 layers at this point). I placed that down and ran 5 clecos the entire edge through all three sides of the tape. Removed all 5 clecos. After that I removed the backing from the bottom of the wedge and skin, and placed the wedge very carefully replacing each of the five clecos until the wedge was attached, with backing still on the top side.
I then had a friend help me lay down the trailing edge and cleco while I put in the pop rivets to attach the stiffeners. We would carefully remove the backing from the top of the wedge as we worked our way towards the top clecoing every hole of the trailing edge.
Well its totally straight and closed so far! My friend and I agreed that really how I do riveting will determine how straight the rudder will end up, but at least I have a good reference before I start riveting. (I also had to peel back the bottom 3 or 4 clecos to I could lift up the edge and hit the last 2 rivets in the very bottom stiffener with the no hole yoke, I did this as quickly as possible, see photo)
I am going to finish off the rest of the rivets around the edges tomorrow and rivet the trailing edge this weekend maybe. Giving it a few days to set can't hurt, plus I have to go back to work.
I am a little unsure how exactly I am going to rivet the trailing edge. I am thinking right now I am going to try and use my pneumatic squeezer to just barely set rivets in the order recommended by Vans and then use mushroom set and back rivets plate to finish. When I get to this point should I used the mushroom set in gun on the manufactured or shop head? I could see it working either way. Would using back rivet set work better or just mar the skin due to the smaller diameter?
I hope my explanation of how I figured it out helps someone out. If anyone has an advice on how to improve my method feel free to add, I have the elevators next and am open to suggestions!
https://imgur.com/a/MsHkw
I did all my TE rivets with my hand squeezer. I felt it gave me better control than a pneumatic squeezer or rivet gun.
Did you just set the rivets with the squeezer and then backrivet the tails, or did you use some kind of ground flat set?
I was thinking the easiest way would be to perhaps set all of them slightly using the backrivet set as per the manual, then finish them off with a squeezer with dies ground to the same angle as the surface? (Or one die ground to double the angle and squeezer held perpendicular to one surface).
Has anyone done this?
czechsix
Well Known Member
Did you just set the rivets with the squeezer and then backrivet the tails, or did you use some kind of ground flat set?
I was thinking the easiest way would be to perhaps set all of them slightly using the backrivet set as per the manual, then finish them off with a squeezer with dies ground to the same angle as the surface? (Or one die ground to double the angle and squeezer held perpendicular to one surface).
Has anyone done this?
I initially tried backriveting per the plans, but after half a dozen rivets I wasn't happy with it...it seemed like even though I had the TE flat on the backplate, the riveting process was slightly bending the TE wedge and I also found it more difficult to control using the rivet gun whereas you can work more carefully and slowly with a hand squeezer.
I first set the rivets partially using standard flat squeezer dies, then I sacrificed one of my flat dies (only one) and ground it down to the correct angle (with grinder wheel and polished with scotchbrite wheel) and used that to finish squeezing the rivets flush. That worked for the rudder, flaps, and ailerons which all use the same TE wedge. For the elevator I used Cleaveland's special 'RV-14 Safety Pin Squeezing Tool' to finish each rivet: http://www.cleavelandtool.com/RV-14-SAFETY-PIN-SQUEEZING-TOOL/productinfo/14-1801/#.WpX0iIanFhE
I also suggest starting with a rivet in the middle of the rudder, then do one on each end, then halfway between those, and so on until you've got all of them partially squeezed. Then repeat that pattern using the angled die.

