What's new
Van's Air Force

Don't miss anything! Register now for full access to the definitive RV support community.

RH bottom wing skin with torque tubes and aileron pushrods installed?

Imlars

Member
Patron
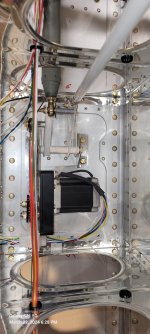
Anbody attempt this? I built lh wing in sequential order. The right hand has the autopilot servo, so I temporary installed and rigged the aileron/flap prior to installing the two bottom skins.

I could simply remove the rods and reinstall after "skinning " the bottom of the rh wing....or it doesnt look like access is more restricted with those items left installed
(wiring not secured yet)
Advice? 20240322_182853.jpg
 
I elected to rig everything in my garage, then when the wings came off I pulled the pushrods out but left the bell cranks and roll servo installed. I taped a chunk of foam to the bell cranks so they wouldn't swing around and bang into the spar webs before final rigging.

When I reattached the wings in the hangar it was pretty simple to shove the pushrods in from the wingtip tip end and bolt everything up. The only drama I had was when I dropped a nut and it ricocheted into the next bay over and fell into the pitot mast. It wasn't hard to retrieve with a magnet, but it took forever to figure out where the freaking thing went.

I'm building a 7 but I don't see why it would be any different on the 14.

FYI- In your picture it looks like that spacer on your long bolt that the big pushrod attaches to might be a little bit short. You've got a lot of threads showing past the nut. Make sure when you torque it that the nut isn't bottoming out on the shoulder of the bolt past the threads, giving you a false torque reading. No big deal if it is, you can just add another washer to take up the space.

Not that it really makes a difference, but I'm surprised to see all metal lock nuts in there. Does Vans call them out for the 14 there?
 
I left out the aileron torque tubes out until I started to rig the ailerons when the airplane was in the hangar. It's easy to insert the torque tubes from the outboard ribs when you are ready to perform the rigglng of the controls. Leave the torque tubes in the wings will increase of the probability of hangar rash and other minor damages to the aluminum tubes. A ding on the thin walled tube will greatly decrease its compression strength due to buckling.
 
I elected to rig everything in my garage, then when the wings came off I pulled the pushrods out but left the bell cranks and roll servo installed. I taped a chunk of foam to the bell cranks so they wouldn't swing around and bang into the spar webs before final rigging.

When I reattached the wings in the hangar it was pretty simple to shove the pushrods in from the wingtip tip end and bolt everything up. The only drama I had was when I dropped a nut and it ricocheted into the next bay over and fell into the pitot mast. It wasn't hard to retrieve with a magnet, but it took forever to figure out where the freaking thing went.

I'm building a 7 but I don't see why it would be any different on the 14.

FYI- In your picture it looks like that spacer on your long bolt that the big pushrod attaches to might be a little bit short. You've got a lot of threads showing past the nut. Make sure when you torque it that the nut isn't bottoming out on the shoulder of the bolt past the threads, giving you a false torque reading. No big deal if it is, you can just add another washer to take up the space.

Not that it really makes a difference, but I'm surprised to see all metal lock nuts in there. Does Vans call them out for the 14 there?
Thanks for the advice. I will check all next time in shop. Extra eyes on my work is welcome to the max!
 
Thanks for the advice. I will check all next time in shop. Extra eyes on my work is welcome to the max!
Your welcome. I'm not going to take the time to look it up so take my memory for what its worth, but I want to say that the guidance for lock nuts from AC43.13 recommends no less than 1 or more than 5 threads showing past the nut. If a guy has 5 threads sticking out, it should always be at least a thought that it might be something to check.
 
I elected to rig everything in my garage, then when the wings came off I pulled the pushrods out but left the bell cranks and roll servo installed. I taped a chunk of foam to the bell cranks so they wouldn't swing around and bang into the spar webs before final rigging.

When I reattached the wings in the hangar it was pretty simple to shove the pushrods in from the wingtip tip end and bolt everything up. The only drama I had was when I dropped a nut and it ricocheted into the next bay over and fell into the pitot mast. It wasn't hard to retrieve with a magnet, but it took forever to figure out where the freaking thing went.

I'm building a 7 but I don't see why it would be any different on the 14.

FYI- In your picture it looks like that spacer on your long bolt that the big pushrod attaches to might be a little bit short. You've got a lot of threads showing past the nut. Make sure when you torque it that the nut isn't bottoming out on the shoulder of the bolt past the threads, giving you a false torque reading. No big deal if it is, you can just add another washer to take up the space.

Not that it really makes a difference, but I'm surprised to see all metal lock nuts in there. Does Vans call them out for the 14 there?
AC 43.13-1B requires a minimum of one thread and allows a maximum of 3 threads. Yes you may replace or add washers to achieve this.

25 years A&P
 
AC 43.13-1B requires a minimum of one thread and allows a maximum of 3 threads. Yes you may replace or add washers to achieve this.

25 years A&P

But, from Section 5 of the KAI,

Some of the newer RV kits use the all metal MS21042 self locking nut. The long standing rule of thumb will not work for these nuts
because they are shorter in height than the AN365 nut. For these nuts, modify the rule of thumb to “at least three, but not more
than five threads showing.” This rule of thumb will still allow for meeting the 'maximum use of three washers' rule.

Make sure you know what you're working with, I guess. ;)
 
.or it doesnt look like access is more restricted with those items left installed
I installed the torque tube, pushrod etc after skins were done. They are still installed and sitting in the wing cradles. I just stuck my arm in the access hole and through the lightning hole in rib and the torque tube will definitely impede your access for riveting. Not worth it, as others have mentioned. The one thing that I will offer, is that I never install any metal stop nuts unless they are not coming back off. I have a collection of regular nuts that I use for fit up and then remove them. If any stay in place for any length of time, I placard the location in a very obvious and secure manner.
 
Back
Top