We bought our 10 with 150 hours on it. IO-540D4A5, two bladed Hartzell HC-C2YR-1BFP/F8068D.
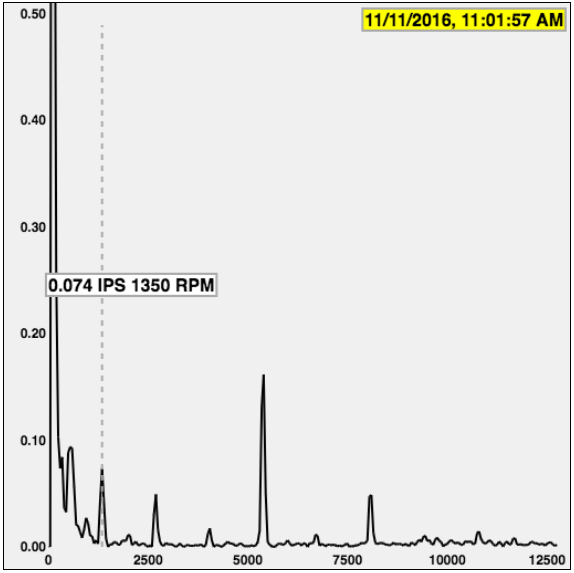
It has had that nagging slight vibration since completion.It follows the engine RPM,gets worse at lower RPM. We put an additional 350 hours on it in the last couple of years. We read all the posts, did all the usual magneto timing, chaffing inspection, prop balance twice, retorquing of everything, etc. Nothing worked.Fortunately we found Les Doud, [email protected], and he suggested reclocking of the prop.
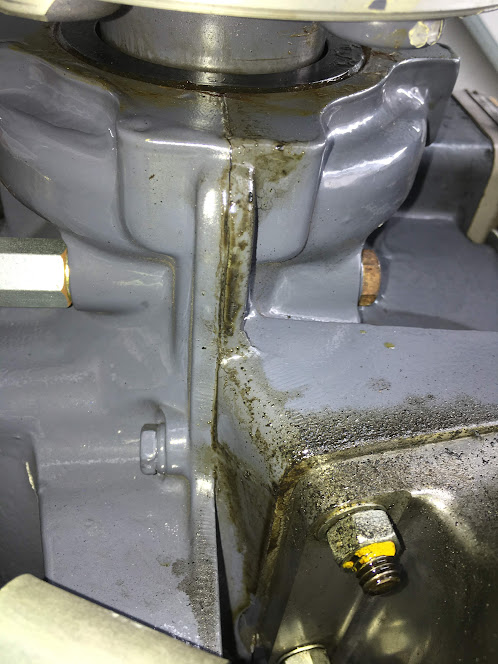
But as most of you know this engine-prop combination will not allow the prop to be moved at all (because of the physical location of the bushings-the prop will not receive them due to their differing lengths). Les sent us the Lycoming crank flange bushing guideline, with the stock location and the desired reclocked location of the bushings and their respective Lycoming part numbers. We ordered the bushings from AC Spruce, it took about a month to get them.
Now for the big news. You cannot remove and install the bushings without a special tool. We tried all the homemade remedies. There simply is not enough clearance between the backside of the crankshaft flange and the engine. I finally located the tool at Lycoming. Its a ST-115 (Special tool). They will not sale it or rent it to you but Van Bortel-Air Power will because they are an authorized Lycoming dealer. I called them, gave them the part number and it was at my place in a few days. Costs-they charged me $1354.00, but refunded it when I returned the tool. Rental cost-$100 per month plus shipping. The tool makes it a snap.We did have to use a long socket and an AN 6 bolt on one or two of the bushings to start them. Very obvious and simple. Entire project can be done in less than a day.
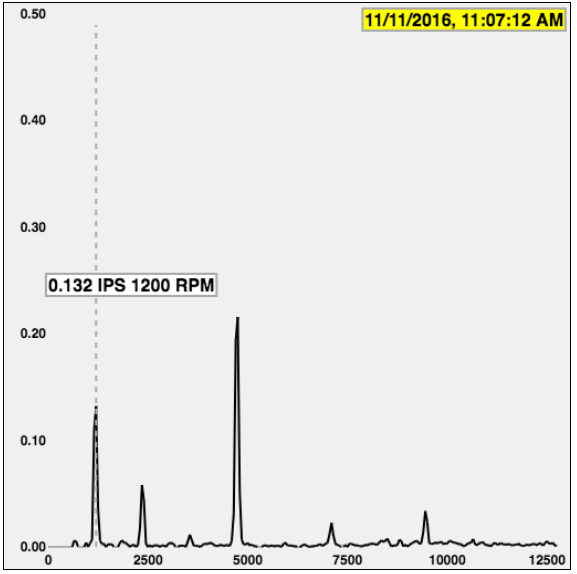
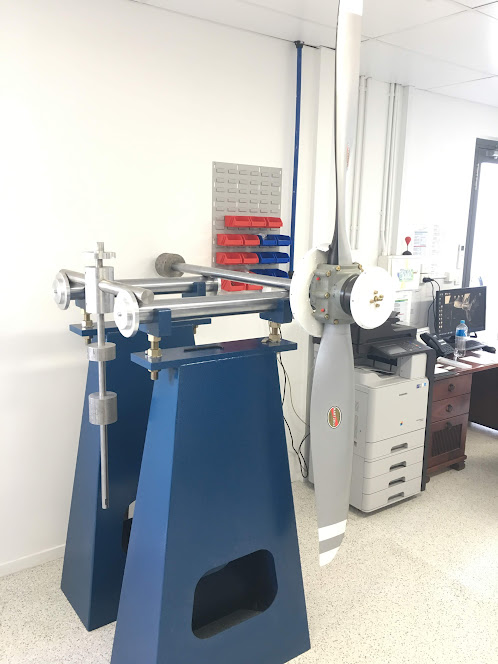
We reclocked the prop so that with #1 at TDC, the prop is horizontal. The prop only needed to be moved one hole. Previously it was at the traditional 11-5 position for hand propping.
Smooth as silk.
It has had that nagging slight vibration since completion.It follows the engine RPM,gets worse at lower RPM. We put an additional 350 hours on it in the last couple of years. We read all the posts, did all the usual magneto timing, chaffing inspection, prop balance twice, retorquing of everything, etc. Nothing worked.Fortunately we found Les Doud, [email protected], and he suggested reclocking of the prop.
But as most of you know this engine-prop combination will not allow the prop to be moved at all (because of the physical location of the bushings-the prop will not receive them due to their differing lengths). Les sent us the Lycoming crank flange bushing guideline, with the stock location and the desired reclocked location of the bushings and their respective Lycoming part numbers. We ordered the bushings from AC Spruce, it took about a month to get them.
Now for the big news. You cannot remove and install the bushings without a special tool. We tried all the homemade remedies. There simply is not enough clearance between the backside of the crankshaft flange and the engine. I finally located the tool at Lycoming. Its a ST-115 (Special tool). They will not sale it or rent it to you but Van Bortel-Air Power will because they are an authorized Lycoming dealer. I called them, gave them the part number and it was at my place in a few days. Costs-they charged me $1354.00, but refunded it when I returned the tool. Rental cost-$100 per month plus shipping. The tool makes it a snap.We did have to use a long socket and an AN 6 bolt on one or two of the bushings to start them. Very obvious and simple. Entire project can be done in less than a day.
We reclocked the prop so that with #1 at TDC, the prop is horizontal. The prop only needed to be moved one hole. Previously it was at the traditional 11-5 position for hand propping.
Smooth as silk.