
Van's Air Force
You are using an out of date browser. It may not display this or other websites correctly.
You should upgrade or use an alternative browser.
You should upgrade or use an alternative browser.
New Service Bulletin 00053
- Thread starter EchoJuliet
- Start date

greghughespdx
Well Known Member
I'll have measurements for the plywood on Saturday night, if they're still needed by then. Planning to do the SB mid-day.
SB-00053 is now backordered on the Van's website.
The parts are in stock. I believe we made 100 initial SB kits. They show “back-ordered” because we just need to build some more of the SB kits with the in-stock parts. Feel free to get the order in.
bshawco
Active Member
Empennage Finished but not attached
I've finished the empennage but don't yet have the fuselage kit, and I'm wondering about the best way to approach SB 00053. I imagine I'll want to:
1) lay the tail cone on padded blankets on the floor
2) roll the tail cone on its side to drill out the rivets for the clips
3) roll the tail cone back upright
4) crawl in to cleco the clips in place (with or without plywood?)
5) roll tail cone back on its side to rivet clips
6) roll upright, crawl back in to remove clecos
7) roll on side to rivet formerly cleco'd holes
Any thoughts / suggestions / cautions for this approach?
My concern with a teenager or anyone else with low experience in that tight space, arms extended, looking at it from an angle and trying to drill out the lower bulkhead rivets (3). What if they miss center, or are at an angle and they over drill one of the holes creating a serious repair issue.
Use some scrap aluminum and set up some practice samples for them first.
Dave
greghughespdx
Well Known Member
Plywood sizes:
Fuel tank removal is optional and will depend on the individual doing the work and in some cases will depend on the specific airplane. On the aircraft we have addressed directly, the fuel tank was not removed during installation of the SB parts. However, some of the original RV-12 aircraft may have a single-piece baggage wall, and in that case the only way to remove the baggage wall is to first remove the fuel tank. If that's the case for your airplane, then you might also want to consider installing the split baggage wall option when you put it all back together.
Also - If you want to you can, of course, cut additional plywood panels and place them in the other half/side of the tailcone. Up to you. As a general rule, it's a good idea to provide load-spreading support in those locations where your body might go, as well as protective padding for any place you might drop a tool or similar.
Hope that helps.
- 24"x10.25"
- 25"x7"
Fuel tank removal is optional and will depend on the individual doing the work and in some cases will depend on the specific airplane. On the aircraft we have addressed directly, the fuel tank was not removed during installation of the SB parts. However, some of the original RV-12 aircraft may have a single-piece baggage wall, and in that case the only way to remove the baggage wall is to first remove the fuel tank. If that's the case for your airplane, then you might also want to consider installing the split baggage wall option when you put it all back together.
Also - If you want to you can, of course, cut additional plywood panels and place them in the other half/side of the tailcone. Up to you. As a general rule, it's a good idea to provide load-spreading support in those locations where your body might go, as well as protective padding for any place you might drop a tool or similar.
Hope that helps.
bkc3921
Well Known Member
I will try something a little different
I also have tail cone complete, but not attached to fuse. (My VS is attached, but not the HS)..The cone itself in NOT very heavy. After drilling skin rivets, it is my intention to hoist the tail up vertically until about 3 feet off the ground, crawl under, stand up, and have someone carefully lower it over me like a dunce cap (Hey!..I can hear you guys laughing..cut it out!)..and do the work standing. A little tool, light, and vent planning will allow me to do the work without touching any tail cone structures. Might have to work one handed for the small bulkhead, but I think it can be done. Obviously I need a helper, and I will take strict precautions to make sure I don't "drop" the cone, or its game over. My helper can raise/lower the cone as needed with the proper "hoist"....If anyone has any other suggestions, I would be happy to hear them. Thanks.
I've finished the empennage but don't yet have the fuselage kit, and I'm wondering about the best way to approach SB 00053. I imagine I'll want to:
1) lay the tail cone on padded blankets on the floor
2) roll the tail cone on its side to drill out the rivets for the clips
3) roll the tail cone back upright
4) crawl in to cleco the clips in place (with or without plywood?)
5) roll tail cone back on its side to rivet clips
6) roll upright, crawl back in to remove clecos
7) roll on side to rivet formerly cleco'd holes
Any thoughts / suggestions / cautions for this approach?
I also have tail cone complete, but not attached to fuse. (My VS is attached, but not the HS)..The cone itself in NOT very heavy. After drilling skin rivets, it is my intention to hoist the tail up vertically until about 3 feet off the ground, crawl under, stand up, and have someone carefully lower it over me like a dunce cap (Hey!..I can hear you guys laughing..cut it out!)..and do the work standing. A little tool, light, and vent planning will allow me to do the work without touching any tail cone structures. Might have to work one handed for the small bulkhead, but I think it can be done. Obviously I need a helper, and I will take strict precautions to make sure I don't "drop" the cone, or its game over. My helper can raise/lower the cone as needed with the proper "hoist"....If anyone has any other suggestions, I would be happy to hear them. Thanks.
I also have tail cone complete, but not attached to fuse. (My VS is attached, but not the HS)..The cone itself in NOT very heavy. After drilling skin rivets, it is my intention to hoist the tail up vertically until about 3 feet off the ground, crawl under, stand up, and have someone carefully lower it over me like a dunce cap (Hey!..I can hear you guys laughing..cut it out!)..and do the work standing. A little tool, light, and vent planning will allow me to do the work without touching any tail cone structures. Might have to work one handed for the small bulkhead, but I think it can be done. Obviously I need a helper, and I will take strict precautions to make sure I don't "drop" the cone, or its game over. My helper can raise/lower the cone as needed with the proper "hoist"....If anyone has any other suggestions, I would be happy to hear them. Thanks.
If you're successful, please let us know. I am in a similar position, but haven't attached either VS or HS. I was considering the blankets on the floor approach, but I might use your approach if it works. I'm particularly interested in whether you can reach the rear most bulkhead doing this. That seems like a long overhead reach with tools that'll get heavy pretty fast.
bshawco
Active Member
After drilling skin rivets, it is my intention to hoist the tail up vertically until about 3 feet off the ground, crawl under, stand up, and have someone carefully lower it over me
I like the overhead approach but am limited by ceiling height. Also, I have the VS installed but intend to remove it for these ground antics. This is the first time I wish I hadn't already finished the tail cone.
Greg,
Why didn’t Vans incorporate some inspection holes on the fuselage? I installed several after mine was licensed, and they have made life much simpler. They are 4” in diameter and each has a doubler ring riveted around the hole with nut plates. I’ve had them for 1200 hours in the 10years since installation.
Rich
Greg,
Why didn’t Vans incorporate some inspection holes on the fuselage? I installed several after mine was licensed, and they have made life much simpler. They are 4” in diameter and each has a doubler ring riveted around the hole with nut plates. I’ve had them for 1200 hours in the 10years since installation.
Rich
They didn’t?
Attachments
fwiw, you all might want to consider some kind of inflatable something under the plywood.i have made literally 50 trips into the tailcone and i am not comfortable with the idea of the edges or corners of the plywood putting too much weight on the skin. i personally used pillows and moving pads but i was just thinking an inflatable something would work to spread out the weight of the plywood over the skin.
I’ve laid my completed (unattached) empennage on its side on a large rug. It gives great access to the bottom rivets. I plan to use cardboard, foam, pillows, or whatever, to kneel and crawl in there. Doesn’t look that bad so far. I ordered early, but the kit hasn’t shipped yet.
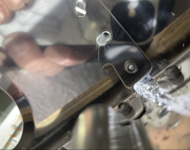
I started sb00053 and it didn't go well. Trying to drill out the 3 rivets on the aft most bulkhead inside the tailcone it is very difficult as you are on your stomach and the heads of the rivets are on the aftside making it hard to get a drill in.
I ended up with 2 oblong holes and couldn't get the drill bit on the bottom rivet.
What do I do now?
See poor quality photo.
Alan
N603NH
I ended up with 2 oblong holes and couldn't get the drill bit on the bottom rivet.
What do I do now?
See poor quality photo.
Alan
N603NH
Attachments
rtlongdon
Well Known Member
I'm curious if Vans has actually attempted this on a finished aircraft? If so, video, photos and/or tips would be helpful.
Greg, can you comment on what the team at Vans learned about the process while doing this? Any tips for removing the rivets?
Can the shop head be carefully ground or cross cut with a cut-off wheel on a Dremel (since the mfr head is on the blind side)? I haven't received my kit yet, so I'm learning and speculating from everyone here.
Last edited:
i'd be thinking about nuts and bolts now. like an3. i would enlarge the holes by hand with a file until the bolt just fit. a right angle drill is a must if you don't already have one.
of course see what vans recommends.
thanks waiting to hear. this was with an angle drill
I started sb00053 and it didn't go well. Trying to drill out the 3 rivets on the aft most bulkhead inside the tailcone it is very difficult as you are on your stomach and the heads of the rivets are on the aftside making it hard to get a drill in.
That's unfortunate - those rivet heads should be facing forward - mine were.
Alan,...the heads of the rivets are on the aft side making it hard to get a drill in.
Do you have the manufactured rivet heads on the aft sides of the bulkhead? It’s a little hard to tell from your picture. I have the shop heads on the aft side.
Thanks,
joedallas
Well Known Member
My head is spinning
My head has been spinning since I read this bulletin, trying to drill out rivets while laying on my stomach with my arm outstretched and my head tipped back to an angle to see if the drill is in center of the rivet and 90 degrees to the bulkhead.
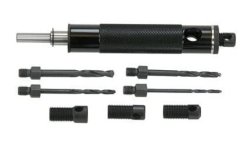
At first, I was going to use a 6” #30 drill in a 5” tube with a counterbore to the size the rivet head to center the drill on the rivet and help me to keep the drill parallel to the angle of the rivet.
Second idea, why not have one flange on the clip on the opposite side and drill new holes in the bulkhead.
I am going to wait until there is more information on this and see if there is an easier way to accomplish it.
My head has been spinning since I read this bulletin, trying to drill out rivets while laying on my stomach with my arm outstretched and my head tipped back to an angle to see if the drill is in center of the rivet and 90 degrees to the bulkhead.
At first, I was going to use a 6” #30 drill in a 5” tube with a counterbore to the size the rivet head to center the drill on the rivet and help me to keep the drill parallel to the angle of the rivet.
Second idea, why not have one flange on the clip on the opposite side and drill new holes in the bulkhead.
I am going to wait until there is more information on this and see if there is an easier way to accomplish it.
Last edited:
At first, I was going to use a 6” #30 drill in a 5” tube with a counterbore to the size the rivet head to center the drill on the rivet and help me to keep the drill parallel to the angle of the rivet.
You just described a rivet removal tool, which is the approach I plan to take using a right-angle drill. At least that’s plan A.
Attachments
I think because it was impossible to punch out the mandrels and the difficulty seeing and getting a drill in there the drill must have walked resulting in these 2 holes that I don't know how to proceed with(hopefully Vans will tell me what to do)
I'm awaiting my airworthiness inspection in a few weeks and thought I would complete this sb before the Faa came but wish I never started it
Alan
n603NH
I'm awaiting my airworthiness inspection in a few weeks and thought I would complete this sb before the Faa came but wish I never started it
Alan
n603NH
shop heads are on the forward side
Many of us have factory heads aft.
Attachments
joedallas
Well Known Member
A bad Dream
Removing rivets form the back side can be accomplished with patience’s
I would use a thin piece stainless with three holes drilled the size of the of the expanded rivet.
Clamp the stainless steel on the bulkhead with some spring clamps.
Use a dermal tool with a cutoff blade and cut off the aluminum around the steel mandril then pull it out.
Use the dermal to grind the aluminum even with the stainless steel.
Then drill out the rivet with a # 31 or 30 drill.
This will work perfect with patience’s
This will not be a pleasant task in the Tailcone.
I will be interested in vans recommendations.
Many of us have factory heads aft.
bkc3921
Well Known Member
Van's Answer
Van's Vice-President has already addressed this question, and relayed the official Van's position....It's in Post #85. You might start there.
i guess i have to ask the question...if this service bulletin is meant to make the skin stiffer, why can't an external stiffener be made to stiffen the skin? same foorprint as the s.b. on the skin, but externally.
Van's Vice-President has already addressed this question, and relayed the official Van's position....It's in Post #85. You might start there.
yes, i have read this but i was under the impression that it was in reference to the outside doubler that was recommended if the skin was cracked. i am not suggesting a ''strap''. i am asking about something rigid, like a piece of U channel of appropiate length and thickness to duplicate the rigidity of the internal gussets .
greghughespdx
Well Known Member
i guess i have to ask the question...if this service bulletin is meant to make the skin stiffer, why can't an external stiffener be made to stiffen the skin? same foorprint as the s.b. on the skin, but externally.
This SB is not actually meant to make the skin stiffer. It's primarily meant to tie together the sections of J channel inside the fuselage, to stiffen that structure and thereby prevent the transfer of undesirable loads into the skins. Hope that helps.
The external doubler is only useful if a crack has already formed, and the J channel stiffener parts are also installed. We're preventing at the cause/source here: Addressing the discontinuity in the J channel.
Tim,
The ports are very limited. I added one under each control stick, one on the right side for access to the elevator counter weight and three on the belly to facilitate inspection and elevator cable wear block replacement. I’m doing the annual now, and I hope I can use them to do this SB.
Rich
The ports are very limited. I added one under each control stick, one on the right side for access to the elevator counter weight and three on the belly to facilitate inspection and elevator cable wear block replacement. I’m doing the annual now, and I hope I can use them to do this SB.
Rich
yes, i have read this but i was under the impression that it was in reference to the outside doubler that was recommended if the skin was cracked. i am not suggesting a ''strap''. i am asking about something rigid, like a piece of U channel of appropiate length and thickness to duplicate the rigidity of the internal gussets .
You mean like this? I don't know why it wouldn't work. Installed on the rivet line transversing the "J" discontinuity at the bulkheads. No work inside the cone. You'd still have to climb in the cone to check for cracks. No one likes to have "scabs" on the plane but in this case, you wouldn't see them on the bottom of the aircraft. I agree Van's solution is more elegant, just not a very practical for installation.
Six pack of beer for the first person that post a detailed, with photos, record of installing the Van's version.
Attachments
Piper J3
Well Known Member
Six pack of beer for the first person that post a detailed, with photos, record of installing the Van's version.
Getting the [popcorn ready...
-
Attachments

Last edited:
greghughespdx
Well Known Member
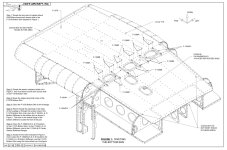
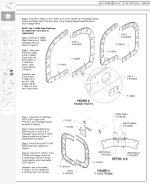
Why isn’t the location of the crack depicted in Figure 2 in the SB visible on the outside of the skin?
On the RV-12 tailcone lower skins, the centerline J-stiffener is integral to the F-01282-L skin and sits inside the F-01282-R skin. The crack initiates in the F-01282-L at a location only visible from inside the tailcone, and then propagates along the rivet row before moving off of the skin splice to a region that would be visible from the outside.
So, it is possible to have a crack initiated that is not (yet) visible from outside the aircraft.
We installed the kit in a flying plane today. My fellow 12iS owner got his SB kit before me, so his was the Guinea Pig. Here’s how it went for us…
Tail cone mechanic specifications:
Tools used inside tailcone:
Our approach used a bunch of furniture moving blankets laid across the bottom skins on both sides of the J stiffener and over the top of bulkheads, with a piece of thin plywood on top of the furniture pads.
We also made a doubler that matched the bulkhead bracket and riveted it to the aft side of the aft-most bulkhead. This was in case any of the bulkhead rivet holes got too large when they were removed. It essentially mimicked the aft bracket used for the middle and forward bulkheads.
Despite a setback from trying as hard as possible to use the WRONG bracket in the aft bulkhead, it took just over an hour to complete the installation. And it took less than an hour to remove the seats, baggage bulkhead cover and the 13 rivets from the bottom skin. So total time was less than two hours with two of us. Planning ahead helped. Note, don’t try this alone unless you love crawling in and out of the tail cone multiple times.
Surprisingly, the toughest one for us to do was the forward-most bulkhead due to the awkward angle of laying over the cross brace and fuel tank. Your whole body is prone for the other two.
Recommendation: before buttoning up the tail cone, use the approach of NASA and account for every tool that went inside. We've got an unaccounted for punch, mystery of its whereabouts yet to be discovered, but we're expecting the worst case...
Here’s a link to a file that’s got photos of the installation. It’s good the ambient temperature was in the 50s, because you work up a sweat in the cramped tail cone.
https://www.dropbox.com/s/7uhk7rzs2qw1vhh/SB-00053.pdf?dl=0
As a side note, doing the work inside the tail cone was challenging enough for a builder. Based upon our experience, attempting to do so with a non builder wouldn't be recommended without a good bit of advance training.
So, there you have it - successful installation in an already flying 12iS. And, before anyone asks, NO WE ARE NOT AVAILABLE FOR HIRE.
Tail cone mechanic specifications:
65 years old
Builder
5’-9”
180 lbs
Builder
5’-9”
180 lbs
Tools used inside tailcone:
Right-angle drill
Rivet removal tool
#30 reamer for one of the stubborn bulkhead rivet holes
Side cutters for extracting stubborn rivet tails
Rivet puller with swiveling head - standard puller may have worked
Needle-nose pliers for inserting rivets in bulkhead closest to floor skin
Cleco pliers
Clecos - extra long ones work best to clear brackets
Work light
Punch for aligning rivet holes
Vacuum for cleaning up the removed rivet debris
Our approach used a bunch of furniture moving blankets laid across the bottom skins on both sides of the J stiffener and over the top of bulkheads, with a piece of thin plywood on top of the furniture pads.
We also made a doubler that matched the bulkhead bracket and riveted it to the aft side of the aft-most bulkhead. This was in case any of the bulkhead rivet holes got too large when they were removed. It essentially mimicked the aft bracket used for the middle and forward bulkheads.
Despite a setback from trying as hard as possible to use the WRONG bracket in the aft bulkhead, it took just over an hour to complete the installation. And it took less than an hour to remove the seats, baggage bulkhead cover and the 13 rivets from the bottom skin. So total time was less than two hours with two of us. Planning ahead helped. Note, don’t try this alone unless you love crawling in and out of the tail cone multiple times.
Surprisingly, the toughest one for us to do was the forward-most bulkhead due to the awkward angle of laying over the cross brace and fuel tank. Your whole body is prone for the other two.
Recommendation: before buttoning up the tail cone, use the approach of NASA and account for every tool that went inside. We've got an unaccounted for punch, mystery of its whereabouts yet to be discovered, but we're expecting the worst case...
Here’s a link to a file that’s got photos of the installation. It’s good the ambient temperature was in the 50s, because you work up a sweat in the cramped tail cone.
https://www.dropbox.com/s/7uhk7rzs2qw1vhh/SB-00053.pdf?dl=0
As a side note, doing the work inside the tail cone was challenging enough for a builder. Based upon our experience, attempting to do so with a non builder wouldn't be recommended without a good bit of advance training.
So, there you have it - successful installation in an already flying 12iS. And, before anyone asks, NO WE ARE NOT AVAILABLE FOR HIRE.
piperpilot
Member
A huge thank you to Bob Y for taking the time to record the experience and share the details!! Way to go ") !
!
I`m waiting for my parts to arrive, hopefully by then weekend.
!I`m waiting for my parts to arrive, hopefully by then weekend.
Recommendation: before buttoning up the tail cone, use the approach of NASA and account for every tool that went inside. We've got an unaccounted for punch, mystery of its whereabouts yet to be discovered, but we're expecting the worst case...
Use the "Etch-A Sketch" reset method. i.e. Pick it up and shake the .... out of it.
The punch will show up.
I had a video that was taken 2 years, 406 hrs ago when my son was inspecting inside the tail cone. While reviewing the video today to better understand this new SB we saw something on the front side of the bulkhead closest to the baggage compartment. I sent my bore cam in from the tail cone to get a better look since I didn't want to take apart the baggage area.
Guess what I found
This crack looks today the same as it did 406 hours ago, it has not grown or propagated to the outside skin. It does not intersect the rivet holes. It looks like it started in the radius of where the J stiffener ends.

Guess what I found
This crack looks today the same as it did 406 hours ago, it has not grown or propagated to the outside skin. It does not intersect the rivet holes. It looks like it started in the radius of where the J stiffener ends.
rtlongdon
Well Known Member
Anybody near KAWO that wants to double team this...
I'm not a -12 builder (built a Pitts S1 from plans years ago), but I'm pretty handy and would be interested and willing to dive into this and trade work with someone that has experience building an RV-12 and still needs to complete this process. My plane is hangared at KAWO, but I could connect anywhere in the greater Seattle area.
PM me if this sounds interesting.
Cheers!
Last edited:
Steve, the rivets in the skin were drilled out before entering the tail cone.
Alan, all of the shop heads were facing forward. That’s how they’re oriented on mine too. And right or wrong, I have never punched a mandrel from the 100s of rivets I’ve had the pleasure of removing. After drilling the factory head flush with the mounting surface, the shop side usually falls out. If it doesn’t, and I have access to the shop-head side, I use pliers or diagonal cutters to twist the tail lose. If it doesn’t fall out and I don’t have access to the shop side, I then push it out with a small punch. Punching the mandrel out before drilling seemed too risk prone to me. Seems like it would put a lot of stress on the skins and I’ve never found it to be necessary. I’m sure there are those that will disagree with my approach, but that’s the method I’ve always used. And the fourth hole in the doubler was a “mistake hole”.
Alan, all of the shop heads were facing forward. That’s how they’re oriented on mine too. And right or wrong, I have never punched a mandrel from the 100s of rivets I’ve had the pleasure of removing. After drilling the factory head flush with the mounting surface, the shop side usually falls out. If it doesn’t, and I have access to the shop-head side, I use pliers or diagonal cutters to twist the tail lose. If it doesn’t fall out and I don’t have access to the shop side, I then push it out with a small punch. Punching the mandrel out before drilling seemed too risk prone to me. Seems like it would put a lot of stress on the skins and I’ve never found it to be necessary. I’m sure there are those that will disagree with my approach, but that’s the method I’ve always used. And the fourth hole in the doubler was a “mistake hole”.
walter, your bore cam really does a good job at this. some time when you have the borescope handy could you copy it's model # and post it ? thanks.
https://www.amazon.com/gp/product/B07MV6X4M4/ref=ppx_yo_dt_b_asin_title_o00_s00?ie=UTF8&psc=1
FYI, the shop heads on all my bulkhead rivets are facing forward, this isn't going to be fun.
