Van's Air Force

The definitive Van's Aircraft support community! Buying, building or flying an RV? Join our exclusive family of mentors and enthusiasts!

New old stock RV6 Project

TryTryAgain

Member
Hello, VAF!

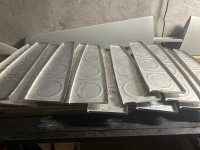
I just yesterday completed a (long!) cross country journey to deliver back home what I’ve been looking for - a RV project to keep me out of trouble this winter and beyond. Came back with a late 80s (I believe?) RV6 wing and tail kit. Kaitlyn from Vans worked really hard and found the original paperwork trail on this beast, and I’m good to go on that front. I’m setting up shop to get ready to start work, and inventorying what I have.

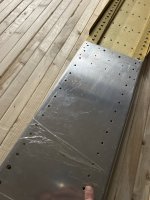
My first question to this group - the tail pieces were constructed already, but also acid etched and primed and have been sitting around like that for the past 35ish years (photo of a small RV6 VS with the tail light attached). While the original guy looks to have done a good job, I was thinking to reskin them anyway. It would allow me to go up a thickness on tail skin, and because I don’t know how that old primer would react to paint. Also gives me a chance to see what might be in there, and deal with any service bulletins. Thoughts on that line of thinking?

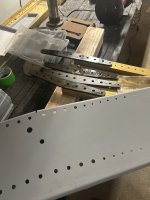
And, yes - I did my homework, and I know what I’m getting into here. Probably famous last words, but…. I’m looking forward to the, shall we say, “Old world” construction! 😏 Otherwise, the kit looks to be in pretty good shape overall, though some of the steel widgets might need to be replaced or spend a long time with a wire brush….
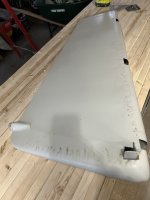
 

Attachments

  • image.jpg
    image.jpg
    1.2 MB · Views: 198
Before I rebuilt anything, I'd push forward on incomplete items like the wings, ailerons, or whatever. After building a few things, you might decide that the rudder is fine. If I was you, I'd be on the lookout for an RV-6 fuselage kit, which isn't available from the factory any longer. There should be quite a few out there on the secondary market, but ideally, you'll be able to find one close to home. The finishing kit is <mostly> the same as the RV-7 finish kit, so that shouldn't be a big concern.

Good luck and welcome to the old-school RV-6 world. It is the best flying and probably the most robust structurally of Van's side by side designs.
 
The only SB’s on the rudder can be complied with visually. Nothing inside. The HS SB’s can be complied with by inspection also. There are many RV 6’s out there with hundreds and even thousands of hours in them with no issues. They are not that hard to do if you want to do them now but I wouldn’t reskin for that. Get an inspection camera or mirror and you can see enough inside to gauge condition. You can rough up the old primer or strip it. Faster than reskinning for sure .
I agree with Kyle on all points.

Do you have the splice plates and center section? The factory predrilled these to the spar bars “in assembly”, and no two 6’s are the same.

Fun project !
 
Interesting - thanks for the advice on the tail pieces. I’ll take a closer look at them and see where they stand, and how I feel about them….

I do! The wing kit was still in the box, and it looks to be complete. The center piece has the original owners name printed on it. Holes line up!
 

Attachments

  • image.jpg
    image.jpg
    1.7 MB · Views: 155
Interesting - thanks for the advice on the tail pieces. I’ll take a closer look at them and see where they stand, and how I feel about them….

I do! The wing kit was still in the box, and it looks to be complete. The center piece has the original owners name printed on it. Holes line up!
Awesome. That’s huge. It’s a prefabbed Phlogiston as well. Save you a bunch of time. Mine came with bar stock that had to be shaped and surfaced. Set the spar rivets with a large hammer!
Pretty much everything else can be fabricated from the plans in a pinch. I’m excited for you.
You will lean heavy on VAF as the brain trust for the legacy kits is no longer at Vans. There here now ;)
 
Do you have the splice plates and center section? The factory predrilled these to the spar bars “in assembly”, and no two 6’s are the same.

Fun project !

Not necessarily. I personally discovered the splice plates to be missing on the 6A project I bought. Contacting Phlogiston I found out that after some particular unit number (etched onto the spars and center section) they started using jigs that allowed interchangability. So they were able to drill new splice plates for me... without having my spars or center section! A large bit of luck that was!

But the caution is very justified! You cannot count on some random barn find kit to have sufficiently late production parts that will be interchangable.
Unfortunately Wayne passed and Phlogiston is no more. He had the jigs and knowledge. I think I can put my hands on the jigs, but as time passes they may be lost forever.
Still, a good machinist can probably get the job done, but at a serious cost.
Appreciate your comments and knowledge. It’s all we have to keep these legacy kits relevant.
 
I believe I have found the jigs. I still need to verify them in person but I at least know where all of Phlogiston’s jigs should be. I’ll post a separate thread for archiving.
 
Hi - say TryTryAgain, there should be serial numbers engraved onto your spars/parts by Phlogiston. What is the number?

Important info for future people on this road: looking in my old email I found out directly from Phlogiston that anything done after about 1993 WAS DONE ON JIG AND SHOULD BE (LARGELY) INTERCHANGABLE. The one thing they asked me was if any of my holes were +1 or +2 oversized so they could do the same on my new splice plates. My parts were from 1996, so I was in luck. What I don't recall is how to determine the date from the Phogiston serial number. [Hopefully they did something like 96-01234 ???]

FYI - at the time Ken at Van's didn't know this, thought I was just up the **** creek.

I also (vaguely) remember that the gold anodizing started around the same time as jig drilling. But no guarantee on that....

Looks like it starts with a “PP”? Other one is the same, but end with a R for right. Doesn’t look like it starts with a date on this specimen, sorry. As I mentioned, the splice plates are labeled with the name of the original owner, which strikes me as a matched set. The timeline described to me places the kit from the late 80s, but no guarantee on that yet...
 

Attachments

  • IMG_6103.jpeg
    IMG_6103.jpeg
    2.5 MB · Views: 64
Hi - say TryTryAgain, there should be serial numbers engraved onto your spars/parts by Phlogiston. What is the number?

Important info for future people on this road: looking in my old email I found out directly from Phlogiston that anything done after about 1993 WAS DONE ON JIG AND SHOULD BE (LARGELY) INTERCHANGABLE. The one thing they asked me was if any of my holes were +1 or +2 oversized so they could do the same on my new splice plates. My parts were from 1996, so I was in luck. What I don't recall is how to determine the date from the Phogiston serial number. [Hopefully they did something like 96-01234 ???]

FYI - at the time Ken at Van's didn't know this, thought I was just up the **** creek.

I also (vaguely) remember that the gold anodizing started around the same time as jig drilling. But no guarantee on that....
That’s good info. I don’t know what Wayne may have left as far as records, if any. I’ll find out when I go over to get my eyes on the jigs. The guy who has all of that stuff doesn’t really know what is there, or what he has.
 
Understood- I’ll leave the tail sections alone for now. Still tempted to open up just the blind rivets at the closure, but that can wait for another day.

Been working on prepping the wings. New question - Even though the modern instructions don’t cover this…. I presume that I’m supposed to cut my own holes in these wing ribs? Also open for suggestions as to be best way to get good results doing that….
 

Attachments

  • IMG_6720.jpeg
    IMG_6720.jpeg
    1.8 MB · Views: 37
I had one tank rib that was actually a wing rib. You could tell because it weighed less than the other tank rib. So even though it might be marked as a tank rib you might wanna mic the thickness. To cut the holes I used to fly cutter on a drill press.
 
They all look like that, unfortunately…..
Pictured are all wing ribs. Tank ribs are all nose ribs. And if I remember correctly, tank ribs are shorter than wing ribs because of the rear baffle.
I'm talking from memory (1989/1990).
 
Also open for suggestions as to be best way to get good results doing that….
Fly cutter or circle cutter. If you don’t have experience with a fly cutter, be careful. We used to call it “the most dangerous tool in the shop”. Back and clamp your rib and make sure it’s perfectly perpendicular to the cutter. Adjust it properly, make sure you have a sharp bit.
There are several different circle cutters out there. They use a center pilot like a fly cutter but do the cutting with a die grinder and special bit.
Fly cutter- cleaner, faster.
Circle cutter - not going to send your rib flying across the shop or you to the emergency room.
 
I had one tank rib that was actually a wing rib. You could tell because it weighed less than the other tank rib. So even though it might be marked as a tank rib you might wanna mic the thickness. To cut the holes I used to fly cutter on a drill press.
IIRC - the end ribs on the tanks are thicker than the inner tank ribs.
 
Understood- I’ll leave the tail sections alone for now. Still tempted to open up just the blind rivets at the closure, but that can wait for another day.

Been working on prepping the wings. New question - Even though the modern instructions don’t cover this…. I presume that I’m supposed to cut my own holes in these wing ribs? Also open for suggestions as to be best way to get good results doing that….
Those are the old style tank ribs with the rear baffle needing closed end pull rivets. The joggle on the end of the rib is where the rear baffle flange will nest.
 
Those are the old style tank ribs with the rear baffle needing closed end pull rivets. The joggle on the end of the rib is where the rear baffle flange will nest.
My mistake, those are wing ribs with the joggle fitting on the spar flange if i remember.
 
Hello, VAF. (Slow!) Progress on the wing kits is being made! Here’s the left wing frame as I’m looking at it this evening. Yes, every lightening hole was cut out by me - circle cutter worked great!

image.jpg

But - I want to ask about fuel caps. First off - I found this in my kit that will probably be of use to someone else with old wings looking for parts…. This is the schematic of the Usher Enterprise UD3 fuel cap that was used in a few old models. Mine will need new o rings (they’re only nearly 40 years old!), but otherwise looks functional. But - I’m more than happy to hear opinions of anyone that has had to use these beasts…. Are they not worth the trouble?

image.jpg

image.jpg
 
Hello, VAF. (Slow!) Progress on the wing kits is being made! Here’s the left wing frame as I’m looking at it this evening. Yes, every lightening hole was cut out by me - circle cutter worked great!

View attachment 112203

But - I want to ask about fuel caps. First off - I found this in my kit that will probably be of use to someone else with old wings looking for parts…. This is the schematic of the Usher Enterprise UD3 fuel cap that was used in a few old models. Mine will need new o rings (they’re only nearly 40 years old!), but otherwise looks functional. But - I’m more than happy to hear opinions of anyone that has had to use these beasts…. Are they not worth the trouble?

View attachment 112204

View attachment 112205
Stock caps that work great when proper adjusted and occasionally lubricated.
Project is looking good.
 
Must be a 6 thing, but what's with the cut in the middle of the 9th rib? and the little short one next to it?
 
Must be a 6 thing, but what's with the cut in the middle of the 9th rib? and the little short one next to it?
The plans ask you to make a cut there to accommodate the aileron bellcrank. I haven’t done it yet, but angles are added to either side to of the rib to stiffen the web on either side of the cut, and the rib is braced against the next rib with two horizontal pieces. The short rib is just an extra stiffener near where the aileron control rod passes through the rear spar, as far as I can tell….
 
But - I want to ask about fuel caps. First off - I found this in my kit that will probably be of use to someone else with old wings looking for parts…. This is the schematic of the Usher Enterprise UD3 fuel cap that was used in a few old models. Mine will need new o rings (they’re only nearly 40 years old!), but otherwise looks functional. But - I’m more than happy to hear opinions of anyone that has had to use these beasts…. Are they not worth the trouble?

View attachment 112204

I've been flying those caps on my RV-6 since 1999 and they still work perfectly. There is no reason to go to a different type of cap.
 
For a bit of context, Usher is still around. They provide manufacturing services and products to the aerospace and other industries. They still have the forms for the early RV ribs, but I am not sure how much they do for Vans anymore.
 
Those caps will work fine for 40 years or more when regularly maintained, yes. There are newer cap designs that work just as well but may require a lot less maintenance due to advances in design over the last 40 years. I have the Usher caps in my -6 but would love to switch to something that didn't require that much maintenance... But a lot of the newer caps need different flanges installed in the tanks.

My recommendation: Look at what the new kits are using, and ask for feedback on those before installing the flanges for the Usher tanks.
Taking a minute to lubricate the stem once a year is a lot of maintenance? If it takes more than that, they’re not adjusted properly.
 
FYI for concerned watchers - I’ve been asked if I have all 4 spar tie plates and the fuselage piece. Yes, they’re all here, and still line up! They are all stamped with the original owners name - it’s all a matched set!
And it appears to be a Phlogiston Spar..saves you a bunch of work !
 
Taking a minute to lubricate the stem once a year is a lot of maintenance? If it takes more than that, they’re not adjusted properly.
By the time you remove, disassemble, clean, lube, reassemble, and reinstall, it's a fair bit more than a minute. But the comparison is to caps that don't require maintenance. Technology does march on, whether we like it or not.
 
By the time you remove, disassemble, clean, lube, reassemble, and reinstall, it's a fair bit more than a minute. But the comparison is to caps that don't require maintenance. Technology does march on, whether we like it or not.
Never done that. Squirt a little lubricant on the stem from the top and move on.
20 years and still working like new. Never taken them apart and don’t see why one would. These are dirt simple, effective, and flying in thousands of RV’s.
Technology advances in fuel caps? Really?
 
Never done that. Squirt a little lubricant on the stem from the top and move on.
20 years and still working like new. Never taken them apart and don’t see why one would. These are dirt simple, effective, and flying in thousands of RV’s.
Technology advances in fuel caps? Really?
I simply take the fuel cap and hold the cap sideways pushing the O-ring up against the fuel drain to wet the O-ring and lower cap in avgas. Doesn't take much. Cap closes very easily.
 
Look what has “magically” appeared in my garage (after a long round trip of approximately 2,600 miles to pick it up!).

Before someone says something - no that isn’t everything, rather a few pieces to get the idea across! I just dragged everything in, and still need to sort it all. But, I’m excited to start digging in! If I’m not mistaken, the sale came along with a few bonus mods waiting to be installed as well (I’m pretty sure one is the “almost 14” seat mod - I’ll post a photo in a bit and have one of you folks confirm that).

…. Eventually I’ll start on this. The wings will get jealous if I just abandon them.
 

Attachments

  • IMG_7160.jpeg
    IMG_7160.jpeg
    1.9 MB · Views: 31
Back
Top