Van's Air Force

The definitive Van's Aircraft support community! Buying, building or flying an RV? Join our exclusive family of mentors and enthusiasts!

My First Trailing-Edge…

etocr

Member
Sponsor
Hi Gang, First-time builder and First-time poster. So here it goes…


I’m fixin’ to close up my RV-14 rudder which leads to riveting the trailing-edge. (Yikes!)

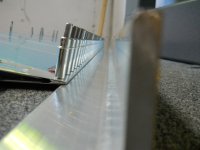
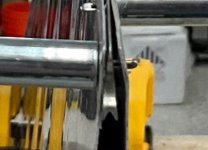
With cleco’s as fasteners, the trailing-edge is somewhat wavy. Will this straighten out during the riveting process?

Also, between some cleco’s, there is some “pillowing” or gaps between the skin and the edge. Will this also straighten out during the riveting process?

If not, I’m tempted to separate the skins from the trailing-edge and reapply the double-sided tape.

Any thought or ideas? Thanks!

Rick.IMG_0267.jpegIMG_0271.jpegIMG_0273.jpeg
 
There should be no gaps...
I would take it apart and see what is causing the parts to not fit flush.

And pay attention what the cleco is grabbing.... see pic,
 

Attachments

  • TE gap.jpg
    TE gap.jpg
    82.3 KB · Views: 94
It looks like some of your wedge counter sinks are not deep enough. Going too deep is not as bad as not deep enough as you put pro-seal on and it will fill the gap.

I like pro-seal for this job, not tape

I recommend getting a long piece of steel angle, perhaps 2"x 2". Apply a thin coat of pro-seal to the three surfaces (both skins and the wedge), hang the trialing edge over a worktable that you know is flat, clekos pointed down. Put the angle on the top skin butted up against the clekoes. I take a 25# bag of lead shot and divide it up into zip lock bags. Put the bags on the elevator as needed to hold it flat on the table. You should not use all the lead shot. Let it sit until the pro-seal is sets, Then rivet. I suggest riveting in an alternating pattern.

Go slow on the riveting. Don't beat it to death.

Carl
 
Agree this fit needs to be better before riveting. I also agree with Carl that I like the proseal method better than the tape. One more tip: we prosealed then cleco'd the assembly to a long length of heavy aluminum angle for it to cure before riveting. Great result.
 
This is the rudder, do not weigh it down, as you will put a twist in it. I did the angles and cleco/clamp method, all using tape, three rudders, all perfectly straight.
 
I’d agree you might have a countersink issue, so need to check depth, and maybe technique. These should be set at flush and seven thousands deeper, or seven notches, to accommodate the skin per section 5.
 
Remove every other or every third cleco and eyeball the empty holes. Do the holes in all three pieces line up or is there some offset in any of the three pieces......? In other words, do all of the holes line up without overlap? Also: start the Clecos in the middle and move to the top/bottom one rivet hole at a time: one up; one down; one up; one down. Maybe that will help iron things out. But, there looks like there is a deeper issue here. Do NOT start the rivets until this is figured out thinking that the rivets will fix things. 😲 If the Clecos aren't holding it right, the rivets will definitely not hold them right.
 
Last edited:
Address the pillowing first. The first picture looks like you were a little aggressive on breaking the skin on the right side of your wedge. I countersink my wedge at least 7 -9 thou deeper by setting a rivet in the hole and measuring with a digital caliper, pretty tough to get 7 exactly. Once you get it to mock up nicely I chose to use the angle with tank sealant. You can use the angle for all your trailing edges. 1000006468.jpg
 
Last edited:
It's been 8 years since I did this but yeah, the gaps need to be closed up and a 2 x 2 X 1/4 aluminum angle was helpful. Also the tapered dies from (I think) Cleaveleand were useful for the riveting. Countersinking to the correct depth should improve the fit
 

Attachments

  • DSCN0593.JPG
    DSCN0593.JPG
    294.1 KB · Views: 80
  • DSCN0602.JPG
    DSCN0602.JPG
    452.2 KB · Views: 79
  • DSCN0604.JPG
    DSCN0604.JPG
    305.9 KB · Views: 79
Last edited:
Lots of good advice here. I would ditch the tape, confirm the nesting of the dimples are correct, then use tank sealant and cleco to a piece of L channel or weight it on a flat surface for a couple days until it cures. Rivet with a squeezer and the proper tapered dies, not a rivet gun if you are a newbie.
 
From the neighbor -

Synergy Air has used structural epoxy in lieu of tape or proseal for years, along with the 2x2x1/4 aluminum angle during epoxy setup. Beautifully straight trailing edges and pretty easy to double flush rivet without any issues.

I think someone (DanH?) was performing some structural tests on trailing edge assembly methods, but I haven’t seen any results published yet. My bet is that properly applied structural epoxy is stronger by a good margin.
 
Address the pillowing first. The first picture looks like you were a little aggressive on breaking the skin on the right side of your wedge. I countersink my wedge at least 7 -9 thou deeper by setting a rivet in the hole and measuring with a digital caliper, pretty tough to get 7 exactly. Once you get it to mock up nicely I chose to use the angle with tank sealant. You can use the angle for all your trailing edges.

Is there anything I should/could do to the right-skin to "smooth" out the metal-edge?

Thx!
 
Is there anything I should/could do to the right-skin to "smooth" out the metal-edge?

Thx!
Maybe a wood block and rubber mallet, but if it was the edge roller, the skin is stretched and that can’t be undone. Maybe others have ideas.
 
I'd be surprised if this can be rectified, reversing that crease with all these dimples holes is a skill higher then my capabilities. Have you done any of the practice kits? Specifically the control surface kit.
 
Last edited:
Back
Top