What's new
Van's Air Force

Don't miss anything! Register now for full access to the definitive RV support community.

Lower cowling prevents full range of mixture arm

[email protected]

I'm New Here
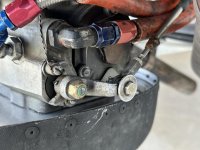
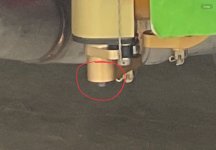
I recently purchased an RV-8. We decided to change the throttle/mixture/prop assembly because it was not doing well after a lot of years of use. We noticed that the builder made some interesting (not direct) routing from the cockpit to the servo fuel injector. We installed the new assembly and realigned the linkages. Everything works great EXCEPT until we install the lower cowl. The mixture linkage / mixture arm bolt rubs on the lower cowl. The issue is the space between the lower cowl and the bolt connecting the mixture linkage to the mixture arm which attached to the servo fuel injector. If the width of the bold and castle nut were 1/8" shorter my problem would be solved.

The only options that I see is to purchase an slightly smaller mixture arm ( the current arm is cast metal which will not bend but will break if bent), figure out how to use fewer washers on the bolt or make a opening in the lower cowl to accommodate the movement of the mixture linkage. The opening would then be covered with a fiberglass bubble and painted.

Any suggestions would be greatly appreciated.

Thanks
Alan
 

Attachments

  • IMG_1684.jpg
    IMG_1684.jpg
    334.9 KB · Views: 186
The mixture arm can be re-clocked. Try if that will solve your problem.

The big washer on the outside can be fitted with a smaller washer. In the Vans firewall forward kit, there are smaller washers that fit these smaller bearing.
 
Ok….so that big washer is in the wrong place - it should be on the opposite side of the Herm bearing, next to the castle nut. It’s there in case the Heim joint fails - then it will keep the mixture cable from falling off. That’ll buy you a little distance. Next, you could consider a an AN3 screw instead of the bolt (don’t have the regency handy) - that will be thinner than the bolt head…might buy another 1/16”.

But definitely fix the big washer location!
 
If that is a Nyloc nut on the mixture arm I would consider replacing it with a high temperature lock nut & washer. It also seems to be a thread shy.
 
I notice the scratch on the air cleaner housing. So you are probably fighting clearance issues on both sides of that lever. Can you try a bolt one size shorter, 2 thin ‘L’ washers & the provided large washer to see if that fixes the clearance issues?

I remember Vans selling a small formed piece that would notch the air cleaner housing to fix this type clearance issue also. A bit of work, but might be more desirable than glassing a bulge in the cowling.

This is what I did. Well worth the extra work. Then you can use a shorter offset arm.
 
The castellated nut and cotter pin as well as the dark ring around the bolt head indicate this is set up to allow the bolt to rotate.

The bolt should be snugged down to keep it from rotating, all motion should between the ball and housing of the Heim joint.

Metal lock nut should be used.

As already mentioned remove the large area washer, put it on the inboard side of the Heim joint.
 
If it helps, some servo’s allow for different configurations. Fuel inlet can be right or left, fuel outlet front or back, mixture arm rotation clockwise or counter. Some can be done in the field, some require rework at the factory.
I ordered my servo with reverse mixture rotation, and used the outlet on the back of the servo, not the front. Fuel inlet is opposite side from yours. I also made a semi-custom mixture control arm, and custom mixture cable bracket, although they now offer options for arms that didn’t exist at that time.

One or more of these options may make it easier, or a cleaner install.
 
Last edited:
I ran into the problem when fitting the lower cowl and the AFP mixture arm mount was hitting the cowl and had to cut a hole in the cowl to raise the cowl into position For fitting.

it turns out that a stimless wine glass with a blob of filler under the glass cloth made a perfect dome to fabricate a low profile blister. I had to ensure the bride the crystal wine glass would be returned unharmed.
 

Attachments

  • IMG_1612.jpeg
    IMG_1612.jpeg
    292.6 KB · Views: 34
  • IMG_1611.jpeg
    IMG_1611.jpeg
    3 MB · Views: 34
Last edited:
While we're all piling on, a couple of other things that look like potential problems - the firesleeve does not look sealed, which is current best practice these days. Also, the throttle cable seems be touching the firesleeve, based on the angle in the photo. I recommend spending some time on entire fuel system to make sure all is done right. If one thing is wrong, there might be other items that can be improved. Any failures here can be catastrophic.
 
Back
Top