Van's Air Force

The definitive Van's Aircraft support community! Buying, building or flying an RV? Join our exclusive family of mentors and enthusiasts!

Hose Day!!

Ironflight

VAF Moderator / Line Boy
Mentor
About a week before Airventure I sent Tom Swearengen a list of hoses I needed for the Rocket project (all except the oil cooler ones - haven’t mounted that yet, so don’t know the lengths), so I was excited when I got a box from TS Flightlines today - I guess he has gnomes building hoses while he’s enjoying cheese curds in Wisconsin! As usual, I was so excited to play with the beautiful hoses that I forgot to take a picture of them all laid out - but I did get a picture of all the end caps. It was sort of a feeding frenzy to get everything in place to see if ‘d measured correctly - and everything fit great!

Thanks (as always) to Tom and Steve for great products and incredible service. I’m convinced that if I was ever AOG someplace with a hose issue, they’d have me airborne the next day!

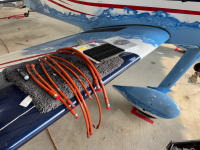
Evidence of a hose-mounting frenzy…..
IMG_7292.jpeg

Pretty hoses (ignore the firewall penetration not being hooped up - not sure al wires have been run yet…..) - nothign is secured yet of course.
IMG_7294.jpeg

Custom hoses are great, especially when you are being creative with installations. Oh - gotta goop up that hose where it goes through the intercylinder baffles - the old factory hoses have much larger fire sleeve, so the grommet is to big now!
IMG_7295.jpeg
 
I don't know which I like better, the beautiful hoses or the carefully cut blue masking tape with straight lines covering the servo. That oddly satisfies my inner aviation perfectionist. I see too many red shop rags stuffed in that hole.
 
I don't know which I like better, the beautiful hoses or the carefully cut blue masking tape with straight lines covering the servo. That oddly satisfies my inner aviation perfectionist. I see too many red shop rags stuffed in that hole.
A box of 100 single edge razor blades for less than ten bucks is one of life’s simple pleasures……😉
 
I tell everyone that I got hosed by Tom. The hoses are awesome and he made it so easy as well as I made a friend in the process.
 
Is the Cannon Plug on the EMag something new or is that what is done on the six cylinder version?

My 2021 four banger certainly does not have a Cannon Plug, it would be nice if it did.
 
Is the Cannon Plug on the EMag something new or is that what is done on the six cylinder version?

My 2021 four banger certainly does not have a Cannon Plug, it would be nice if it did.
That’s standard on the six-cylinder, but not on the four-banger units.
 
1753997256864.jpegRed cube in the heat under the engine, mounted solid to the engine, and wires not pointing up as mfgr. recommended :devilish: Tsk, tsk! Watch out for the red cube controversy police and possible s..t storm! Actually, despite the endless red cube opinions and controversies, it'll work of course, but might show some slightly bouncy fuel flow numbers due to vibration and shorter life due to heat and vibration.
 
"...Oh - gotta goop up that hose where it goes through the intercylinder baffles - the old factory hoses have much larger fire sleeve, so the grommet is too big now!"

Instead of goop I wrapped silicone tape around the hose where it passes through the grommet. A perfect color match!
 
View attachment 93855Red cube in the heat under the engine, mounted solid to the engine, and wires not pointing up as mfgr. recommended :devilish: Tsk, tsk! Watch out for the red cube controversy police and possible s..t storm! Actually, despite the endless red cube opinions and controversies, it'll work of course, but might show some slightly bouncy fuel flow numbers due to vibration and shorter life due to heat and vibration.
Yeah, know…that location and mounting system has only worked for 900 hours and thirteen years on our RV-3, 480 hours and eight years on the tundra, etc…etc…. Fuel flows smooth as glass….😉
 
View attachment 93855Red cube in the heat under the engine, mounted solid to the engine, and wires not pointing up as mfgr. recommended :devilish: Tsk, tsk! Watch out for the red cube controversy police and possible s..t storm! Actually, despite the endless red cube opinions and controversies, it'll work of course, but might show some slightly bouncy fuel flow numbers due to vibration and shorter life due to heat and vibration.
Reinhard, we helped Paul and Louise plumb the RV3 in a similar location. We also have shown that the 'wires have to be up' thing doesnt necessarily inhibit its accuracy. I'll ask you the same question I asked EI 10+ years ago----If you mount the transducer with the wires UP, is it NOT going to work if you fly inverted?---gee the wires are now down. YEARS of testing, hundreds if not thousands of flight hours and its like Timex---takes a licking and keeps on ticking. And I can assure you, Paul has not only thought all of this through very carefully, but I'll bet he has a BUNCH of acro hours in his Rv3 and RV8. Tom
 
Im glad you are satisfied with the hoses, looking forward to see what i make for you next.
Some of you met Cody at our exhibit at Airventure. He is a member of our production shop staff, and builds ALOT of hose assemblies. He and Cory do 99% of the hose assemblies, I still do a few custom creations. So---as Ive said for many years, Steve and I may be the names and faces of the company, but we are all a team. Tom
 
@Ironflight Consider using steel AN & AN-NPT fittings FWF and Firewall Penetrations.
Before this spins off into a totally different topic (which are the awesome hoses made by TS Flightlines), I’d say that a separate thread in which people debate the merits of standard aluminum AN fittings versus steel fittings would be a better place to debate that. It would be more prominent with an appropriate title that will let people know the topic of the thread!

That said, remember that this is an in-progress photo of a project that is far from complete, and some things are done just for fitting purposes…..
Roger that!
 
"...Oh - gotta goop up that hose where it goes through the intercylinder baffles - the old factory hoses have much larger fire sleeve, so the grommet is too big now!"

Instead of goop I wrapped silicone tape around the hose where it passes through the grommet. A perfect color match!
I made a silicone doughnut outa left over baffle seal and RTV’d it to the grommet on the high pressure side.
20250111_141835.jpeg20250102_185655.jpeg
 
I have been dealing with Tom for 12+ years and couldn’t be more satisfied with the products or service. The good stuff is not cheap and the cheap stuff is not even close in quality. Something to consider for critical hoses that carry flammable fluids in the engine compartment. Tom recently made a full set for my hangar partner’s RV7. Some of the new hoses now have 90° ends so I was able to do away with extra fittings and potential leak points. Big 👍’s up. No aluminum fittings FWF on my 9.

Don Broussard
RV9 Rebuild in Progress (Painting and assembling)
57 Pacer (Maybe For Sale before long?)
 

Attachments

  • IMG_0770.png
    IMG_0770.png
    6.5 MB · Views: 50
Several ways to do this. Remember the original grommet was sized for H8794 -4 hose with firesleeve---a much larger ID grommet. Technically the same OD and thickness grommet is needed, but with a .435-.440 ID. Havent found them in Red High temp.
After sleeping on this and waking up in the middle of the nite, i thought about this. On our integral hose, the OD of the hose cuff is about .660. Thats still shy of the .750 ID of the stock grommet from Lycoming (MS35489-20x), but alot closer. We might add a 3rd cuff to the flow divider hose ( if we know thats what youre using it for) so it can be positioned to take up the slack in the grommet hole. A cuff for the -6 hose is .750 OD and would work, except the ID is larger than the -4 hose OD. Alternative would be some High Temp Silicone Firesleeve Tape, at the appropriate location on the hose. The would seal off the hose from the grommet, and stop whatever possible air leaks there might be. Tom
 

Attachments

  • firesleeve tape.png
    firesleeve tape.png
    492.6 KB · Views: 7
After sleeping on this and waking up in the middle of the nite, i thought about this. On our integral hose, the OD of the hose cuff is about .660. Thats still shy of the .750 ID of the stock grommet from Lycoming (MS35489-20x), but alot closer. We might add a 3rd cuff to the flow divider hose ( if we know thats what youre using it for) so it can be positioned to take up the slack in the grommet hole. A cuff for the -6 hose is .750 OD and would work, except the ID is larger than the -4 hose OD. Alternative would be some High Temp Silicone Firesleeve Tape, at the appropriate location on the hose. The would seal off the hose from the grommet, and stop whatever possible air leaks there might be. Tom
Well, loosing sleep over solving customer issues, even small ones, is a clear sign of a strong customer centric mentality. No surprise that you receive so much praise here.
 
Hose to the servo won't work as in the photo. The cowling comes to within 1" directly below the exhaust pipe at the slip joint. If you use 4000 series camlocks on the scoop (which I highly recommend) the receptacles will interfere with the hose as routed. I would modify the hose to use a smooth 90 fitting.
 
Technically the same OD and thickness grommet is needed, but with a .435-.440 ID. Havent found them in Red High temp.

Do the options open up if you don't restrict the search to the red high-temp ones? The grommet that came with my engine isn't anything special, just a normal black rubber one.

Or - I'm sure a "reducing patch" could be riveted over the hole in the baffle, though would probably require some un-building to get it loose...
 
Or - I'm sure a "reducing patch" could be riveted over the hole in the baffle, though would probably require some un-building to get it loose...
You can usually do this with a rubber hose. Slit the hose for installatio, slid into place and use a bit of safety wire to hold in place. That should fill up the space.
 
Hose to the servo won't work as in the photo. The cowling comes to within 1" directly below the exhaust pipe at the slip joint. If you use 4000 series camlocks on the scoop (which I highly recommend) the receptacles will interfere with the hose as routed. I would modify the hose to use a smooth 90 fitting.
This was just a trial fitting to make sure lengths were appropriate and the ends fit Bob - not even close to a final configuration.
 
After sleeping on this and waking up in the middle of the nite, i thought about this. On our integral hose, the OD of the hose cuff is about .660. Thats still shy of the .750 ID of the stock grommet from Lycoming (MS35489-20x), but alot closer. We might add a 3rd cuff to the flow divider hose ( if we know thats what youre using it for) so it can be positioned to take up the slack in the grommet hole. A cuff for the -6 hose is .750 OD and would work, except the ID is larger than the -4 hose OD. Alternative would be some High Temp Silicone Firesleeve Tape, at the appropriate location on the hose. The would seal off the hose from the grommet, and stop whatever possible air leaks there might be. Tom
First off, I’ve been dealing with you and Steve for a while and the customer support you provide is awesome!
As far as this grommet goes, why don’t you throw a sheet of silicone baffle seal material on your CNC and cut out a bunch of doughnuts. Include them with the servo to spider hose, when required, and the builder can do the other 51% by RTVing it to the grommet?
 
Reinhard, we helped Paul and Louise plumb the RV3 in a similar location. We also have shown that the 'wires have to be up' thing doesnt necessarily inhibit its accuracy. I'll ask you the same question I asked EI 10+ years ago----If you mount the transducer with the wires UP, is it NOT going to work if you fly inverted?---gee the wires are now down. YEARS of testing, hundreds if not thousands of flight hours and its like Timex---takes a licking and keeps on ticking. And I can assure you, Paul has not only thought all of this through very carefully, but I'll bet he has a BUNCH of acro hours in his Rv3 and RV8. Tom
Sorry that got taken so seriously! I've been helping a friend on his RV 10 and when it was time to mount his red cube we researched on the forum for recommendations, and we've been amused by how the red cube mounting location and orientation have been one of those forum s..t storm topics, and I was just reflecting that. Mine, while not underneath, is also mounted solid to the baffles at the back of the engine and is working perfectly for many years!
 
Sorry that got taken so seriously! I've been helping a friend on his RV 10 and when it was time to mount his red cube we researched on the forum for recommendations, and we've been amused by how the red cube mounting location and orientation have been one of those forum s..t storm topics, and I was just reflecting that. Mine, while not underneath, is also mounted solid to the baffles at the back of the engine and is working perfectly for many years!
Not a problem! LOL---we fought this for years. It only took 10 years and thousands of flight hours and many of those doing aerobatics to show that the FT60 is a great unit and will operate in any attitude, as long as there is enough slack in the wiring harness, and some stability of that harness at the unit body. I dont ever recall an impeller failure of a FT60. As long as the little shutter wheel and pass by the photocell, and the electrics work, then the unit works.
 
Not a problem! LOL---we fought this for years. It only took 10 years and thousands of flight hours and many of those doing aerobatics to show that the FT60 is a great unit and will operate in any attitude, as long as there is enough slack in the wiring harness, and some stability of that harness at the unit body. I dont ever recall an impeller failure of a FT60. As long as the little shutter wheel and pass by the photocell, and the electrics work, then the unit works.
i vaguely remember dans pics of cutting one apart several years ago. i recall there being a bypass channel on the top side (where wire exits) that goes around the wheel. I suspect the recommendation is for effectively utilizing that channel ( air bubbles would rise). Though don't recall anyone being able to figure out its purpose. Probably for outlier situations and why iot doesn't seem to affect most folks.

I could be wrong on that recollection though.
 
View attachment 93855Red cube in the heat under the engine, mounted solid to the engine, and wires not pointing up as mfgr. recommended :devilish: Tsk, tsk! Watch out for the red cube controversy police and possible s..t storm! Actually, despite the endless red cube opinions and controversies, it'll work of course, but might show some slightly bouncy fuel flow numbers due to vibration and shorter life due to heat and vibration.
I think that red cube location would interfere with my Sky-Tek NL starter? If not, I'll put it there on my next one.
 
I think that red cube location would interfere with my Sky-Tek NL starter? If not, I'll put it there on my next one.
Hey Steve - fits fine on O-320 with the NL - you might have to offset it from center a bit…or not… doesn’t have to be symmetrical!
 
Back
Top