What's new
Van's Air Force

Don't miss anything! Register now for full access to the definitive RV support community.

Hangar rash

Manchu16

Active Member
Stupid mistake, but it happened. Scraped the wing tip on a chain link pole by the fuel pump. Not the builder, so apologize for the questions.

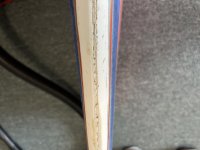
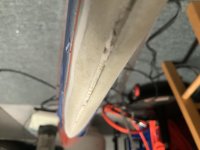
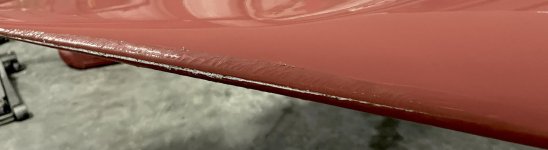
The edge does not appear to be split, but there in a nice gouge where it ran along the pipe. It appears that the damage is mainly in filler right now, but hard to tell without sanding it out. The damage is roughly 20” from tip to the start.

I am going to feather in to the glass where the paint wrinkles are on the top and bottom. I was going to run a ~1” band and then a ~2” band using 4oz tape. Depending on the profile I may also use a 1/2” band to start. The glass will be centered along the tip edge. As it gets closer to the tip, I am just going feather out the 2” and just use a single 1” band. Going to use west systems epoxy and will try to use peal ply to weigh it down if I can get the shape to hold.

Will sand and then will mix up a slurry of micro to finalize the shape. As I get to the last 6” near the tip not sure I really can do anything with glass and will just use the micro to shape it. I am planning on making a few templates to make sure that I keep the profile as true to the original tip as possible.

I have some experience repairing glass on boats, but none on aircraft. Please poke holes in my approach.
 

Attachments

  • IMG_4507.jpg
    IMG_4507.jpg
    89.2 KB · Views: 392
Last edited:
Fiberglass guru's will be along anon, but my $.02 is: sand away the damaged paint area, fill the deepest part of the gouge with flox and sand that down, then follow with a slurry coat of micro, sand that down to final profile, fillet the edge of the micro if needed with a smidge of glazing putty compatible with your paint system, wet sand everything to 400 grit, shoot primer and then color. Done.

This and the trailing edge of the wing tips are high-wear areas for hangar rash, and you will likely be repairing the same area again at some later time unless you and everyone walking by are obsessively careful and you are blessed with a spacious hangar not shared with others. I would personally not bother with adding layers of glass here, based on your photo.
 
Are your wing tips removable? That damage looks like it may need to be repaired from the inside and it would be helpful if it could be inspected on that side.
 
Are your wing tips removable? That damage looks like it may need to be repaired from the inside and it would be helpful if it could be inspected on that side.

Plus 1, agree with Paul

Yup - that white area is likely just the gelcoat used to glue the tip halves together. It is brittle, but that stripe is suspiciously right along the parting line. It may be nothing, but it would be reasonable to remove the tip and inspect the interior.
 
Repair

I recommend removing the tip first.
Stand it on edge and apply a bead of flox along the inside edge. That will hold the tip just in case you sand through.
Then move to the outside. I prefer a scarf with flox followed by layers. The flox can be shaped under the fabric with a credit card. End result is pretty stong and sandable because the flox is encapsulated. I save micro for cosmetic filling.
 
Update

I believe tips are removable. No paint on the screws so I am hopeful. I am going to tackle this after osh. My plan was to remove them and work it at home if I can.

Never used flox, so I will have to do some reading this week.

Bill, I think you are on point with the white being gelcoat. I thought the wing tip was one solid piece, hence my comment about filler being used. Being split, gelcoat would make sense.

Is there any value in running a strip of cloth on the outside or will the flox provide a stabilizing bond?
 
Just looking at the picture, it is hard to tell if there is any separation between the top and bottom of the wingtip at the seam. My guess is “no”, in which case, sand away paint for a little ways, fill with micro, sand smooth, and proceed to finish/repaint. If there is a split, I’d fix that with cloth from inside, then do the same thing outside as I outlined above - if you put cloth on the outside, you’re going to be in for a pretty big refinishing job to make it look good.

Take off the wingtip and look from inside as you try to punch the top and bottom apart - if you see daylight, it is split. Lay in a layer or two of cloth to re-join the top and bottom, then do the external refinishing.

This one isn’t rocket science - its mostly art.
 
A strip of cloth on the outside will be much more difficult to fair off and will probably change the shape a little. The wingtip was probably made in two pieces and bonded with strips of cloth from the inside. I would add a couple strips inside for the extra strength due to the damage I see on the outside. Pictures can be deceiving. Best to get some pictures of the inside before giving a good recommendation on repairs. Bonding strips could be like new for all we know at this point , and all the damage might be on the outside layers (if you’re lucky ).
 
If there is ANY question about it being split, use some of the good Gorilla tape over the joint. It will probably be fine but with all the other crapola you have to deal with going into OSH you don’t need to look out and see the wingtip flapping.

That is what I would do with only what I can see in the picture. You can flex it and get a better understanding of how solid it is and make a better assessment than a 250 hour one time builder looking at a picture on the internet!

Wish I was going to OSH. Have fun on the trip.
 
Agree with Paul it is unlikely to be split and with internal overlay. If it is split do wedge it open and get some epoxy in the crack to firm it up also.

If you want to sand internally, you will need to glue some sand paper on something to get into the narrowing space within. I heated and bent the end of PVC then wrapped with sandpaper - -but still too large for the tip.

I am of the belief that simply filling with epoxy will be sufficient in that area if it can not be backed up with a reinforcement layer inside. It will serve to keep the paint from cracking in the future as that corner is quite stiff structurally and epoxy just keeps the parts together.

Lets hope it is just a scrape.
 
Update 1

Good news wingtip was easily removed and no direct light showing through. I am laying one strip of glass on the inside just so I sleep better at night, but it looks pretty solid.

There is some loose gelcoat in the parting area on the outside. I am going to remove the real loose pieces before continuing, but not planning on gouging out everything in the gap. The gap is about 1/8" across at its widest. Is it worth running a bead of epoxy down to stabilize the loose pieces or will the micro be sufficient?

Thanks in advance.
 

Attachments

  • IMG_4728.jpg
    IMG_4728.jpg
    200.3 KB · Views: 100
Last edited:
Update 2

Here is a picture after the loose gelcoat was removed.

It does not appear that the top and bottom half skins were previously connected. There is a 1/8” to 1/16” strip of gel coat across the entire seam. The interior fiberglass is solid and not cracked.

The gelcoat void cross section is approximately 3/16” x 3/16” at its largest.

I am still doing a bit more research, but I think I am going to do this in two steps.

Make a micro mixture the consistency of lose ketchup and let that flow into the voids where the gelcoat was. Let that tack for 10 mins or so.

Follow up micro mixture the consistency of peanut butter to fill the remaining gaps and provide the sanding coat.

I am working off of the Gelcoat provides no structural stability, mainly filler. This was holding together perfectly fine with just gelcoat. If I were to add flox in the first step, it would not flow into the voids as easily. Adding flox to the second layer will not provide any significant stability due to the thin layer required.

If I am wrong in that approach, please call it out. This is definitely not like the boat repairs I have done previously.
 

Attachments

  • IMG_0787.jpg
    IMG_0787.jpg
    201.4 KB · Views: 109
Split

Correct. Gel coat is not structural. Just a surface finish.
I'm with Dan. Hate the stuff.
Nothing wrong with your solution

Personally, since you've sanded the area...
I would apply flox in the gap then a layer of fiberglass. Squeegee the flox into place under the fiberglass with a spreader to shape the tip. Once it cures, feather sand the glass then apply the micro. Cure. Block sand to shape and finish.
The flox/fiberglass will be a pretty strong repair.
 
Last edited:
Back
Top