What's new
Van's Air Force

Don't miss anything! Register now for full access to the definitive RV support community.

Forward fuselage skin

charlesmc

Member
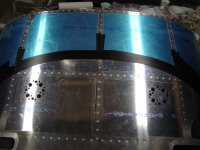
I went ahead, blindly followed the plans, and riveted on the top forward fuselage skin to the underlying ribs. It is not attached to the fuselage and is currently sitting off the aircraft.

In researching wiring, I found that it is extremely popular to NOT rivet the skin on for ease of wiring.

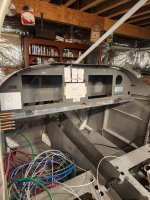
How tough is it going to be to install avionics / forward wiring with the skin in place?

I was thinking of creating a wood frame that would pop the forward fuselage top up at an angle to make it a little easier to work on. Would need some service loops for the wiring and would try to keep those as short as possible.

I also see people turn the assembly upside down and install avionics on the bench.

Should I bite the bullet and drill out the rivets and then rivet the skin back on later? Or just buy all new parts and assemble in stages?

-Charles
 
In my case I don't think it would have been possible to do the panel/forward fuselage wiring with the top forward fuselage skin in place, even if the sides were not yet riveted to the fuselage sides. I had my panel built, prewired and tested professionally with plug and play CPC connectors to connect to the rest of the airplane. But even so, there were voltage regulators, panel dimmer, pitot/static lines,and of course lots of cable clamps to attach the wiring to the structure. And lots and lots of wiring.

If I were you, I would carefully drill out the top forward fuselage skin rivets out and inspect. You'll probably be able to re-use it. Remember the tank sealant between the firewall and the top skin when reassembling. Vans has a few years ago offered a forward fuselage inspection panel kit which I highly recommend. It provides access just behind the firewall for wiring/component access after the airplane is finished.
 
I wired most all my avionics with the top skin riveted to the ribs. I had it upside down in my office. Just installed it on the plane after doing all I could do in my office.
 
Should I bite the bullet and drill out the rivets and then rivet the skin back on later? Or just buy all new parts and assemble in stages?

-Charles
The short answer is no.

It is very advantageous to build and rivet the forward fuselage skin together, but hold of riveting it to the fuselage. This way you can fit the fuselage top. I suggest that once the fuselage top is fitted:
- Do a fit up of the windshield. Once done mark windshield arc on the fuselage top. Take the windsield and fuslelage top off.
- On the fuselage top you now know where to paint the glare shield flat black.
- On the fuselage top you can now figure out where to mount your defog fans. Attached photo is example.
- With the fuselage top and the cabin top off, this is a perfect time to final paint the interior. Paint the inside of the cabin top off the airplane.
- Run all your wires that go through the firewall before you rivet the fuselage top on for the last time.

The second photo is a fit up of the panel (this is a left over from my first RV-10 build - good enough to figure out placement and such). The biggest decision to make is where and how big to make access holes on the bulkhead just aft of the firewall while you have to forward fuselage off. I suggest:
- Never mount anything between this bulkhead and the firewall. There is no need and future access involves a lot of time on your back with your head under the panel.
- Assuming you are using something like a GTN-650 you will need to make a hole in this bulkhead for it to fit. The hardest part here is to figure out the GTN-650 placement so it does not hit the fuselage top skin center rib.
- If you use a GPS-175 you need not make this clearance hole as it is not at all deep.
- I suggest making a smaller access hole on each side for your hand to reach in if needed. For me this was only needed to access the ground “forest of tabs” mounted on the cabin side of the firewall.
- The panel is assembled on the bench.
- Remote components mounted on the bulkhead forward of the panel include Comm #2, XPDR, ARINC, alternator voltage regulator and EMS module.
- The panel is fully removable to provide access to all that stuff and to facilitate maintenance and modification.

The rule is never on your back with your head under the panel.

Carl
 

Attachments

  • DSC00861.jpeg
    DSC00861.jpeg
    2.6 MB · Views: 46
  • 20240412_174604.jpeg
    20240412_174604.jpeg
    2 MB · Views: 46
Back
Top