Van's Air Force

The definitive Van's Aircraft support community! Buying, building or flying an RV? Join our exclusive family of mentors and enthusiasts!

EZ-CLAMP Production ...

HFS

Well Known Member
Sponsor
Advertiser
If anybody out there has interest on producing these tools on a larger, more cost efficient basis, you are more than welcome to do so.

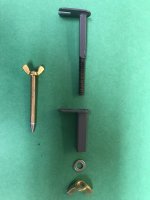
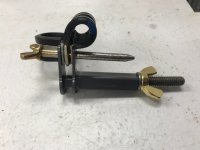
I'll be glad to send you engineered drawings for the slotted "tangs" and simple dimensional drwgs. for the other parts. There is a lot of hand work involved, the way I make them and some fairly sensitive thin wall TIG welding at assembly. Hard to imagine, but I have 5 separate "fixtures" + a small DIY welding positioner to make them.

I don't want to take them "offshore" for a lot of reasons, where they might be made for pennies, but not meet the quality or use standards that customers deserve, not to mention a minimum order quantity of 10K ...

So, if anyone has a way to make a better "mousetrap" just get in touch with me.

HFS
 

Attachments

  • EZ-CLAMP Blow Up.jpg
    EZ-CLAMP Blow Up.jpg
    2.5 MB · Views: 192
You could 3d print them from 316L stainless for $69/each set in quantities of one each. I'm guessing you have far more cost than that in labor with your welded ones.
You'd probably need to chase the threads with a die, but that's not a big deal.

1746632269074.png

I did a quick eyeball reverse engineer of your parts to get this quote, so obviously it'll need a little fine-tuning based on your actual dimensions.

1746632421517.png
 
You could 3d print them from 316L stainless for $69/each set in quantities of one each. I'm guessing you have far more cost than that in labor with your welded ones.
You'd probably need to chase the threads with a die, but that's not a big deal.

View attachment 87091

I did a quick eyeball reverse engineer of your parts to get this quote, so obviously it'll need a little fine-tuning based on your actual dimensions.

View attachment 87092
I really don't think the price point for something as simple as this can be that high. But if anyone wants to try ...

HFS
 
I'm not an engineer and not going into business.

What the flip is this, how does it work? I can't picture it and can't find it on first search page.
 
It's pretty simple. I can do it one handed now. Slip the drift pin through the clamps. Assemble the EZ-Clamp loose. Slip it over the clamps and tighten the wing nut. The two ears hold the clamps. Slip out the drift pin. Install a bolt, washer and nut. Remove the EZ-Clamp.

I have an idea. Instead of welding the ears, you could use threaded parts. It wouldn't need to be box shaped. Cheaper to fabricate.
 
just use a loop of safety wire problem solved
I use zip ties to the same end but still ... it's well known around adel clamp time that I spent a good bit of my life in the Navy learning the finer points of profanity
 
More information. Use the awl to align the holes in the Adel clamp, grip to close the clamp, Drop a loop of safety wire around the tangs and give it a few twists
I've seen lacing tape used with the same technique, have not tried it but plan to. Will not scratch the cad plating which is a plus.
 
I'm not an engineer and not going into business.

What the flip is this, how does it work? I can't picture it and can't find it on first search page.
 

Attachments

  • EZ-CLAMP Blow Up.jpg
    EZ-CLAMP Blow Up.jpg
    2.5 MB · Views: 111
  • EZ-CLAMP Gen 3.jpg
    EZ-CLAMP Gen 3.jpg
    1.6 MB · Views: 115
Sorry, I must be really thick, but that looks like one can simply pull out the unthreaded wing nut metal and then the adel clamp is loose.

Maybe I need to get Dzhanibekov to explain it to me...

 
Sorry, I must be really thick, but that looks like one can simply pull out the unthreaded wing nut metal and then the adel clamp is loose.

Maybe I need to get Dzhanibekov to explain it to me...


The other wingnut is on a threaded rod that keeps the assembly together. The unthreaded one is just an alignment tool.
 
So what keeps the adel clamp in the alignment tool?
You put the adel clamp where you want it. Insert the alignment tool through both holes of the clamp.
Then you use the threaded rod "clamp" with the wingnut to tighten the whole thing up.
Then pull out the alignment tool from the holes. Insert a bolt into the hole, washer(s), nut and tighten it a few turns.
Remove the clamp and the adel clamp is now held in place by the bolt and nut. Tighten it up.
 
  • Like
Reactions: RNB
You put the adel clamp where you want it. Insert the alignment tool through both holes of the clamp.
Then you use the threaded rod "clamp" with the wingnut to tighten the whole thing up.
Then pull out the alignment tool from the holes. Insert a bolt into the hole, washer(s), nut and tighten it a few turns.
Remove the clamp and the adel clamp is now held in place by the bolt and nut. Tighten it up.
OK, I get that part, but then what keeps it in place? Because the other threaded rod seems to not hold onto anything.

Where and why is this needed?
 
OK, I get that part, but then what keeps it in place? Because the other threaded rod seems to not hold onto anything.

Where and why is this needed?
The 2 grey pieces slide together. The wingnut tightens the the whole thing down and holds the legs of the adel clamp tight together so it doesn't move.
It's just a smaller more compact version of this tool.
12-02017.jpg
 
The 2 grey pieces slide together. The wingnut tightens the the whole thing down and holds the legs of the adel clamp tight together so it doesn't move.
It's just a smaller more compact version of this tool.
View attachment 87127

Thanks, I was thinking of it as a thing that stayed in place, not as a tool. It helps to clamp, is not a clamp.
 
If it solves Adel clamp woes I'd pay immediately, there's a lot of cussing involved with those things in tight areas ...
This. 👆

Some of my adel installations required a lot of force to clamp. I'm not a materials guy, would 316L stainless steel be strong enough?

Dave
 
Last edited:
I did this just to goof around. It can be done in an average shop. It's 1/4" black pipe from Amazon, 5/16 carriage bolt and some misc hardware from Ace. The index is a 3/32" rolled pin from Ace. I had the cold rolled steel plate. It was an excuse to buy some taps and dies. Minus the taps and dies, it probably cost about $5.
Took a couple hours. Most of that was grinding the ears.
I have one of David's and it's far superior so I'll save this one for when it breaks.
I have lots of the pipe if anyone wants to try making one. No interest in fabricating, sorry.
20250514_154315.jpg
 
Back
Top