What's new
Van's Air Force

Don't miss anything! Register now for full access to the definitive RV support community.

Elevator trim cable attach bracket

Megan995

I'm New Here
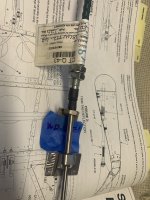
I decided to order the machined aluminum elevator trim attach bracket from iflyrv-10. I noticed the hole size was different then the welded one that comes on the kit. The plans say this attaches to the CT-Q-43 cable. But that’s actually a much larger bolt and neither bracket fits on that cable. In the second picture, that’s as far as I can get the brackets to slide over the cable.

What am I missing here?
 

Attachments

  • IMG_2055.jpeg
    IMG_2055.jpeg
    1.3 MB · Views: 102
  • IMG_2054.jpeg
    IMG_2054.jpeg
    1.6 MB · Views: 104
Whew! I already riveted mine and was worried I’d have to remove them to re-tap the threads.

Thanks for the update!
By the way, is there any reason not to use AN470-AD4 driven rivets? This part is critical for flight. I think they will hold more reliably through the thick billet anluminum and they only show a very little. Maybe 0.01 kn parasitic drag and a touch of flow separation right in front of the trim tabs.

I could always dimple and countersink for 426…
You may find that drilling and tapping the billet bracket for 6-32 screws is a better plan; much easier to adjust than trying to turn the whole access panel.
 
You may find that drilling and tapping the billet bracket for 6-32 screws is a better plan; much easier to adjust than trying to turn the whole access panel.
I was just about to go browse around the forums to see what people were doing as far as that goes. Perfect timing! As far as keeping them from coming out when you don’t want them to, did you use some light duty loctite or something else? Just thinking about how nutplates are pinched to prevent screws from coming out.. I won’t have that just tapping the billet.
 
I was just about to go browse around the forums to see what people were doing as far as that goes. Perfect timing! As far as keeping them from coming out when you don’t want them to, did you use some light duty loctite or something else? Just thinking about how nutplates are pinched to prevent screws from coming out.. I won’t have that just tapping the billet.
If you have countersunk access plates then there’s not much meat left to thread.
I used 6-32 PEM nuts pressed into the bases. Making them removable greatly assists with rigging and adjustment.
In an ideal world the bases would be big enough to rivet one legged nut plates into each corner. I’d prefer that to the PEM nuts as they have a locking feature and you’re not at risk of weakening the bases.

1711331285822.jpeg
 
Last edited:
If you have countersunk access plates then there’s not much meat left to thread.
I used 6-32 PEM nuts pressed into the bases. Making them removable greatly assists with rigging and adjustment.
In an ideal world the bases would be big enough to rivet one legged nut plates into each corner. I’d prefer that to the PEM nuts as they have a locking feature and you’re not at risk of weakening the bases.

View attachment 59206
That is exactly what I did…pem nuts.

I think that if you tapped the bracket, a drop of blue loctite would prevent the screws from loosening, as well.
 
On SuzieQ, an RV-4 but still relevant: After the SB came out about the original steel fitting nut breaking off and there being a better one available with both sides of the nut welded, I ordered one and set to install it. On the -4 there is no room to buck driven rivets. The plans call for pulled rivets. After 1200 hours of the abuse that area takes, there was NO evidence of any movement, rivets or bracket being loose or any other problem....until I got the old fitting out. It was, indeed, only welded on one side of the nut and easily snapped off with just gentle pressure! :oops: SO: it was only a matter of time before I snapped off itself.😬

Whatever this fitting is attached with, most of the forces on it will be shear force along the vector of the cable housing that screws into it. Even with the movement of the elevator itself, the force is still linear in the direction of the housing. Inspection of the exit hole in my horizontal shows no evidence of cable housing movement.

That said, the aluminum milled brackets are pretty cool-looking! Especially anodized!
 
If you have countersunk access plates then there’s not much meat left to thread.
I used 6-32 PEM nuts pressed into the bases. Making them removable greatly assists with rigging and adjustment.
In an ideal world the bases would be big enough to rivet one legged nut plates into each corner. I’d prefer that to the PEM nuts as they have a locking feature and you’re not at risk of weakening the bases.

View attachment 59206
So the predrilled holes in the billet are 1/8”, preventing just tapping the billet to 6/32 as the hole is already too big. I could drill it out to 8-32 if necessary, but hoping to keep the head of the screw small, 1/8” is tap size for an M4. So for now I have them tapped for M4. Problem is I don’t know where I can get metric aviation screws.
Ideally I want these screws to sit flush but as you said that wouldn’t give a lot of room for thread engagement. Then today I thought about riveting a doubler to the cover plate which would allow me to countersink the cover plate, and give me flush screws without compromising thread engagement in the billet. Two issues to solve if I go that route though, where can I get metric stainless screws with the 100 degree countersink and the second issue being, is a doubler, which will cause the billet to sit up a bit higher, cause any issues related to clearance or operation with the cable?

Where did you get the billet anodized at?
 
If you were going the route of screws I would opt for a pan head screw and would not counter sink anything. You really don't see them once installed and you certainly don't see them from inside the plane :cool:.

A better option would be to use the very inexpensive stock stainless brackets and pull rivets per the plans and be done w/it. It's easy peasy to just drill out the pull rivets the once or twice in the life of the plane you ever need to remove the elevators. Carefully drilling out the pull rivets does no damage for re-install. Cleco them in place while adjusting during rigging and then install the pull rivets when satisfied with setting the trim tab travel limits.
I have to chuckle at "the better option"...

I used truss head screws on my billet brackets.
 
Back
Top