I'm thinking of replacing my Odyssey 680 battery with an EarthX Li-ion one. Two are listed on my supplier's website: the ETX680 and ETX680C. From what I can see the only difference is in dimension. It'll be going in my RV-7. Anyone using an EarthX battery and if so, which one? Many thanks from a grey and wet UK.

Van's Air Force
You are using an out of date browser. It may not display this or other websites correctly.
You should upgrade or use an alternative browser.
You should upgrade or use an alternative browser.
EarthX battery
- Thread starter Coling955
- Start date

Earthx
I have dual etx900 batteries in my -10.
I am very happy with them…
I have dual etx900 batteries in my -10.
I am very happy with them…
Tankerpilot75
Well Known Member
You might want to consider the ETX 900 battery. More cranking power. Same size.
RVbySDI
Well Known Member
For clarifications sake, the EarthX batteries are NOT Li-ion chemistry. Rather, they are LiFE PO4 (Li - Lithium; FE - Iron; PO43- - Phosphate).I'm thinking of replacing my Odyssey 680 battery with an EarthX Li-ion one. . .
To all the chemists out there, my apologies for the non-subscript and superscript. Unable to get them to display appropriately.
earthx battery
I installed a etx680 in my rv4 over a year ago and it's been great. The C stands for compact and is slightly smaller but the amp/hr rating is the same. I was worried about ever having the charge it, other than flying, and recently bought a special charger. Be care full about what charger you use. You should also have some kind of over-voltage protection in case your regulator runs amok but there is a warning light that warns of problems. Your first impression when you pick one up is that they forgot to put the battery in the case - it is that light. It really cranks my high compression O320.
Chuck
One other consideration, slightly buried in their documentation:
You want to get the right battery for your alternator.
If your alternator is rated for 60 amps (as is for most of the 2-seat RVs), you NEED at least the ETX680 family. The ETX900 will do but may take longer to recharge.
If you have a 70 amp alternator, the ETX680 is too small: You'll need to bump up to the ETX900.
Tankerpilot75
Well Known Member
You want to get the right battery for your alternator.
If your alternator is rated for 60 amps (as is for most of the 2-seat RVs), you NEED at least the ETX680 family. The ETX900 will do but may take longer to recharge.
.
Sid,
My 60 amp alternator usually fully recharges my ETX900 after starting within a few minutes (based on observed amperage drop).
smithflys23
Well Known Member
What size wire is needed for the fault monitoring?
Ill be connecting it to a Skyview HDX.
Ill be connecting it to a Skyview HDX.
Sid,
My 60 amp alternator usually fully recharges my ETX900 after starting within a few minutes (based on observed amperage drop).
Roger that, Jim, that's not a problem. I meant two things:
- It'll take a little longer to recharge the 900 with a 60 amp alternator, but I should have pointed out it takes only a minute or two longer. This is my setup, but the way.
- EarthX is pretty adamant about using a battery properly rated for the alternator. A 680 is too small for a 70 amp alternator.
Sorry for not being more clear.
I have an ETX900 on KELLI GIRL...WOW what quick starts.
What size wire is needed for the fault monitoring?
Ill be connecting it to a Skyview HDX.
Earthx says anything bigger than a AWG#20 will work. Not a lot of current there, just enough to light a LED on the panel or tickle your EFIS.

smithflys23
Well Known Member
Earthx says anything bigger than a AWG#20 will work. Not a lot of current there, just enough to light a LED on the panel or tickle your EFIS.
View attachment 19234
Thank you!
The internals of the 680 and 680C are the same. The 680's case is a little larger so that it would be drop in replacement for the Odyssey 680 battery box. I installed dual 680Cs to take advantage of the smaller box. They turn over my 360 very well.
I have a 60 amp alternator on one of the batteries and a 30 amp on the other. It will take about 5 mins for the 30 amp alternator to charge the battery if I have had the avionics on doing updates, troubleshooting, etc. If not, I do not even notice a significant current draw, even after starting the engine.
I have a 60 amp alternator on one of the batteries and a 30 amp on the other. It will take about 5 mins for the 30 amp alternator to charge the battery if I have had the avionics on doing updates, troubleshooting, etc. If not, I do not even notice a significant current draw, even after starting the engine.
smithflys23
Well Known Member
What is the consensus on using the vented, or standard EarthX battery on an RV8 with the rear mounted battery?
David Paule
Well Known Member
I think that it's a good idea to seal and vent any lithium battery whose fumes can get into the cockpit if it had a problem. I'm planning to put the 680C I'll be getting into the cowl cheek of my RV-3B project. I would not put a lithium battery on the engine side of the firewall.
I checked with EarthX back when I was planning a cockpit mount, and was given a max temperature for a runaway battery. Aluminum is sufficient for the case. You might check for yourself if that's a concern.
Dave
I checked with EarthX back when I was planning a cockpit mount, and was given a max temperature for a runaway battery. Aluminum is sufficient for the case. You might check for yourself if that's a concern.
Dave
What is the consensus on using the vented, or standard EarthX battery on an RV8 with the rear mounted battery?
Depends entirely on your level of risk aversion. Thermal runaway can occur with a lithium battery if they are overcharged - so if you are absolutely 100% certain that you will notice and stop an overcharge event if your alternator regulator goes Tango Uniform, then you may choose to do without the vent.
I have a full glass panel with no less than 4 individual devices that will alarm on high or low voltage - so I'm relatively sure I'll notice it and correct it - and I still put my ETX900 (behind the baggage compartment) in a sealed case and vented it through the belly. YMMV.
I've been wondering how people vent these. Can you describe it? Pictures?I still put my ETX900 (behind the baggage compartment) in a sealed case and vented it through the belly. YMMV.
Battery compartmet
I replaced my Concord with a Lithium battery (LiFE PO4).
It´s in the engine compartment. The new battery is smaller so I made an insulated box of glass fiber over it with a scat hose close to cylinder 3.
So the battery stays relatively cool.
I had a spare Lithium battery and one day a hangar friend put it on a diesel
generator. It worked fine for an hour or so and then it had a thermal run away.
It melted a bit in the corners and we had a lot of smoke in the hangar for about
20 min. Yes the battery was hot but there where no open flames.
This smoke is poisonous, I would definitely not put a Lithium battery aft of the firewall in an aircraft. If you have to, put it in a box vented to the outside.
What is the consensus on using the vented, or standard EarthX battery on an RV8 with the rear mounted battery?
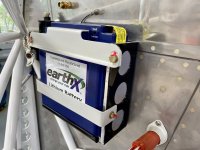
I have the ETX680c on the firewall - saves a lot of weight to not have those fat cables going all the way to the rear. And of course the battery is very light.

http://www.rv8.ch/battery-holder/
If for some reason it decides to start smoking, it's outside the cabin, and on the other side of the FW from the fuel lines and pump. It will be a bad day for sure, but hopefully not my last day.
Freemasm
Well Known Member
Depends entirely on your level of risk aversion. Thermal runaway can occur with a lithium battery if they are overcharged - so if you are absolutely 100% certain that you will notice and stop an overcharge event if your alternator regulator goes Tango Uniform, then you may choose to do without the vent.
I have a full glass panel with no less than 4 individual devices that will alarm on high or low voltage - so I'm relatively sure I'll notice it and correct it - and I still put my ETX900 (behind the baggage compartment) in a sealed case and vented it through the belly. YMMV.
I believe your configuration is safe; however, thermal runaways can occur for reasons other that OV. Internal shorts (related/unrelated to manufacturing quality issues), mechanical damage, over temp, etc. I'd never consider a Li-Fe-xx application without proper venting.
smithflys23
Well Known Member
I have the ETX680c on the firewall - saves a lot of weight to not have those fat cables going all the way to the rear. And of course the battery is very light.
View attachment 19276
http://www.rv8.ch/battery-holder/
If for some reason it decides to start smoking, it's outside the cabin, and on the other side of the FW from the fuel lines and pump. It will be a bad day for sure, but hopefully not my last day.
Ideally, i would put it on the firewall. However, with the inverted oil system, there isn’t a lot of real estate left.
Fit in Vans PC680 steel battery box?
Can you confirm the EarthX fits in Vans’ 680 steel battery box?
The internals of the 680 and 680C are the same. The 680's case is a little larger so that it would be drop in replacement for the Odyssey 680 battery box. I installed dual 680Cs to take advantage of the smaller box. They turn over my 360 very well.
I have a 60 amp alternator on one of the batteries and a 30 amp on the other. It will take about 5 mins for the 30 amp alternator to charge the battery if I have had the avionics on doing updates, troubleshooting, etc. If not, I do not even notice a significant current draw, even after starting the engine.
Can you confirm the EarthX fits in Vans’ 680 steel battery box?
SteveHicks
Active Member
Fit in Vans PC680 steel battery box?
Dave ... you may be talking about a different battery box, but the box supplied for the RV14 is designed to fit an Odyssey PC680. The EarthX ETX680/900 is 0.1″ deeper, and just over 0.5″ shorter in width. Height about the same.
The depth issue means that the ETX900 sits on the battery box lower lip, rather than on the box bottom.
I used packing pieces/strap/spacers to fit my EarthX into the kit battery box ... see here for more info.
Attachments
Last edited:
jliltd
Well Known Member
I've been wondering how people vent these. Can you describe it? Pictures?
Here you go. Vented EarthX in an RV-8:
https://vansairforce.net/community/showthread.php?t=177796
Can you confirm the EarthX fits in Vans’ 680 steel battery box?
I cannot. I did not have the steel box with my 6A kit.
Can you confirm the EarthX fits in Vans’ 680 steel battery box?
I'll tell you what the EarthX rep told me at Airventure 2021. It will not fit, a little to thick (?). I haven't tried one myself to confirm.
Can you confirm the EarthX fits in Vans’ 680 steel battery box?
As mentioned, the ETX680 is just a tad too thick. However, I mounted first ETX in the Van's box by adding left and right side spacers between the box and the firewall. I fab'd match-drilled lengths of 1/2" by 0.125" aluminum bar from Home Depot Aviation Supply. I used padding on the left and right sides to be sure it stayed in place. Piece of cake.
I eventually bought EarthX's stainless battery box for the ETX680. It just does a better job holding the battery in place while also protecting it from heat.
smithflys23
Well Known Member

I’ve been looking through the EarthX installation instructions, and I’m wondering what this statement means.
Also, I’m trying to find an appropriate spade connector for the fault monitoring.
Does this look correct? My concern is a proper fit with the one installed on the battery.
https://www.digikey.com/en/products/detail/3m/MNU18-250DMIK/31264
All it means is that the battery and EFIS must both be connected to a common ground which is the case with almost all aircraft. Not to worry about it.wondering what this statement means
smithflys23
Well Known Member
All it means is that the battery and EFIS must both be connected to a common ground which is the case with almost all aircraft. Not to worry about it.
Thank you!
smithflys23
Well Known Member
Fault monitoring
The installation instructions say to connect the battery fault monitoring wire to one of the General Purpose Input pins. They list 4,6,7,8,9,10,11,12,20,21,22,23, or 31.
I assume these pins are on the main HDX wiring harness. Will there be a wire that I need to remove, or will this be an empty spot waiting for a pin and wire? Are there any other considerations to installing the fault monitoring wire and integrating it with the Skyview HDX?
smithflys23
Well Known Member
The general purpose input pins are on the SV-EMS-220/221.
Do not remove any existing wire. Find a pin location that is empty.
You will have to read the Skyview installation manual and go into
the Skyview menu to set up the display and alarm.
Ok, thanks!
BlackhawkSP
Well Known Member
I have the ETX680c on the firewall - saves a lot of weight to not have those fat cables going all the way to the rear. And of course the battery is very light.
View attachment 19276
http://www.rv8.ch/battery-holder/
If for some reason it decides to start smoking, it's outside the cabin, and on the other side of the FW from the fuel lines and pump. It will be a bad day for sure, but hopefully not my last day.
Mickey:
Save yourself some trouble in the future, and make sure that the bottom of the plastic battery case is thermally protected from convection heating from the exhaust pipes below.( I don't know if yours are directly below like my RV-10, but I softened my case and created a bulge on my first iteration).
Also, I would put a blast tube to the battery top, or a shroud too, to keep the electronics cool, and use the fault lite feature on the panel, or your EFIS. Since I did that on my 10, no troubles whatsoever.
Thanks for the tips, Larry - all good advice.
smithflys23
Well Known Member
Who has a clever solution for this problem?
The terminals are located in a different place on the EarthX battery Vs the PC680. They are now directly under the hold down for the battery box.
Is there a simple solution?


The terminals are located in a different place on the EarthX battery Vs the PC680. They are now directly under the hold down for the battery box.
Is there a simple solution?
smithflys23
Well Known Member
I believe that will work. Thank you!
Should I bother I insulating the aluminum bracket in case of accidental contact with the terminals?
I would
I would probably insulate it…a piece of silicone baffle material between the battery and holder would likely work…
I would probably insulate it…a piece of silicone baffle material between the battery and holder would likely work…
Odyssey Battery Mount for Earthx
Odyssey makes their own hold down kit for their PC680. Does anyone know if the Earthx ETX680 will fit in the Odyssey mount? The Earthx is.1 inch wider but from the pictures, there may be enough room.
I bought an RV-3 with the Odyssey battery in an Odyssey mount. The battery is getting a little weak and I am thinking about a replacement. I like lithium but not enough to install a new mount.
smithflys23
Well Known Member
Dynon HDX fault monitoring
The EarthX instructions say to set up the EMS input as “active low” and “alarm” type. I don’t have those options available when I attempt to configure pin 20. Can someone provide advice on how to configure the fault monitoring? I’ve attached a picture of the selections that I have available.

The EarthX instructions say to set up the EMS input as “active low” and “alarm” type. I don’t have those options available when I attempt to configure pin 20. Can someone provide advice on how to configure the fault monitoring? I’ve attached a picture of the selections that I have available.
Set it up as contact on that page. Then on the Sensor Input Mapping page where you can set alarms, you set it to alarm below, say, 2 volts. That pin will normally have a slight voltage on it from the Skyview high-impedance pull-up resistance internally, and when the battery faults the wire will be grounded internally to the battery, pulling that voltage down to zero. As the voltage falls below the 2 volt (or whatever) threshold to zero, it should turn ON the widget alarm on your panel.
See the tail end of section 7 (EMS setup) in the installation manual.
See the tail end of section 7 (EMS setup) in the installation manual.
Last edited:
smithflys23
Well Known Member
Set it up as contact on that page. Then on the Sensor Input Mapping page where you can set alarms, you set it to alarm below, say, 2 volts. That pin will normally have a slight voltage on it from the Skyview high-impedance pull-up resistance internally, and when the battery faults the wire will be grounded internally to the battery, pulling that voltage down to zero. As the voltage falls below the 2 volt (or whatever) threshold to zero, it should turn ON the widget alarm on your panel.
See the tail end of section 7 (EMS setup) in the installation manual.
Thank you! I’ll give that a look tomorrow.
EarthX battery mounts
Just posted this in another section. Perhaps someone may be able to use these mounts:
https://vansairforce.net/community/showthread.php?t=203023
Just posted this in another section. Perhaps someone may be able to use these mounts:
https://vansairforce.net/community/showthread.php?t=203023
smithflys23
Well Known Member
As with many of my projects, things that seem simple, are not so simple. I came across a few issues while switching from a PC680, to the EarthX 680. I have a few pictures, and some configuration instructions that may help someone who is doing a similar upgrade.
If your battery box is located aft and you have the aluminum battery hold down, you will likely need the terminal adapters that EarthX sells. This is because of the difference in terminal location on the two battery's.

Next, Its probably a good idea to insulate the hold down bar from the terminals in case of accidental contact. For insulation, I used baffle material encased in a big piece of heat shrink tubing. The heat shrink tubing does a good job of holding the baffle material in place on the hold down bar. I also made a small pad out of the baffle material. This sits on top of the battery to provide some room between the terminals and the hold down bar.


The EarthX fault monitoring instructions were a little lacking. I found SkyView configuration instructions on the Dynon Forum. They worked great! The last step is important. You have to actually display the widget. See below.
1) Connect the EarthX fault monitoring wire to any unused General Purpose input (type = A or C) on the SV-EMS-220. (Pins 4, 7, 8, 9, 10, 11, 12, 20, 21, 22, 23, or 31)
2) Configure the input in the EMS SETUP> SENSOR INPUT MAPPING. FUNCTION = CONTACT, SENSOR = CONTACT, NAME = EARTHX (select CUSTOM and enter a suitable name)
3) Configure the EARTHX CONTACT in EMS SETUP> SESNOR SETUP.
ALARM = SELF-CLEARING
MAXIMUM GRAPHICAL DISPLAY = 5.0 VOLTS
MINIMUM GRAPHICAL DISPLAY = 0.0 VOLTS
RANGE 1
ENABLE = YES
NAME = ALRM
COLOR = RED
TOP = 1.0 VOLTS
BOTTOM = 0.0 VOLTS
RANGE 2
ENABLE = YES
NAME = (NOT SET)
COLOR = BLACK
TOP = 5.0 VOLTS
BOTTOM = 1.0 VOLTS
Ranges 3, 4, and 5: ENABLE = NO
4) Place the EARTHX CONTACT widget on the 100%, 50%, and 20% EMS screens using the EMS-SETUP> SCREEN LAYOUT EDITOR
Hopefully this helps someone else!
If your battery box is located aft and you have the aluminum battery hold down, you will likely need the terminal adapters that EarthX sells. This is because of the difference in terminal location on the two battery's.
Next, Its probably a good idea to insulate the hold down bar from the terminals in case of accidental contact. For insulation, I used baffle material encased in a big piece of heat shrink tubing. The heat shrink tubing does a good job of holding the baffle material in place on the hold down bar. I also made a small pad out of the baffle material. This sits on top of the battery to provide some room between the terminals and the hold down bar.
The EarthX fault monitoring instructions were a little lacking. I found SkyView configuration instructions on the Dynon Forum. They worked great! The last step is important. You have to actually display the widget. See below.
1) Connect the EarthX fault monitoring wire to any unused General Purpose input (type = A or C) on the SV-EMS-220. (Pins 4, 7, 8, 9, 10, 11, 12, 20, 21, 22, 23, or 31)
2) Configure the input in the EMS SETUP> SENSOR INPUT MAPPING. FUNCTION = CONTACT, SENSOR = CONTACT, NAME = EARTHX (select CUSTOM and enter a suitable name)
3) Configure the EARTHX CONTACT in EMS SETUP> SESNOR SETUP.
ALARM = SELF-CLEARING
MAXIMUM GRAPHICAL DISPLAY = 5.0 VOLTS
MINIMUM GRAPHICAL DISPLAY = 0.0 VOLTS
RANGE 1
ENABLE = YES
NAME = ALRM
COLOR = RED
TOP = 1.0 VOLTS
BOTTOM = 0.0 VOLTS
RANGE 2
ENABLE = YES
NAME = (NOT SET)
COLOR = BLACK
TOP = 5.0 VOLTS
BOTTOM = 1.0 VOLTS
Ranges 3, 4, and 5: ENABLE = NO
4) Place the EARTHX CONTACT widget on the 100%, 50%, and 20% EMS screens using the EMS-SETUP> SCREEN LAYOUT EDITOR
Hopefully this helps someone else!
smithflys23
Well Known Member
The only thing I have left to do, is to properly configure the battery voltage widget. According to the EarthX instructions, the normal voltage ranges are quite a bit different than a standard battery. Again, their instructions were a little lacking. Below, I have listed what I set up thus far. I need to decide on what the normal voltage range (green) should be.
If anyone would care to share how they have theirs set up, it would be appreciated.
Max 18v
Min 11v
Range 1
Red 18-15v
Range 2
Yellow 15-14v
Range 3
Green 14-13v
Range 4
Yellow 13-12.6v
Range 5
Red 12.6-11.0v
If anyone would care to share how they have theirs set up, it would be appreciated.
Max 18v
Min 11v
Range 1
Red 18-15v
Range 2
Yellow 15-14v
Range 3
Green 14-13v
Range 4
Yellow 13-12.6v
Range 5
Red 12.6-11.0v
dmattmul
Well Known Member
Normally my “green” is 13.6 to 14.3 volts. Anything above and below probably user preference. Since I have a set-able voltage regulator (B&C) I have it at 14.2 both batteries so 14.3 appropriate. You can charge these batteries up to 14.6 and if so probably 14.7 more in line with “green settings”.

