What's new
Van's Air Force

Don't miss anything! Register now for full access to the definitive RV support community.

Did you place your CB's below the right side switch panel?

claycookiemonster

Well Known Member
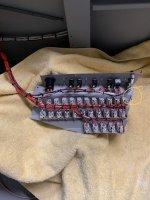
I'm searching for a good place to locate my few CB's. I have the VPX, but there are a few simple items I want to keep out of the red box, like seat heaters and USB charging ports.

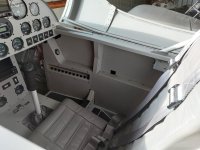
I'm very tempted to either fab up, or use a side CB panel like the one Stein sells that hangs beneath the right side panel where switches live. My hesitation is packing all that wiring with switches and CB's into a small space, and yet leave enough of a service loop that it's removable and maintainable.

Does all that complexity hang on the attachments holding the upper side panel, or is the lower CB panel separate? Any photos would be appreciated.
 
Ammeter Feature

there are a few simple items I want to keep out of the red box, like seat heaters and USB charging ports.

I am not sure about your seats, but each of my 4 cushions (top/bottom front and back) pull about 4 amps, for a potential max load of around 16 amps. I imagine it would be helpful to have that kind of draw on the electrical load monitoring?

Otherwise your question is timely as I am scratching my head with the same issue as I am in the early stages of the wiring process.
 
There is enough room to put some breakers on the side of the switch panel. I had to cut some of the side panel off to fit the Stein wave. About an inch, see yellow circle.

Wire it so that it folds back over the wire when installing. The area I circled is aft when wired and forward when installed. That plus the extra you push back in the tower will provide a long service loop.
 

Attachments

  • IMG_6274.jpg
    IMG_6274.jpg
    403.7 KB · Views: 119
channeling Bob Nuckolls here...

just a reminder that CB's tend to be (100% of the time) heavier, bulkier and more expensive than blade fuses, and offer reset-ability in flight, something that is rarely recommended as safe to do.

What's not to love, eh?

It's your build, but there are many of us flying with no CB's anywhere in our architecture and "No Regerts." A block of a dozen ATC fuses fits in a very small space and is a cinch to wire.
 
Some big airplane manufacturers put fuses and breakers outside the flight deck. If it pops, they don't want the pilots to even have the ability to reset.
If one needs to disable a system, turn the switch off.

I'll probably put some fuses in the forward baggage compartment of my RV8 for things like seat heaters. I won't give myself the option of doing something stupid.
 
Really good suggestions, guys. Frankly I hadn't thought of using blade fuses. Also really appreciate the inside view of that side panel, since that is what I've been anticipating.
The heated seats I got from Classic Aero call for 7.5 amp breakers and the USB chargers from Stein called for 5 amp breakers.

Continuing to stare at the drawing board...
 
To the OP’s question, yes - I’ve had a CB panel under the right side panel for twenty years - a good place to put breakers…both out of the panel architecture, but easy to see and use.

Mine is just a flat panel, and its mounts with a couple of screws to nutplates on a piece of angle riveted to the rear of the gear tower (in front), and to two nutplates on the spar bulkhead (forget the number) cap at the rear. Service loop to allow removal and work.

Paul
 
Fuse block

Just another option...
If the circuit doesn't need to be reset, locate a blade fuse panel firewall forward. A small 4 or 6 circuit blade fuse panel is enough for ancillary circuits.

That's leads to another issue.
The wire supplying power to the breaker panel needs to be protected. I think?
 
On an RV8 that right side panel area is one of the easiest places to add additional controls and components after the airplane is built. The area under it is the only place in the cockpit to put things you can access in flight. I left it completely unoccupied and put the power distribution (fuses) on the bulkhead in front of the panel. That’s the Blue Sea Systems 12 pole Fuse block.
 

Attachments

  • IMG_3698.jpg
    IMG_3698.jpg
    332.3 KB · Views: 125
Last edited:
I recently upgraded my panel to a Skyview HDX / ACM system. The ACM is similar the VPX. I have heated seats and a few other circuits that I did not want to put on the ACM. Like Mike, I attached a blade fuse box on the lower portion of the panel bulkhead with some commercial grade Velcro. This location makes it easy to connect to ships power.
 

Attachments

  • 70179835807__8FEB7712-DF78-4BCB-AF5A-075E31EF01E3.jpg
    70179835807__8FEB7712-DF78-4BCB-AF5A-075E31EF01E3.jpg
    518.1 KB · Views: 128
Confession time.

Sometimes I'm smart, sometimes not so much.

It's just hitting me now, seeing all your glorious photos, that the copper bar connecting all the CB's is in fact, the buss bar. I was struggling to imagine wiring from a buss bar located midway between the CB's and the electric source. So many, many wires would have to go from the buss bar down to the CB panel before proceeding on to the device. It was a nightmare.

No, that's not how it works at all. A single suitably heavy gauge wire to that copper bar carries the current, and then each CB provides the link to the devices.

D'oh! It's all becoming clear to me now.
 
Clay, I agree with Bill - fuses are a good solution. If you have not already, you might want to get a copy of the "aeroelectric connection" PDF written by Bob Nuckolls. He makes the case for fuses far better than I could. My only CB is for my alternator since it's part of the "crowbar" over-voltage protection system.

Good luck with the wiring!
 
Don't mean to start a fight but switch fuses tend to suck. If they made some where the reliability matched the components it was replacing, the industry and builders would have switched a long time ago. The failures tend to be mechanical in nature versus electrically/thermally initiated from my experience. Sure, you'll hear from some people that have incorporated them and not had an issue but they'll be the minority.

They have their place. Sometimes there's just no room. Avionics shops use them in legacy to glass panel upgrades but not typically on "reassigned" locations for less important equipment for the aforementioned reasons.
 
Here’s a pic of mine during construction. Removing a few screws allows access behind the panel even after it is completed.

IMG_0307.jpg

IMG_0308.jpg
 
Here are some pictures of mine.
I printed a attachment to keep the wires in a nice loop when I open the panel. Also I‘ve covered the whole inner side of the fuselage opposite of the CB panel with Kapton tape to avoid any shorts if I ever drop a screwdriver or some other tool (was not yet done during the the time I took the picture).

Cheers Yves
 

Attachments

  • IMG_9919.jpg
    IMG_9919.jpg
    258.2 KB · Views: 84
  • IMG_0005.jpg
    IMG_0005.jpg
    322.3 KB · Views: 94
  • IMG_0220.jpg
    IMG_0220.jpg
    336.1 KB · Views: 100
Thank you all for your photos! I'm currently reworking the side panel containing switches to better support and integrate CB's beneath it thanks to your illustrations.

Since my CB panel is only a side show to the VPX, my current plan only needs 5 CB's. I plan to leave room for a total of 10, but such a small panel has issues.

The actual copper buss bar seems to be cantilevered in space by the body of the actual CB's. That seems a bit tenuous. What do I look for to restrain and yet provide insulation to that live copper source? Are there "dummy" CB's or something I can use to hold the bar, or should I cut the bar shorter to fit the number of CB's I have.
 
B&C sell predrilled buss strap sized for up to 5 breakers. They also sell undrilled strap in 12" lengths that you can drill for whatever your breaker spacing is and just cut off the surplus. Get two of them, match drill them both for your spacing. cut one off and use it for your current 5 breaker setup, throw the other one in your toolbox for future expansion.

Alternately, you can just install a full row of breakers and know that you have 5 extra that are hot but don't currently have anything attached to the output side.

Personally, I'd go with option 1. Breakers are about $30 a pop. B&C sells a 12" length of undrilled buss strap for a whopping $2 bucks.

edit- ps, I think I've got quite a few new breakers that I didn't end up using. Was planning to just hang on to them because well, I'm a parts hoarder :). If you haven't bought new ones yet shoot me a pm and I'll see what I've got. Would sell them for stein or b&c's price and save you the shipping and tax.
 
Last edited:
I did..RV4

Seemed like the perfect spot in my RV-4 for the essential CB's. I do have a few additional ones under the panel edge above knees, but they are non-essential and spares. a couple screws in the sidewall and the whole group comes out for any required servicing.
 

Attachments

  • FWD cockpit.jpg
    FWD cockpit.jpg
    271.4 KB · Views: 60
So, just to clarify, the copper buss strap is only held in place by the screws holding it to the body of the CB's, and the CB's are held in place by their neck screwed in place into the CB panel I can see from the cockpit side of things?
 
Hey Clay- that's correct. Buss bar aside, they install in the panel just like toggle switches.

The hardware should consist of two nuts, a star washer & and anti-rotation washer. How far they stick out of the panel is determined by how far down you screw the nut that's closest to the body of the breaker.

You can stack the hardware up a few different ways, but to make them tidy put the anti-rotation washer on the back side with the locking tab facing the back side of the panel. Drill a dimple on the back side for the tab to nest in if the material is thick enough to do that without going all the way through, or make a doubler strap that picks up all the breaker row then you can just drill a hole all the way through the doubler for the locking tab. Either way will avoid seeing either the locking tab or a hole in the panel for it above each breaker.
 
Got it. Getting it. It's a process, not a destination.

I did the back side of the instrument panel trick for the toggle switch anti-rotation washer. I'll try with the CB's, though the metal isn't as thick. Maybe a doubler? Also, for some reason, the CB's only come with one nut to tighten, and (of course) it's not the same size as the toggle nuts. Another search underway.
 
Got it. Getting it. It's a process, not a destination.

I did the back side of the instrument panel trick for the toggle switch anti-rotation washer. I'll try with the CB's, though the metal isn't as thick. Maybe a doubler?

Do a doubler thats a duplicate of the panel, it doesn't have to be anything fancy, .020 will do it. Drill the holes for your anti-rotation tabs in that. It doesn't have to be permanently attached to anything. The breakers themselves will hold it in place.

Don't know what breakers you're using that only have one nut, but mine are klixon and I want to say the nuts are 7/16". Also they're a black finish, but they're just brass and easy to over torque (also easy to scratch up that pretty black finish) A deep well socket and just turn a flat or two so after the star washer starts to hit is plenty tight.
 
Back
Top