What's new
Van's Air Force

Don't miss anything! Register now for full access to the definitive RV support community.

Cowling Needs Filler, or ??

Karetaker

Well Known Member
Howdy everyone. Please take a look at the video link below at the 4:00 mark. It shows the misalignment I am having with both outside corners of my engine cowlings. The rest of the cowlings look great. I tried to fill in those areas with a flox and epoxy mix, but 24 hours later, while sanding, it just kinda chipped off and I could not get it to feather in nicely. I did not prep the surface, it was pretty smooth. (I'm an idiot and totally missed surface prep...)

The epoxy/flox deal is quite easy and I hoped that would work, but...how about some type of JB Weld, or...?

Much obliged.

https://www.youtube.com/watch?v=H1k3a4tnoGI
 
Mike, can you post a timestamp of where the issue becomes apparent in your video? Maybe just post a picture or two here. At 14 minutes plus commercials, the video is a bit long...
 
Hi Mike in cases like that I would first take a heat gun and heat the area up. This will cause the cowling to become slightly flexible and you’ll want to pull the cowling to the desired position and hold it there till it cools. You’ll be able to get the cowling match close this way and any final mismatch fill in with epoxy/micro mix.

Bill
 
Kyle, original post, 4:00 min. mark. I cant easily do a picture now because the cowlings are off and I am fitting baffles.
 
Howdy Bill. Those areas with the compound curves are very strong/stiff. I don't know if I will get much flex out of the fiberglass, but I can try and see what gives.
 
I had similar fit issues with both cowls.

If this was mine, I'd try to heat form the aft corner of the air inlet on the left hand side of the cowl, so you have less fiberglass work to do. Then I'd scuff the areas on top cowl inlets where you need to fill and lay up a layer or two of fiberglass cloth there to bring the areas to a close shape match with the bottom cowl. Then use micro/epoxy to finish fairing it to the bottom cowl. After that, use your preferred method of filling/finishing the fiberglass.

The gaps you have at the upper/lower intersection on the outer radius of the cowl inlets are probably OK - primer and paint will close them up a surprising amount. Chapter 5 of the instructions gives a good idea of how to eliminate the mismatched gap below the three screws behind the spinner on each side.
 
First, finish all the hinges and cowl fasteners. You don't have final alignments on anything until you do.

Previous cowls were bare epoxy/glass (good), but that gray cowl has a layer of polyester gel coat on the outside (sheesh...). Remove the gel coat before attempting to bond anything remotely structural.

Even simple cosmetic bonding requires you wash the cowl to ensure there is no mold release remaining on the surface. Sand any bond area for filler with a coarse grit until totally dull. The entire surface should be sanded with a moderate grit at some point.

The mismatch on the left inlet will require restructuring. Cut the offending section from the bottom cowl and move it over. Look up "scarf joint" before glassing it in where it belongs.

Right inlet can be done with filler. Epoxy/micro is fine, no need to add flox. Kyle's suggestion of a few plies of glass cloth to minimize filler thickness is a good one.
Again, remove all the gray polyester before you bond anything.

Don't be bashful. Non structural composite work allows changing anything.
.
 

Attachments

  • PA040002.JPG
    PA040002.JPG
    277.5 KB · Views: 104
  • P4190003.jpg
    P4190003.jpg
    189.7 KB · Views: 97
Last edited:
Howdy all. Thanks for the tips. The video was from a while ago and the cowling is fully riveted, (hinges) and fitted/screwed to the fuselage. All I have left to do is fit in the exhaust, heat shield the inside bottom, fit the baffles and fix these two areas in question.

My guess is that my complete lack of surface prep was my biggest enemy. I believe I will try the heat/move/reshape some of the existing fiberglass. Then scuff those areas aggressively, clean and re-apply filler. I will also allow the filler to dry a few days to be sure.

I'll post a follow up if/when I have a solution.

Much obliged.
 
Underbite

Mine had an overbite.
Like Dan said. Fit everything first.
I fixed mine by rough sanding the inside of the part I needed to sand down with 80 grit. Clean it well with a solvent. Add a slather of flox with two layers of glass over it. Cure then go after it with a mini belt sander or a round rasp till it gets within a 1/16 of final. Then switch to PVC pipe with less aggressive grit to get the final shape.
 
I have done some boat repairs on glass and used heat to bend it. You have to remember heating it and holding it in the place you want will weaken the glass. It looks to me that with some heat and metal plates held with clecos you could bend the back out and the bottom in to be close enough to hit with heavy sandpaper and rasp to fit. Then you can repair the damage. With glass, you can fix almost anything.

It doesnt look as bad as my first cowl! I ended up purchasing a James cowl and love it.
 
KT,
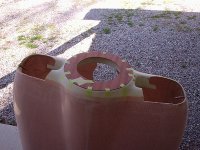
First of all, very nice detail on your initial video. You explain things very well, and I have to say, you have done a very nice job with your initial fitting of your cowl. The sides and the firewall ends are the main parts to get right. After that, the spinner backplate clearance is the next most important areas, and this looks fine too. I had to build up my backplate clearance area on my last build, because it wasn’t even. The air intake areas (outboard) look like almost everybody’s intake areas. Very easy to fix without making any adjustments to the other perfectly fit parts of your cowl, previously mentioned. Rather than than adjusting your perfectly aligned cowl, build up the areas of the cowl inlet that don’t align. I’ve done this on every cowl I’ve done so far. I took a piece of .025 Al covered with packing tape and mold release, slid it in between the upper and lower cowl half sections in that nose area, slathered the upper part with an epoxy/chopped glass slurry (after roughing up the surface to be filled with 60 grit), smoothed it as best I could with a spatula, and let it cure. Sanded it after cure and maybe added a layer or two of epoxy filler to make it smooth and aligned with the lower cowl lip. If that upper cowl lip is too thick for your liking, just grind some of it away from the inside with dremel tool sander wheel. If you are worried about strength because you’ve ground away too much of the original structure, just epoxy in a layer or two of 9 oz cloth on the inside.

All of this I’ve said just takes a few minutes for each step. If you don’t like the outcome, sand it off and try again. You’ve done a very nice job on your cowling. Don’t mess it up by trying to make adjustments that will sacrifice the other , more important areas that you’ve already done such a good job fitting. Those insignificant cowl inlet areas can be easily made perfect (like the rest of your cowl) with epoxy, flox or chopped glass, and minimal cloth fillers.

You might want to take one of those SS rulers (.032”) and make sure it slides between the upper and lower cowl halves for paint clearance. If you are going to use vinyl, you may want to double that.
 
Last edited:
Howdy Scott. Your process explained above is what I have planned to do next. The video is quite old compared to how far along my cowling work is today. I have already made adjustments to the seams between the cowling halves and the cowling and fuselage to straighten them and open them up some. They look the best they ever have so far. The spacing between the cowling and spinner back plate is correct and even. So yes, I will not be fooling around with any other part of the cowlings except for the two areas up front.

I might get back to that next weekend, but for now I have moved back to fitting/shaping the baffles to engine/cowling.

Much obliged everyone.
 
Sorry to disagree with Dan H the maestro but I found it almost impossible to remove the grey gelcoat layer without damaging the (very thin) outer layer of glass over the combs of the honeycomb. Yes it has to be roughed up so I used Scotchbrite to get into the slight dimples on top of the voids.

I'm not so quick to castigate polyester gelcoat, most glider manufacturers use it as the first layer in their moulds which becomes the undercoat for the 2K acrylic top coat. I did use a 2K primer on top of the gelcoat.

Glass is always good over and thicker application of filler (whatever type of filler) to stop it breaking off - use peel ply on the glass for a better finish.
 
Sorry to disagree with Dan H the maestro but I found it almost impossible to remove the grey gelcoat layer without damaging the (very thin) outer layer of glass over the combs of the honeycomb.

Remove the gel coat before bonding anything remotely structural, not from the entire surface. There is no honeycomb in that mismatched inlet.

I'm not so quick to castigate polyester gelcoat, most glider manufacturers use it as the first layer in their moulds

Yep, it's cheap labor-saving filler. Like most fillers, it's not structural.
 
Back
Top