Van's Air Force

The definitive Van's Aircraft support community! Buying, building or flying an RV? Join our exclusive family of mentors and enthusiasts!

tip-up canopy screws....countersink the canopy plastic?

scsmith

Well Known Member
Sponsor
Advertiser
I'm helping a local shop that is replacing a tip-up canopy on an RV-7
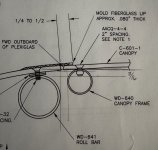
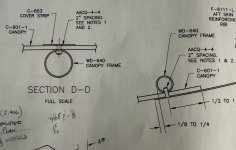
It was installed by drilling clearance holes for the AN507-632 screws along the sides of the skirt, but the holes were not enlarged to provide any room for differing thermal expansion. The canopy cracked, and upon removal, there are cracks starting at every screw hole. Clearly the oversize holes are important.

So - following the installation instructions for the RV-6 (because that's what I have) it describes drilling these holes thru the canopy and skirt, and then disassembling and drilling the canopy holes oversize (either 5/32" or 3/16").
But here is the odd thing: the canopy skirt aluminum strip gets dimpled for the flat head AN507-632 screws. But the instructions do not say to countersink the plastic to accept that dimple. The enlarged (3/16") clearance hole may be big enough to accept the dimple, but contact between the edge of the hole and the dimple would restrain the plastic, defeating the purpose of the oversize holes.

I'm wondering if there was a later update to my (very old) version of the RV-6 KAI that added the instruction to dimple the canopy plastic? Or is this a persistent oversight?
We intend to put some countersink into the plastic to receive the dimple with some 'wiggle room'.

thoughts?
 
Steve,
I oversized the holes and over countersunk and then used SS tinnerman washers to spread to load over more of the plastic. This was on the front of a slider without dimpled aluminum strip. On the sides with aluminum strip I slightly over countersunk so that the screw head is bearing on the aluminum and the metal is bearing on the surrounding plastic not so much the dimples. I did some test countersinks in scrap to establish what felt right.
Ed
 
Yup, +1 except the washers.

Drilled the larger holes and was generous on the countrsinking - not overly so, but just enough. All holes were also generously deburred on the inside and all cuts in the canopy were smoothly rounded so there were no sharp edges.
 
On my Jodel, I skipped the whole screwing thing altogether and glued the canopy onto the frame, using Sikaflex. Proper preparation is key and Sika requires two different primers for the tubing and the plexiglass. That was back in 2002, and it has held up really well in all sorts of weather and temperatures.

I didn't have a skirt to attach, but I see no reason why after gluing the plexiglass onto the frame, that skirt in turn could not be glued onto the plexiglass...
 
I have read about people using hose like Tygon in the hole, after enlarging the hole, to try and eliminate screw to plexiglass contact. Don't know how well it works.

Personally I went the Sika route on my 7 tipper and on my 8. Over 9 years on the 7 and 1.5 on the 8 with no cracks so far....touch wood! Just another option to consider.
 
I also countersank the transparency holes. I urge you to buy a diamond beveling chamfer bit to do the countersink. It won't leave an edge on the countersink, reducing the risk of a crack start point. Search for 'diamond countersink bit' on the 'Zon
 
I have read about people using hose like Tygon in the hole, after enlarging the hole, to try and eliminate screw to plexiglass contact. Don't know how well it works.

I did this with 1/32" wall thickness soft silicone tubing. Obviously you have to drill the holes a bit oversize. Knock on wood, no cracks so far.

1783084602063.jpeg
 
I do what Matt did - with soft surgical rubber or soft silicone tubing. The goal is to not let the screw or Tinnerman washer countersink “cone” touch the plexiglass, just the soft rubbery thing. I have yet to have a crack at a screw hole (yes…I have had cracks elsewhere - that step-down weld joint about a foot from the aft end of the RV-8 canopy frame is my nemesis….. no screws or rivets anywhere around it!))
 
It's already drilled, but you could still Sika the canopy and skirt.
One hole for the latch. Canopy windshield & trim all Sika.
Someone wrote an article way back. 😁
20250303_135616.jpg
 
I do what Matt did - with soft surgical rubber or soft silicone tubing.....

I'm at the canopy stage with my -7A slider. I would like to use the tubing method as both Paul & Matt have done - BUT - the slider plans call for the use of many AACQ-4-4 rivets in the sliding portion of the canopy (see pics). So my question for the brain trust is - Has anyone actually done it this way and/or is there a better way? Would the tubing and Tinnerman washers still work here?

It seems to me that with a pulled rivet in plexiglass, you're just asking for trouble!! I'd live to hear what others have done at this stage and if they have cracks. The Sika method is looking more attractive in this area instead of pulled rivets. Advice?
 

Attachments

  • IMG_5658.jpeg
    IMG_5658.jpeg
    1.6 MB · Views: 2
  • IMG_5657.jpeg
    IMG_5657.jpeg
    989.8 KB · Views: 2
It seems to me that with a pulled rivet in plexiglass, you're just asking for trouble!! I'd live to hear what others have done at this stage and if they have cracks.

At the aft edge you'll have the canopy skirt, and along the top-center you'll have an aluminum strip. The rivets won't bear directly on the glass there, so this is really only a concern at the front. Putting a Tinnerman washer under a blind rivet helps spread out the load... I went even further and made an aluminum strip for the front, which may not actually be functionally different from a Tinnerman, but looks nice:

1783097925965.jpeg
1783098178125.jpeg
1783098636704.png
1783098676021.jpeg

This was back before doing canopies with Sika really took off, so the landscape of options looks different now... if I had to do it again I'd definitely weigh the pros and cons of the "gooey method"...!
 
At the aft edge you'll have the canopy skirt, and along the top-center you'll have an aluminum strip. The rivets won't bear directly on the glass there, so this is really only a concern at the front. Putting a Tinnerman washer under a blind rivet helps spread out the load... I went even further and made an aluminum strip for the front, which may not actually be functionally different from a Tinnerman, but looks nice:

View attachment 122057
View attachment 122058
View attachment 122061
View attachment 122062

This was back before doing canopies with Sika really took off, so the landscape of options looks different now... if I had to do it again I'd definitely weigh the pros and cons of the "gooey method"...!
Also, when you do all of the cutting and drilling do it in nice warm temperatures, less chance of cracking
 
Back
Top