I have to install a couple nutplates in a very difficult to reach location inside my fiberglass wingtip for my new navlights, a friend suggested I use these. Anyone have any experience with them?
TIA
TIA


https://www.electricalhub.com has one of the better selections of sizes. Work really well ! Locktite Hysol 9460 or 62 works well for an adhesive but takes a little longer to set. If you don't want to invest in the click bond dispenser buy the 40 ml cartridge and just dispense 1/4 inch out of each side and hand mix on a note card.I have to install a couple nutplates in a very difficult to reach location inside my fiberglass wingtip for my new navlights, a friend suggested I use these. Anyone have any experience with them?
TIA
https://www.electricalhub.com has one of the better selections of sizes. Work really well ! Locktite Hysol 9460 or 62 works well for an adhesive but takes a little longer to set. If you don't want to invest in the click bond dispenser buy the 40 ml cartridge and just dispense 1/4 inch out of each side and hand mix on a note card.
Be careful using them. I have come across places where they have been used and found the bonding that has let loose, now you have a major problem if you can not access the nutplate.
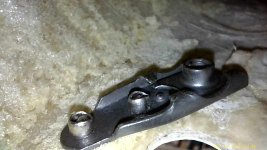
HFS? A boating friend turned my onto Weld Mount AT-4020 which is stupid expensive but has worked out great. Fast setup, and in this case using the mixing tip is easier than mixing up some West Marine, adding filler, etc., then trying to get it inside the access hole.I rivet a nutplate to a small piece of aluminum and use 2216 or G//flex to bond it on. Very inexpensive and no shipping costs. Not my idea, got it from HFS.
Dave
I have used click-bond products on certified aircraft. The problem is they don’t always stay stuck. Being certified means there isn’t any room for substitution.I have to install a couple nutplates in a very difficult to reach location inside my fiberglass wingtip for my new navlights, a friend suggested I use these. Anyone have any experience with them?
TIA
I have used click-bond products on certified aircraft. The problem is they don’t always stay stuck. Being certified means there isn’t any room for substitution.
As you are already experimental, why not look at your favorite nutplate painted thick with Pro-Seal? Clean the area real good with MEK or Acetone and coat the screw/bolt threads with oil and snug things up and let it cure.
I’m assuming this isn't a high torque application.
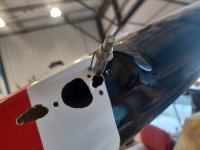
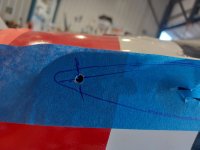
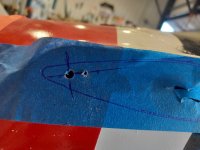
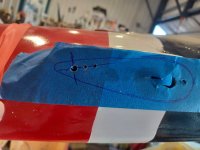
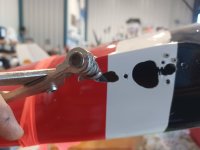
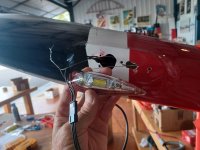
BTW Click-Bond only goes down to 8/32. I researched them as an option for something similarThanks for another alternative. Not structural, long story short, I had to replace my navlights with something else, instead of seeing if there was an alternative with the same footprint I grabbed the first shiny thing, without realizing the footprint was different, AND it was going to be a PITA to get a nutplate into the wingtip at the the trailing edge. Someone said That's a perfect place for a Clickbond. As Matt said-and as I learned-the surface has to be well prepared, so I'm on the second try.
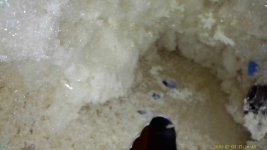
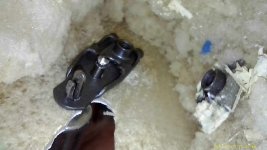
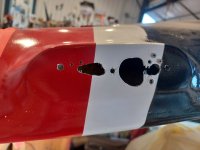
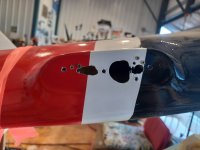
The extreme holes on each end are where I have to put a #6 nutplate, you can see where the previous nutplate and wire access hole was.
It's all part of the adventure.
BTW Click-Bond only goes down to 8/32. I researched them as an option for something similar
That hfs guy has some really clever tips!I rivet a nutplate to a small piece of aluminum and use 2216 or G//flex to bond it on. Very inexpensive and no shipping costs. Not my idea, got it from HFS.
Dave
I have a great deal of experience with them on the production line and flight line of a major military OEM. Even following stringent processes and quality assurance oversight they are an absolute nightmare in service. Nothing like having a panel held down with 100 fasteners and on first installation the 99th one pops free and spins. Or on postflight inspection a few pop trying to drop a maintenance panel.Anyone have any experience with them?
I’d just pop rivet normal nutplates in there.Thanks for another alternative. Not structural, long story short, I had to replace my navlights with something else, instead of seeing if there was an alternative with the same footprint I grabbed the first shiny thing, without realizing the footprint was different, AND it was going to be a PITA to get a nutplate into the wingtip at the the trailing edge. Someone said That's a perfect place for a Clickbond. As Matt said-and as I learned-the surface has to be well prepared, so I'm on the second try.
The extreme holes on each end are where I have to put a #6 nutplate, you can see where the previous nutplate and wire access hole was.
It's all part of the adventure.
If you’ve can get a clickbond in there I guarantee I can get a normal nutplate riveted in there. I rate them about as useful long term as rivnuts.
Haha yep they are the devils work. Only takes one to cure you!I was hoping to hide the rivets, but as soon as you said rivnuts a chill went through me from a past experience. Ok, she'll have a little cosmetic flaw of a rivet protruding.

Haha yep they are the devils work. Only takes one to cure you!
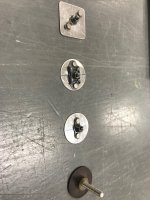
How about mini one legged #6 nutplates?
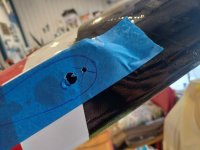
View attachment 119386
Steve- If I were trying to fish a nut plate into an area like that, This would be my plan A.You read my mind. $9.16 shipping from Spruce for a $2 part. Worth it. (I got a few extra, and some #8 and #10 while I was at it because I'm old and it's only money and I might need them.)
FWIW, after I made the order I checked and a mini 2 legged will fit. Which one will make me swear more is TBD.
I'm thinking I drill from the outside, then cut the head off a long #6 and screw it in, manipulate that inside the wingtip with a pair of forceps, drop it, retrieve it, repeat a few times until I get the get the screw shaft into the hole, pull it out, cleco and then rivet it. Should only take most of a day.
Yep this is the way. If you can’t manipulate safety wire then builders string can be sucked through any number of strange contortions over almost any distance- think in between the floors of an RV10.Steve- If I were trying to fish a nut plate into an area like that, This would be my plan A.
1. run a piece of safety wire through both of the rivet holes in the wingtip and then back out through the big hole in the wingtip
2. thread the nut plate onto the wires and then shove it through the big hole and into place by pushing a piece of flexible rubber hose behind it.
3. shove hard enough on the hose that it's firm against the inside of the tip.
4. stick a cleco in the threaded hole to suck it up tight
5. get a cleco and a screw into it to hold in position
6. pop rivet in place with 3/32 cherry nutplate rivets
Should still take most of the day, but only if you pull up a chair and admire your work after


This (and other words)They won't stay stuck without great surface prep - clean the surface, scuff the surface, clean it again... then glue. They should then stay stuck - at least I hope mine do!
https://www.electricalhub.com has one of the better selections of sizes. Work really well ! Locktite Hysol 9460 or 62 works well for an adhesive but takes a little longer to set. If you don't want to invest in the click bond dispenser buy the 40 ml cartridge and just dispense 1/4 inch out of each side and hand mix on a note card.
locking or non-locking?FYI, I just learned the hard way that Clickband nutplates are non-returnable to electricalhub.
Anyone need some 6/32 clickbond nutplates?
My guess is they make these non-returnable as the epoxy has a shelf life. BTW store the epoxy packages in the refrigerator to extend their life.FYI, I just learned the hard way that Clickband nutplates are non-returnable to electricalhub.
Anyone need some 6/32 clickbond nutplates?
non-locking, and I got them dry, no epoxy included. If you're interested, make me an offer.locking or non-locking?
So was the IPA prep for you.I attached two click bond #6 fasteners this past weekend over AL surface using JB Weld as the adhesive. I prepped with sandpaper and then IPA. Not too risky as both are in a spot that can be reached in case the adhesive fails. The result... JB Weld was very strong after 12 hours cure time and screws went in and out at least a half dozen times without issue. The 10 year old original adhesive was long expired. Click Bond CN614CR06PNL Minature Fold Over Nutplates, #6-32, Two Lug , Primed, Non-Locking... https://www.electricalhub.com/click...9BJk-v4iNUCPvj-IkHss6PcKvWfAMtjggKWkBEwUqFBIi
That hfs guy has some really clever tips!
These ...That hfs guy has some really clever tips!
Click bond stuff is Great! Clean surface, rough surface, then clean again. Then go for the belt and suspenders! If it positively should not fail…critical part I put two to three layers of fiberglass on top. Just use your favorite type of aircraft grade epoxy.
These ...