

Van's Air Force

The definitive Van's Aircraft support community! Buying, building or flying an RV? Join our exclusive family of mentors and enthusiasts!

Rollbar Fitment Issues

mstrauss

Well Known Member
Patron
Looking for suggestions on resolving an issue with constructing the rollbar. In my case the width of the bar does not match the width of the support section that hold the base of the bar.
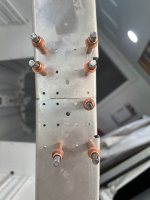
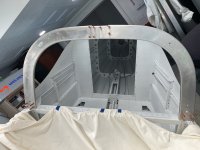
To be clear see the pictures below:
IMG_4433.jpeg
IMG_4432.jpeg
The distance between the blocks is a bit to wide for the bar. I understand that the bar halves are formed as T0, and then hardened via heat treating, and that can cause some deforming. At least that is what tech support indicated. They went on to say that some massaging may be required. I'm thinking about removing the support blocks (currently bolted in place) and elongating the bolt holes to allow the bloc to shift inward about 1/8in on each side. Thinking about the forces involved during a rollover, the bulk of the force will be inward (crushing) on the top of the rollbar, and that would cause the ends to want to push outward, so elongating the holes as proposed, should not impact the bolts shear force support of the block.

What have others done in this scenario?
 
Last edited:
What have others done in this scenario?
I would not elongate any holes. Get a steel punch or scratch awl and work the top centre joint, one hole at a time, until you get all the Clecos in place. It is not out by that much. The hole on the left side of the joint seems to be the worse. You’re only out half of that, if you split the difference with the other holes. I’ve used this steel worker technique many times in similar situations. You may need to switch and start on the bottom holes and work the top outward. Give that a try before modifying oem parts. When I did my canopy I ordered a second set because of that same misalignment. It was far worse than your roll bar though.

I used something similar to this on a daily basis during my build.
 
It doesn't look like you've completed the steps on page 38-14. What does it look like with fixture C-01442C in place?
Thanks for taking the time to reply, but I am working the roll bar (fuselage), not the canopy (finish).
 
I had the exact same issue, spoke to some other builders and they had the same. I called the Mothership and they said to make sure not to change anything on the roll bar or I'd be sorry later.

I wasn't pleased as it looked like crap. I decided to do the opposite which really came out nice. Rather than trying to close the gap at the bottom (mine was .015) I decided to file the top portion so that it looks like a seam rather than a misalignment. It's a nice even .012 from bottom to top. I would have rather had a roll bar that fit perfectly at the top, but I'm happy with the outcome.
 
After looking at my tech councilor’s 14, it’s obvious you do not want to change the location of the lower roll bar mounting blocks. It would definitely set you up for issues when building the canopy.
 
After looking at my tech councilor’s 14, it’s obvious you do not want to change the location of the lower roll bar mounting blocks. It would definitely set you up for issues when building the canopy.
Try putting it on the bench, put all the clecos in the top splice and then put it in the fuselage. Then cleco one side 100% in to the block and see if you can persuade the clecos in to the other side.
 
I’m going to do something like what Tod B. suggested. I have already final sized all the 3/32 holes by clecoing everything together and the spreading the bar the needed 1/4in using a bar clamp in spreading mode. I have it all apart for debuting and priming right now, but when assembling, I will cleco the two halves together first, then cleco to the support blocks, and finally rivet the two halves.
 
Back
Top