Anyone have to open up the clearance holes for the pushrod to pass through on the side of the fuselage. My pushrod touches and prevents full travel not allowing the pin to retract fully. Doesn’t need much , but will have to be opened up on the top. I have Van’s latch, no mods.

Van's Air Force
You are using an out of date browser. It may not display this or other websites correctly.
You should upgrade or use an alternative browser.
You should upgrade or use an alternative browser.
SB-00128 RV14 & 14A Side Canopy Pins Lengthened, and Rear Canopy‑Latch Pin Engagement Depth Increased
- Thread starter mstrauss
- Start date

Anyone who has completed this, how much did you need to remove from the canopy side? i feel like i have filed out alot of material, but the pin still will not pass through the hole.
I had to clearance the holes some but can't give an amount specifically, I guess the amount will depend on how far the pins retract into the roll bar when opened and therefore impact how far the go forward through the nylon blocks and into the canopy frame holes. I have my pins adjusted so they just sit flush when retracted (canopy unlocked).Anyone who has completed this, how much did you need to remove from the canopy side? i feel like i have filed out alot of material, but the pin still will not pass through the hole.
rdusair
I'm New Here
I just finished the Canopy SB. Nothing complicated fabrication wise. Just a lot of crawling in and out. I have the Classic Aero side panels and there was no issues except for lengthening the two latch rods a little. My issue was with the latch pins binding in the canopy blocks. My first step was to reshape the tips to look more like a bullet. That helped a little. Then, I removed the blocks and opened the frame holes ever so slightly. Still, the pins were binding on the blocks. The plans say not the file the blocks. But after talking with Gary at Van’s, we agreed that filing some of the material where the binding was occurring was the only answer. Biggest takeaway: Don’t bend the cotter pins until final fit is complete. During the fine tuning adjustments, don’t force close the canopy. I locked myself in ….Had to partially disassemble the latching mechanism and punch the pins out to escape. Funny now, but scary at the time it happened as I was alone and my phone was outside. :-0
I always made sure I had my phone when trying the new pins for that reason. I was fortunate, pins fit nicely without doing anything to the pin holes.I just finished the Canopy SB. Nothing complicated fabrication wise. Just a lot of crawling in and out. I have the Classic Aero side panels and there was no issues except for lengthening the two latch rods a little. My issue was with the latch pins binding in the canopy blocks. My first step was to reshape the tips to look more like a bullet. That helped a little. Then, I removed the blocks and opened the frame holes ever so slightly. Still, the pins were binding on the blocks. The plans say not the file the blocks. But after talking with Gary at Van’s, we agreed that filing some of the material where the binding was occurring was the only answer. Biggest takeaway: Don’t bend the cotter pins until final fit is complete. During the fine tuning adjustments, don’t force close the canopy. I locked myself in ….Had to partially disassemble the latching mechanism and punch the pins out to escape. Funny now, but scary at the time it happened as I was alone and my phone was outside. :-0
I actually bought a cellular Apple Watch when I started building just so I could contact my wife if I was turned into a pretzel inside the airplane and needed my wife for help to grab some tools or whatever. It has saved the day multiple times.I was alone and my phone was outside. :-0
Back to the original topic at hand - I finished the canopy side pins today. The only tough part was remembering how to remove some of the Classic Aero interior side panels. I'll start on the rear canopy latch pins tomorrow. Definitely not a five hour job for me. I'm already five hours into it...
Has anyone completed this SB, on a new build? Vans has yet to publish updated instructions with the SB incorporated. I have found that implementing some SB while building can have a very different approach to make the mod simpler. Not sure if that is the case here, just asking in case some has blazed the path.
When I get to it I'll be doing partial "new build" changes. What I mean is that I've put in the horizontal pins and latching mechanical parts already, so that all has to come apart from what I'm reading, but I had not done the vertical pins on the side, so that will be like new build.Has anyone completed this SB, on a new build? Vans has yet to publish updated instructions with the SB incorporated. I have found that implementing some SB while building can have a very different approach to make the mod simpler. Not sure if that is the case here, just asking in case some has blazed the path.
Aerotoons
I'm New Here
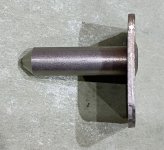
Anyone notice how rough the top welds are on the guide pins? Are they going to be an "eye sore", how do you finish them without filing a lot of that weld "glob" off....I really don't want to do that!? I filed as much as I dare to flatten the top of the weld.
Attachments
I just finished this Service Bulletin. It took me 14 hours. Yes, I'm slow! Five hours of that was removing and reinstalling the Classic Aero interior side panels. Another hour getting in and out of the airplane 50 times. Anyway, the service bulletin itself is pretty easy. Some of the nuts for the interior side panels though.....man!
I didn't have to ream out the canopy pin holes or make any adjustments to the linkage. I just replaced the parts and it works fine.
I didn't have to ream out the canopy pin holes or make any adjustments to the linkage. I just replaced the parts and it works fine.
I have had a bad experience so far with this SB. I am incorporating it while working on the finish kit, so the rear window is not yet installed, which made a lot of the work quite easy. I haven't yet installed the canopy vertical side pins, so I'm just doing the torque tube related hardware and the longer latch pins. It took a few hours to swap all the hardware and to dremel/file the slots to the right length.
Before this SB, my canopy latch worked smoothly and easily. Now, it's a horrible mess. The worst part is that if I open it far enough to lift the canopy, something in the levers goes over-center and gets stuck, and I have to bang on the back of the right-side pin with a hammer to be able to to close it. And while opening and closing, it takes a ridiculous amount of excessive force, and makes horrible squealing noises. Now I wish I hadn't done it at all! I'll call Van's tomorrow, but it's tempting to just reverse course and put it back together with the old hardware.
Before this SB, my canopy latch worked smoothly and easily. Now, it's a horrible mess. The worst part is that if I open it far enough to lift the canopy, something in the levers goes over-center and gets stuck, and I have to bang on the back of the right-side pin with a hammer to be able to to close it. And while opening and closing, it takes a ridiculous amount of excessive force, and makes horrible squealing noises. Now I wish I hadn't done it at all! I'll call Van's tomorrow, but it's tempting to just reverse course and put it back together with the old hardware.
rdusair
I'm New Here
Just curious if the trouble you're having is a result of installing the bellcranks (part #C-01455) in backwards. I'm not even sure that is possible but it may be something to check?I have had a bad experience so far with this SB. I am incorporating it while working on the finish kit, so the rear window is not yet installed, which made a lot of the work quite easy. I haven't yet installed the canopy vertical side pins, so I'm just doing the torque tube related hardware and the longer latch pins. It took a few hours to swap all the hardware and to dremel/file the slots to the right length.
Before this SB, my canopy latch worked smoothly and easily. Now, it's a horrible mess. The worst part is that if I open it far enough to lift the canopy, something in the levers goes over-center and gets stuck, and I have to bang on the back of the right-side pin with a hammer to be able to to close it. And while opening and closing, it takes a ridiculous amount of excessive force, and makes horrible squealing noises. Now I wish I hadn't done it at all! I'll call Van's tomorrow, but it's tempting to just reverse course and put it back together with the old hardware.
No, they are not backwards. Other posters have mentioned the need to adjust the shape of the pin, and also to enlarge holes in the canopy arch bushing. I suspect that is in my future. When I remove the right canopy pin, all works well, with no binding, and no over-center locking either. The new geometry is quite extreme, and I think the bellcranks are putting a lot more sideforce (up force actually) on the pins when they are fully retracted, so they are looking for any excuse to bind up. I'll talk with Van's today, and post whatever I learn.Just curious if the trouble you're having is a result of installing the bellcranks (part #C-01455) in backwards. I'm not even sure that is possible but it may be something to check?
I wonder if the slot is longer and allows the bell crank to go farther back that needs it and this causes the lockup if pushed back with forceNo, they are not backwards. Other posters have mentioned the need to adjust the shape of the pin, and also to enlarge holes in the canopy arch bushing. I suspect that is in my future. When I remove the right canopy pin, all works well, with no binding, and no over-center locking either. The new geometry is quite extreme, and I think the bellcranks are putting a lot more sideforce (up force actually) on the pins when they are fully retracted, so they are looking for any excuse to bind up. I'll talk with Van's today, and post whatever I learn.
I spoke with a couple tech support people at Van's tomorrow. They acknowledged they are getting some calls about these issues, and they asked me to send photos and any details I could figure out. They have an engineering meeting tomorrow at noon, and plan to discuss this. Here is what I sent them:I wonder if the slot is longer and allows the bell crank to go farther back that needs it and this causes the lockup if pushed back with force
*******************
Hello Support Folks,
I am building RV-14 #141428. I am working on the new SB 00128 for the longer canopy latch pins, and having issues. I spoke with John and Kevin in tech support this morning, and they asked me to send photos of my issues so you could discuss in the engineering meeting tomorrow. Here goes:
I am working on the Finish kit, so the rear window isn’t yet installed, making access easy to the SB parts. I haven’t installed the vertical canopy pins that go on the canopy side rails yet. But I previously installed the original canopy latch pushrod and torque tube and bell crank angles, and the canopy latch mechanism worked very nicely, locking and unlocking the canopy.
Yesterday, I replaced the canopy pins and bellcrank angles with the new SB parts, and ran into two problems, though they are probably related:
1. When the canopy latch is pulled open far enough to open the canopy, then the right latching pin gets locked in place (kind of like something went over-center) and I can’t close the handle without first pushing the right side pin forward by hand.
2. The right side pin is binding and causing excessive drag when moving the latch handle open and closed. It works OK, though not smoothly or easily, when the canopy is raised. But when the canopy is lowered, and the right side pin is moving forward to engage the holes in the canopy arch, then it binds and is very hard to close the latch. The left side suffers from the same issue, but not as bad as the right.
Below is a photo of the right latching pin in the open position. You can see that the bellcrank geometry is pushing upward on the tail of the pin. That causes the nose of the pin to dip downward, and the sharp shoulder of the pin is catching on the brass bushing in the rollbar, and then it catches, but even worse, on the lip of the hole in the canopy arch. Another photo below shows the hole in the canopy arch, and you can see where the sharp lip on the nose of the pin is digging into the lower edge of that hole. Same thing happens on the left side, but maybe not quite as badly.
I am including a link to two videos below, showing how the mechanism jams in the open position, and how I can clear it by pushing the pin forward with my finger.
The VAF forums are full of similar issues, and people have been enlarging the holes in the canopy arch and/or also the roll bar to compensate, and reshaping the sharp shoulder on the latch pins. I haven’t tried that yet, but it might solve the problem.
Please let me know what you suggest.
*******************
So, that's what I sent them. Hopefully the video links copied below will work.
Good luck with the SB!
-Lou


Here is a link to a video showing the right pin stuck in the open position:
iCloud Photos - Apple iCloud
View, organize, and share photos and videos with iCloud Photos on the web. Changes will sync across your devices with iCloud.
 share.icloud.com
Here is another video showing how I can get it moving again, by pushing the right pin forward with finger pressure:
iCloud Photos - Apple iCloud
View, organize, and share photos and videos with iCloud Photos on the web. Changes will sync across your devices with iCloud.
share.icloud.com
This is so strange. I had no trouble with mine. I didn't have to open up any holes. Didn't adjust any linkage. All I did was replace the original hardware. Worked fine before. Works fine now. One possible difference with my install is I'm using the JD Air canopy handle. Shouldn't make any difference but I'm mentioning it anyway.
I went out and looked at how mine operates and my rear canopy pin does not "ride up" like yours does when activated:
Can you tell me what the picture you shared is? The way your pin behaves almost looks like the hole in the rear of the roll over structure is too large or the bushing is missing.
I went out and looked at how mine operates and my rear canopy pin does not "ride up" like yours does when activated:
Can you tell me what the picture you shared is? The way your pin behaves almost looks like the hole in the rear of the roll over structure is too large or the bushing is missing.
Last edited:
Lou, I would first adjust the pushrod length so that the pin retracts further into the roll bar, that will limit the amount the pin moves into the canopy blocks. Second, I would disconnect that pin from the mechanism and confirm it moves through the roll bar smoothly then remove and hold the black nylon pin block up against the roll bar and see if the pin moves into the block without any drag. I think the up/dn movement you see is the mechanism fighting to overcome drag in that pin.I spoke with a couple tech support people at Van's tomorrow. They acknowledged they are getting some calls about these issues, and they asked me to send photos and any details I could figure out. They have an engineering meeting tomorrow at noon, and plan to discuss this. Here is what I sent them:
*******************
Hello Support Folks,
I am building RV-14 #141428. I am working on the new SB 00128 for the longer canopy latch pins, and having issues. I spoke with John and Kevin in tech support this morning, and they asked me to send photos of my issues so you could discuss in the engineering meeting tomorrow. Here goes:
I am working on the Finish kit, so the rear window isn’t yet installed, making access easy to the SB parts. I haven’t installed the vertical canopy pins that go on the canopy side rails yet. But I previously installed the original canopy latch pushrod and torque tube and bell crank angles, and the canopy latch mechanism worked very nicely, locking and unlocking the canopy.
Yesterday, I replaced the canopy pins and bellcrank angles with the new SB parts, and ran into two problems, though they are probably related:
1. When the canopy latch is pulled open far enough to open the canopy, then the right latching pin gets locked in place (kind of like something went over-center) and I can’t close the handle without first pushing the right side pin forward by hand.
2. The right side pin is binding and causing excessive drag when moving the latch handle open and closed. It works OK, though not smoothly or easily, when the canopy is raised. But when the canopy is lowered, and the right side pin is moving forward to engage the holes in the canopy arch, then it binds and is very hard to close the latch. The left side suffers from the same issue, but not as bad as the right.
Below is a photo of the right latching pin in the open position. You can see that the bellcrank geometry is pushing upward on the tail of the pin. That causes the nose of the pin to dip downward, and the sharp shoulder of the pin is catching on the brass bushing in the rollbar, and then it catches, but even worse, on the lip of the hole in the canopy arch. Another photo below shows the hole in the canopy arch, and you can see where the sharp lip on the nose of the pin is digging into the lower edge of that hole. Same thing happens on the left side, but maybe not quite as badly.
I am including a link to two videos below, showing how the mechanism jams in the open position, and how I can clear it by pushing the pin forward with my finger.
The VAF forums are full of similar issues, and people have been enlarging the holes in the canopy arch and/or also the roll bar to compensate, and reshaping the sharp shoulder on the latch pins. I haven’t tried that yet, but it might solve the problem.
Please let me know what you suggest.
*******************
So, that's what I sent them. Hopefully the video links copied below will work.
Good luck with the SB!
-Lou
View attachment 115599View attachment 115600
Here is a link to a video showing the right pin stuck in the open position:
iCloud Photos - Apple iCloud
View, organize, and share photos and videos with iCloud Photos on the web. Changes will sync across your devices with iCloud.
Here is another video showing how I can get it moving again, by pushing the right pin forward with finger pressure:
iCloud Photos - Apple iCloud
View, organize, and share photos and videos with iCloud Photos on the web. Changes will sync across your devices with iCloud.
None. I made no changes other than replacing the hardware.Anyone who has completed this, how much did you need to remove from the canopy side?
I spoke with a couple tech support people at Van's tomorrow. They acknowledged they are getting some calls about these issues, and they asked me to send photos and any details I could figure out. They have an engineering meeting tomorrow at noon, and plan to discuss this.
I am having the exact same issue Lou. Curious to hear how you resolve it
")
I also have the JD Air latch handle. The picture I shared is very similar to the angle in your video. If I'm careful not to open the latch too far, then it is possible to close it. But at full aft travel of the latch handle, the pin gets stuck. I think what's happening is that the sharp shoulder (transition from cylinder to cone) at the front of the pin is hanging up on an edge of the bushing in the rollbar. That sharp edge is also hitting the lower perimeter of the hole in the canopy arch, and digging in, making it very difficult to close the latch when the canopy is lowered (which is the whole point!). Probably filing the sharp shoulder, and filing the holes in the roll bar and canopy arch will get it working, but I'm waiting to hear from Van's before I dive into that.This is so strange. I had no trouble with mine. I didn't have to open up any holes. Didn't adjust any linkage. All I did was replace the original hardware. Worked fine before. Works fine now. One possible difference with my install is I'm using the JD Air canopy handle. Shouldn't make any difference but I'm mentioning it anyway.
I went out and looked at how mine operates and my rear canopy pin does not "ride up" like yours does when activated:
Can you tell me what the picture you shared is? The way your pin behaves almost looks like the hole in the rear of the roll over structure is too large or the bushing is missing.
I saw your video but I'm curious what this is below. I can't find any part of my roll over structure that looks like this. Clearly I'm missing something!The picture I shared is very similar to the angle in your video.

this picture is from the aft side of the canopy without the UHMW (black) block.I saw your video but I'm curious what this is below. I can't find any part of my roll over structure that looks like this. Clearly I'm missing something!
View attachment 115631
Ohhh, OK! Thanks. I was focusing on the roll bar in his video where his pins weren't going in and out smoothly.this picture is from the aft side of the canopy without the UHMW (black) block.
I really like the video, and wondered if anyone has a video of the entire assembly in motion? I have noticed the side canopy pins on my ship, in flight, are not in the fuselage rail as deep as when the ship is not in flight. Next flight I will see at what airspeed the canopy seems to rise up off the rail.This is so strange. I had no trouble with mine. I didn't have to open up any holes. Didn't adjust any linkage. All I did was replace the original hardware. Worked fine before. Works fine now. One possible difference with my install is I'm using the JD Air canopy handle. Shouldn't make any difference but I'm mentioning it anyway.
I went out and looked at how mine operates and my rear canopy pin does not "ride up" like yours does when activated:
Can you tell me what the picture you shared is? The way your pin behaves almost looks like the hole in the rear of the roll over structure is too large or the bushing is missing.
I completed the SB. When out on a cross country, I opened the canopy and the pins got stuck in the open position. I think the lower C-01431 links on the right side were over-centered. I had to remove the cotter pins on the AN320-3 bellcrank screws (both of them) to free it up to get home.
My next step is to play with the canopy latch pushrod to limit rearward travel. I've added some cotter pins to my cross country tool bag, but hopefully will not need them once I get this fixed.
My next step is to play with the canopy latch pushrod to limit rearward travel. I've added some cotter pins to my cross country tool bag, but hopefully will not need them once I get this fixed.
Thanks for chiming in, Peter. It seems like some people have no issues with the longer pins and new geometry that come with the SB, but a subset of use are getting this binding problem. I'll let you know what I learn...I am having the exact same issue Lou. Curious to hear how you resolve it
Hi John, can you tell if it was really an "over-center" issue? On mine, there is nothing going over-center, but instead the right canopy pin is binding in the roll-bar bushing, I think because of upward pressure on the tail of the pin when you try to close the latch.I completed the SB. When out on a cross country, I opened the canopy and the pins got stuck in the open position. I think the lower C-01431 links on the right side were over-centered. I had to remove the cotter pins on the AN320-3 bellcrank screws (both of them) to free it up to get home.
My next step is to play with the canopy latch pushrod to limit rearward travel. I've added some cotter pins to my cross country tool bag, but hopefully will not need them once I get this fixed.
I emailed all the details and photos to Van's a week ago. But, I still haven't heard back from them. I called the support number today and talked with Gary. He is aware of the problem, and it was discussed in their engineering meeting last Tuesday, and he expects more discussion about in in their meeting tomorrow. Gary thinks the sharp edge on the pin where it transitions from a cylinder to a cone is causing the binding in the roll-bar bushing. And some people in this thread said they solved the problem by making the pin more "bullet shaped", and maybe also with some filing or smoothing on other parts. Gary said I could try that, or to "watch this space" because Van may come up with some other recommendations (or even another design change?) soon.
Hi John, can you tell if it was really an "over-center" issue? On mine, there is nothing going over-center, but instead the right canopy pin is binding in the roll-bar bushing, I think because of upward pressure on the tail of the pin when you try to close the latch.
CFILou,
I sat in the baggage compartment today and got the pins stuck on purpose. It was not an over-center issue. What you said above is exactly what is happening. I did smooth out the transition on the nose of the canopy pins first, which helped, but I still was getting binding.
When I attempt to close the latch, the rear of the pin gets pushed up and friction binds on the rear of the canopy roll bar frame. When I apply the slightest amount of downward pressure on the rear of the pin, I have no binding. It looks like the hole in the C-01433 bushing cover plate (section 37-04) is not perfectly round allowing the canopy pin to float up and binds there.
What I think will work as a temporary fix is to glue and RTV an AN4 nut (or 1/4” spacer of some sort) right in front of the lower linkage, which would prevent me from opening the pins too far.
The hard fix looks to be to replace or add another C-01433 bushing cover and be careful not to elongate the canopy pin hole.
Last edited:
That's what it looked like to me after looking at the video in post #65. The hole is either not round or slightly oversized.It looks like the hole in the C-01433 bushing cover plate (section 37-04) is not perfectly round allowing the canopy pin to float up.
I thought about blocking the rearward travel of the canopy pin also. In my case, though, this is a fine balance, because the binding occurs when the right canopy pin is just barely aft enough to allow me to lift the canopy!CFILou,
I sat in the baggage compartment today and got the pins stuck on purpose. It was not an over-center issue. What you said above is exactly what is happening. I did smooth out the transition on the nose of the canopy pins first, which helped, but I still was getting binding.
When I attempt to close the latch, the rear of the pin gets pushed up and friction binds on the rear of the canopy roll bar frame. When I apply the slightest amount of downward pressure on the rear of the pin, I have no binding. It looks like the hole in the C-01433 bushing cover plate (section 37-04) is not perfectly round allowing the canopy pin to float up and binds there.
What I think will work as a temporary fix is to glue and RTV an AN4 nut (or 1/4” spacer of some sort) right in front of the lower linkage, which would prevent me from opening the pins too far.
The hard fix looks to be to replace or add another C-01433 bushing cover and be careful not to elongate the canopy pin hole.
I have another issue also, which is that the right pin is dragging very heavily on the bottom of the hole in the UHMW pin block. This creates a LOT of friction and makes it very hard to latch the canopy shut. With the canopy up, the latch closes easily (when it doesn't bind up!). This wasn't noticeable, with the original-size latch pin, before I finished the canopy fairing and tightened (barely) all the screws securing the canopy to the arch. So there seems to be a little misalignment after the canopy was installed on the frame.
I've been waiting for Vans to chime in, and ignoring this problem in the meantime. I hope they chime in soon!
I thought about blocking the rearward travel of the canopy pin also. In my case, though, this is a fine balance, because the binding occurs when the right canopy pin is just barely aft enough to allow me to lift the canopy!
I have another issue also, which is that the right pin is dragging very heavily on the bottom of the hole in the UHMW pin block. This creates a LOT of friction and makes it very hard to latch the canopy shut. With the canopy up, the latch closes easily (when it doesn't bind up!). This wasn't noticeable, with the original-size latch pin, before I finished the canopy fairing and tightened (barely) all the screws securing the canopy to the arch. So there seems to be a little misalignment after the canopy was installed on the frame.
I've been waiting for Vans to chime in, and ignoring this problem in the meantime. I hope they chime in soon!
I learned a bit more about the two problems I am having with the SB.
1. I drilled out the 4 LPs holding the front bronze bushing into the right roll bar, so I could inspect it. Without that bushing in place, the binding is really bad. When trying to close the canopy, the up force on the tail of the pin causes it to bind in the rear bushing. So, the front bushing seems to keep the pin aligned, preventing binding. I rotated the front bushing 180 degrees, swapping top for bottom, checo’ed the bushing back into place on the front of the rollbar, and the binding disappeared! Trying the front bushing in several different positions, sometimes I get binding and sometimes I don’t. So, this binding problem is caused by tiny tolerances somewhere, but the up force on the tail of the pin seems to be the root cause. The front bushing has a bit of up-down slop in its mounting hole on the rollbar. If I space it upward, even with a single layer of masking tape, then the binding is gone. That’s not a permanent solution, obviously, but it’s a good hint of what contributes to the binding problem.
2. The other problem (which perhaps in NOT related to the SB) is that since I installed my acrylic canopy just recently, the right latching pin encounters serious friction when it engages with the UHMW pin block. I have to pull down really hard on the canopy to get it to close. I’m not sure what is limiting downward motion of the canopy, but I think it is the acrylic canopy itself touching the top of the roll bar. Is that what is supposed to happen? If I could get a bit more downward travel, this problem would go away. If I put thin washers between the canopy arch and canopy at the top, this might do it, but it would cause misalignment of the screw holes on the side of the canopy. Would it be OK to ream out the screw holes larger than the #27 called out in the plans, to give the canopy a little more upward shift (with thin washers) relative to the canopy arch?
-Lou
I just spoke with Gary in Van's support. They have had lots of calls about issues with this SB, including the pin binding in the full open position. I think I've found a band-aid solution to it (see #1 in my previous post), but not sure it will be robust.
My other problem (#2 in the post above) is unrelated to the service bulletin, and is caused by my acrylic canopy touching the top of the rollbar, making it difficult to engage the latcing pin in the canopy arch.
Gary says the engineering team is studying all of the issues that have been reported with the SB, and there may be changes coming to SB-00128 to address the problems. So, I would suggest that if you haven't done this SB yet, you should hold off a while and see how it evolves!
We finished the install of SB-00128. Everything is working as it should. With the original pins the canopy would rise about 3/8 of an inch in flight. It seems the rubber that the pins went through to the to lock the canopy, flexed enough to allow the 3/8 inch rise in flight. just the tip of the pin was through the canopy which allowed the rise so no metal contact was made until the rubber flexed. My guess only 1/8 inch of the pins were making metal to metal contact. The new longer pins are solid against metal so no flexing. Cheers
Did earlier 14's use rubber canopy pin blocks? The current blocks in the finish kit are hard plastic material and don't allow any flex.We finished the install of SB-00128. Everything is working as it should. With the original pins the canopy would rise about 3/8 of an inch in flight. It seems the rubber that the pins went through to the to lock the canopy, flexed enough to allow the 3/8 inch rise in flight. just the tip of the pin was through the canopy which allowed the rise so no metal contact was made until the rubber flexed. My guess only 1/8 inch of the pins were making metal to metal contact. The new longer pins are solid against metal so no flexing. Cheers
No they did not.Did earlier 14's use rubber canopy pin blocks? The current blocks in the finish kit are hard plastic material and don't allow any flex.
We finished the install of SB-00128. Everything is working as it should. With the original pins the canopy would rise about 3/8 of an inch in flight. It seems the rubber that the pins went through to the to lock the canopy, flexed enough to allow the 3/8 inch rise in flight. just the tip of the pin was through the canopy which allowed the rise so no metal contact was made until the rubber flexed. My guess only 1/8 inch of the pins were making metal to metal contact. The new longer pins are solid against metal so no flexing. Cheers
the rubber piece is hard, maybe even plastic, so it's not flexing. Most probable is the hole was too big allowing for movement enough to allow the canopy to rise 3/8 inch. I made the longer rear pins slightly smaller by putting the pins in the drill press and dressing them with a file and then scotchbrite to shine. Now locking tight and no way for the canopy to rise now.
If you have not started the install of SB-128 GOOD!. If you do the locking pin install first instead of last as shown in the SB. You will prob not have to remove the 8 rivets and not use the longer side pins.
with the New longer locking pins in place the canopy when locked is flush against the fuselage rail and the shorter original side pins should be good. If any one would like to see a video of the new locking with SB 128 send me an email ( [email protected] ) and I will forward the video to you.
with the New longer locking pins in place the canopy when locked is flush against the fuselage rail and the shorter original side pins should be good. If any one would like to see a video of the new locking with SB 128 send me an email ( [email protected] ) and I will forward the video to you.
A couple comments on this SB. Figure #9 and 11 have an omission. The 2 forward screws are 8R9 and the 2 aft are 8R8.
If you are in the habit of resting the canopy on the pins while taxiing, the new pins will contact aluminum and not the UHMW black blocks, if fully engaged, due to the longer length pins. You’ll have to retract them a bit to rest on the blocks.


If you are in the habit of resting the canopy on the pins while taxiing, the new pins will contact aluminum and not the UHMW black blocks, if fully engaged, due to the longer length pins. You’ll have to retract them a bit to rest on the blocks.
I just completed this SB and can report that I had the same issue as a lot of builders with the pin binding in the retracted position. I looked through the SB again and I noticed that on page 8, fig 13, my geometry didn’t look anything like that. When I looked at it closer I could see that fig 13 has the original bell crank angles in it! You can just scale it and see the height of the screw hole is higher than the new angles that came in the kit. As mine was binding anyway, I took it all apart and reinstalled everything with the original C-01429 bellcrank angles. Happy to report it worked awesome! No binding. Even if I manually pull the pin aft to bind it, I can release it with the handle, albeit a good tug. I had to modify the tops of the two holes that the pushrod passes through as the pushrod will ride up a bit. I did put the pins in the drill press and dress them with a file, emery cloth and scotch brite, as others have done. I also had to lengthen my pushrod slightly.I just spoke with Gary in Van's support. They have had lots of calls about issues with this SB, including the pin binding in the full open position. I think I've found a band-aid solution to it (see #1 in my previous post), but not sure it will be robust.
My other problem (#2 in the post above) is unrelated to the service bulletin, and is caused by my acrylic canopy touching the top of the rollbar, making it difficult to engage the latcing pin in the canopy arch.
Gary says the engineering team is studying all of the issues that have been reported with the SB, and there may be changes coming to SB-00128 to address the problems. So, I would suggest that if you haven't done this SB yet, you should hold off a while and see how it evolves!
It makes a lot of sense that the higher bellcrank pivot point would lessen the upward force that seems to be the cause of the binding.
Hopefully this works for those who are having trouble with this SB. YMMV
C-01460 on the left and the oem C-01429 re-installed


Now my geometry matches that in fig 13


Flight Chops
Member
I was wondering about this...If you are in the habit of resting the canopy on the pins while taxiing, the new pins will contact aluminum and not the UHMW black blocks, if fully engaged, due to the longer length pins. You’ll have to retract them a bit to rest on the blocks.
I absolutely use "the rest the canopy on the pins while taxing on a hot day" trick.
It will take some muscle memory training to not re-lock the release after opening, and before resting the canopy on the pins as I normally do...
Thanks for confirming there's a slight issue here.
So with what you say and what was mentioned above in post #88, does this mean that this SB can be reduced to simply swapping out the latching pins (C-01456) and enlarging the pushrod hole?I just completed this SB and can report that I had the same issue as a lot of builders with the pin binding in the retracted position. I looked through the SB again and I noticed that on page 8, fig 13, my geometry didn’t look anything like that. When I looked at it closer I could see that fig 13 has the original bell crank angles in it! You can just scale it and see the height of the screw hole is higher than the new angles that came in the kit. As mine was binding anyway, I took it all apart and reinstalled everything with the original C-01429 bellcrank angles. Happy to report it worked awesome! No binding. Even if I manually pull the pin aft to bind it, I can release it with the handle, albeit a good tug. I had to modify the tops of the two holes that the pushrod passes through as the pushrod will ride up a bit. I did put the pins in the drill press and dress them with a file, emery cloth and scotch brite, as others have done. I also had to lengthen my pushrod slightly.
It makes a lot of sense that the higher bellcrank pivot point would lessen the upward force that seems to be the cause of the binding.
Hopefully this works for those who are having trouble with this SB. YMMV
C-01460 on the left and the oem C-01429 re-installed
View attachment 117305
View attachment 117306
Now my geometry matches that in fig 13
View attachment 117307View attachment 117308
Vans is the only one that can answer that question.So with what you say and what was mentioned above in post #88, does this mean that this SB can be reduced to simply swapping out the latching pins (C-01456) and enlarging the pushrod hole?
I completed the entire SB including the C-01458 side pins. The only deviation from the SB I made was to put the original bell crank angles back in. That’s what worked for me and stopped the pins from binding. I wrote in my log that the SB was completed with a note stating the original C-01429 bell crank angles were used.
Last edited:
rdusair
I'm New Here
Once installed the only visible part of the pin will be the pin itself. You won't see any of the weld glob once installed.Anyone notice how rough the top welds are on the guide pins? Are they going to be an "eye sore", how do you finish them without filing a lot of that weld "glob" off....I really don't want to do that!? I filed as much as I dare to flatten the top of the weld.
Hi All, I'm replying to my message earlier in this thread. John from Van's support called me about the problem with the new longer pins binding when the latch is fully open. He said the engineering team recommends the same as what several others who posted above already did: chuck the new longer pins into a drill, and hit it with emery cloth, with the goal of reducing the diameter about 0.003". I haven't tried it yet, but wanted to put it out there since it seems like Van's recommended solution.I just spoke with Gary in Van's support. They have had lots of calls about issues with this SB, including the pin binding in the full open position. I think I've found a band-aid solution to it (see #1 in my previous post), but not sure it will be robust.
My other problem (#2 in the post above) is unrelated to the service bulletin, and is caused by my acrylic canopy touching the top of the rollbar, making it difficult to engage the latcing pin in the canopy arch.
Gary says the engineering team is studying all of the issues that have been reported with the SB, and there may be changes coming to SB-00128 to address the problems. So, I would suggest that if you haven't done this SB yet, you should hold off a while and see how it evolves!
Last edited:
On mine you could see the ‘weld glob’ once the canopy was closed so I gave it a little clenaup and polished it.Once installed the only visible part of the pin will be the pin itself. You won't see any of the weld glob once installed.

38-37: Canopy Hard to Close / Canopy Side Pins
A Build Log detailing the build of a Vans RV-14
 tasrv14.blogspot.com
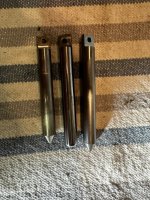
Based on the experiences reported in this thread, I decided to investigate the possibility of machining new pins that use the original bellcrank and support mounts. My goal was to build pins short enough to clear the aft face of the canopy bow when retracted and long enough to fully engage the canopy bow when latched. Looking closely at the operation of the original pins, it appeared that most of the points are not doing anything - the pins are fairly well aligned and the holes in the nylon guideblocks on the aft face of the canopy bows are slightly tapered.
The pins I machined are longer than the original pins and shorter than the new SB pins. The distance from the clevis pin hole to the shoulder on the engagement end of my original pins is 2.531 in. For the new service bulletin pins, the dimension is 2.875. My pins are 2.814, The overall length of my original pins is 2.945. The service bulletin pins are 3.249, and my new pins are 3.110.
My pins have a short rounded nose that engages smoothly using the original linkages with no adjustments. When retracted to the open position, the nose of the pins extends slightly less than the head thickness of the LP4 rivets, so there is no interference with the canopy. In the latched position, the nose of the pins extends far enough that the latching is fully on the cylindrical part of the pins. With the original pins, I had the microswitch as far aft as it would go to get reliable canopy warnings. For my new pins, I'm using the original microswitch brackets with the switch as far forward as possible. The switch operates reliably and the pin is not bottoming out the switch button.
I found that polishing the pins improved operation smoothness a lot so I also rounded off the corner at the base of the points of the side guide pins
and polished them.
Attachments

Please do NOT skip this! Maybe more later.What's the community consensus here on already built airplanes that are not flow in aerobatics? I'm strongly considering skipping this since we've never seen a canopy latch annunciation in flight.
I started reading all of the comments ts here and got maybe a third through and was concerned with some of the comments.
Although I will not attempt to go into details and start even more speculation, I am aware of the (a??) situation that led to a conversation with Van's engineering by ME.
This is **not** due too "overstressed aerobatics".
This situation CAN lead to a very problematic flight condition.
They took the time to study the "possible" scenario and come up with an engineering solution that is installable in the field and VERY ROBUST vis-a-vis the possible situation.
If on noting else, I implore you to install this based on what I know.
Of course, your situation may be different so "Your Mileage May Vary"
It's your plane and your call.
