
Van's Air Force
You are using an out of date browser. It may not display this or other websites correctly.
You should upgrade or use an alternative browser.
You should upgrade or use an alternative browser.
RV6 Elevator skin cracks - how to repair?
- Thread starter nickw9815
- Start date


You could try another shot at stop drilling the crack. Go slightly past the end of the crack, at the one o’clock position, and drill a slightly larger hole, maybe 1/8th inch. The larger the hole, the less stress on a given distance around the circumference of the drilled hole, which lessens the chance of a new crack starting. You want to make sure you are actually drilling at the end of the crack! The last hole might have been short, and that is why the crack is continuing to progress. Redrilling has no real downside. It will work, or it won’t. If it doesn’t stop the progression of the crack, then options become more intense, with one being to build a new control surface. Your skin is most likely .016 inch. The replacement skins are .020. Getting the trailing edge bend perfect is most important to preventing cracks, as to keep pressure off the end of the skin stiffener, where the cracks start. Try the easy most conservative fix first, and if that doesn’t work, come back in a year for further suggestions?…What is the best way to fix this?
Jim Baker
RV-6
If my airplane developed cracks, I'd probably stop drill the cracks and apply a patch made of .016 or .020 aluminum, using proseal or some other adhesive to hold it in place.
Tracer 10
Well Known Member
It’s a very common problem with the older RV aircraft elevator skins made of .016” aluminum. Some have seen the same problem with the rudder skins since they also are made of .016” aluminum. Dynamic balancing your prop is your best preventative measure. Re-skinning with .020” reusing the structure that the skin is riveted to is another option.You could try another shot at stop drilling the crack. Go slightly past the end of the crack, at the one o’clock position, and drill a slightly larger hole, maybe 1/8th inch. The larger the hole, the less stress on a given distance around the circumference of the drilled hole, which lessens the chance of a new crack starting. You want to make sure you are actually drilling at the end of the crack! The last hole might have been short, and that is why the crack is continuing to progress. Redrilling has no real downside. It will work, or it won’t. If it doesn’t stop the progression of the crack, then options become more intense, with one being to build a new control surface. Your skin is most likely .016 inch. The replacement skins are .020. Getting the trailing edge bend perfect is most important to preventing cracks, as to keep pressure off the end of the skin stiffener, where the cracks start. Try the easy most conservative fix first, and if that doesn’t work, come back in a year for further suggestions?…
Jim Baker
RV-6
I have had two small rudder cracks. The first, I did exactly this, the second, I just stopped drilled and inspect regularly. Both worked.If my airplane developed cracks, I'd probably stop drill the cracks and apply a patch made of .016 or .020 aluminum, using proseal or some other adhesive to hold it in place.
I am lucky. Mine are in an area that’ isn’t obvious, but the patch is way more noticeable if you’re looking. You have to look hard to see the one stopped drilled crack.
Not sure why the pull rivets were added, but,‘wouldn’t do that.
Tracer 10
Well Known Member
The trailing edge on the .020” skin is pre- bent.You could try another shot at stop drilling the crack. Go slightly past the end of the crack, at the one o’clock position, and drill a slightly larger hole, maybe 1/8th inch. The larger the hole, the less stress on a given distance around the circumference of the drilled hole, which lessens the chance of a new crack starting. You want to make sure you are actually drilling at the end of the crack! The last hole might have been short, and that is why the crack is continuing to progress. Redrilling has no real downside. It will work, or it won’t. If it doesn’t stop the progression of the crack, then options become more intense, with one being to build a new control surface. Your skin is most likely .016 inch. The replacement skins are .020. Getting the trailing edge bend perfect is most important to preventing cracks, as to keep pressure off the end of the skin stiffener, where the cracks start. Try the easy most conservative fix first, and if that doesn’t work, come back in a year for further suggestions?…
Jim Baker
RV-6
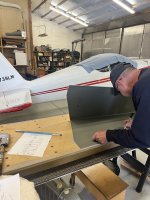
Attachments
One owner in my region stop-drilled the cracks on his rudder (.016" skins) and placed epoxy on the cracks and in the holes. I thought it was a strange way to fix the problem and wasn't confident it would work, however,15 years later the cracks haven't moved. Go figure.
If (or when) my rudder and elevators crack I'll be doing the same I guess.
If (or when) my rudder and elevators crack I'll be doing the same I guess.
You are correct, the trailing edge is pre-bent. However, as your picture even shows, the skin is not “final” bent. The reason it is not bent to final shape, is it would then be impossible to open the skins back up enough to rivet the stiffeners in. So, Van’s has you fit the stiffeners, then squeeze the trailing edge to final bend closure in a brake, usually putting in a drill bit inside the radius at both ends to not over close the brake on the skin. When final bent and fitted to the spar, you should be able to put a straight edge on the elevator skin, front to back, and have no convex surface before the actual bend radius of the back edge of the skin. If you have any, then there is stress on the skin where the stiffener ends, which is where most cracks develop. This is a very critical bend, or step, to get right/perfect, but needs attention given, to get it perfect! This, if not right, and especially in the rudder, can even cause flutter! I’ve seen this in two RV’s personally, at high speeds. We squeezed the trailing edge with seamer pliers to get rid of the slight convex surface very close to the trailing edge, and the flutter went away. It really needs to be right, for more reasons than to just not get cracks…The trailing edge on the .020” skin is pre- bent.
Jim Baker
RV-6
Exactly the same as the .016" is! But it is the "final" bend after the installation of the stiffeners that is critical.The trailing edge on the .020” skin is pre- bent.
