Van's Air Force

The definitive Van's Aircraft support community! Buying, building or flying an RV? Join our exclusive family of mentors and enthusiasts!

Sticky valve on a Thunderbolt IO390

To those who have completed SI 1425A, did you have to drop the exhaust to help re-insert the valve, or were you able to work through the spark plug holes, with a pickup tool?

Also, to those who have used a magnet to help guide the valve back in, will a 1/2" magnet work, or does it have to be less than 1/2" in diameter?
Sorry, disregard my magnet size question. SI 1425A does say a max diameter of 3/8".

Also, does anyone know the correct reamer size from McFalane?
 
To those who have completed SI 1425A, did you have to drop the exhaust to help re-insert the valve, or were you able to work through the spark plug holes, with a pickup tool?

Also, to those who have used a magnet to help guide the valve back in, will a 1/2" magnet work, or does it have to be less than 1/2" in diameter?
Definitely remove the exhaust header tube. That way you can also ease the valve into the cylinder without letting it fall in and potentially putting a micro-ding into the cylinder wall. Didn't find that a magnet helped much.

What did help was thin safety wire (~.010 dia). I used needle-nose pliers to pull the valve out of the guide working through the port. Once the stem was out of the guide, but before sending the valve completely into the cylinder, I attached ~10" of safety wire to the end of the stem, around the keeper groove. The wire provided something to grab through the spark plug hole to retrieve the valve to clean the stem. Also helped to fish the valve out of the cylinder through the port. In combination of holding the wire taut and the needle-nose pliers, got the tip of the stem started in the guide and then unraveled the wire.

Below, you can see the safety wire. And the varnish on the stem before I cleaned it. And after cleaning.

1729888137837.jpeg1729888221869.jpeg
 
Last edited:
Rehab on sticking valve - IO390

I'll begin with a summary:
My engine is a Lycoming IO-390 - Thunderbolt build. At 270 hours in October 2021, I experience a sticking exhaust valve on cylinder 2. The valve was so tight, that it required tapping out to release it. I reamed the valve guide yielding a black semi-hard tar/coke material. No wobble test was performed, and nothing was done to other cylinders. Returned to service and normal operation.

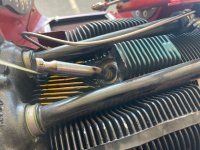
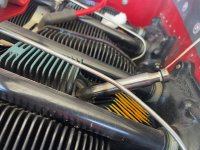
Just before this incident, I had installed the Tunnel Cooling Flap kit designed for the EXP-119 engine on RV-14s. My plane has a Vetterman trombone exhaust (2 x 2-into-1), meaning the tunnel is empty providing addition cowl exit area and even greater cooling than a stock setup. While I was installing it in the quest for speed/efficiency, it became a good way to increase engine temps in an attempt to reduce valve guide buildups (following the Camguard and Mike Busch school's of thinking).

At 396 hours (125 since last incident), I again experienced a sticking exhaust valve, again on cylinder #2 on 2 days. Day 1 involved "morning sickness" for 30 seconds prior to a normal flight with 2 segments, an hour each. On Day 2, morning sickness occurred again, for about 45 seconds. After a normal run-up (with CHTs all over 250), I took off and had cylinder #2 drop out for 6 seconds on climb out, followed by 45 minutes of normal operation.

Now - the update to the story:
Lycoming Technical Service spent about 40 minutes on the phone with me, but every idea for a cause was a dead end - they are stumped.
1. too cool? - except I increase CHTs with the tunnel cooling flap and "harder" operations, and cylinder #2 runs 350 in cruise, a good number.
2. dirty oil? - I change every 40 hours, and my silicon reading is very low
3. slow flight operation (cool and low power)? - I don't do this
4. glazed cylinder with excess oil going to valve? - 78/80 on all cylinders

Lycoming recommendations:
1. SB 388 C (wobble test) on all cylinders
2. SI 1425A - ream valve guides on all cylinders
forward results to Tech Service

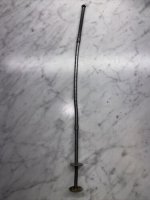
To perform the infamous wobble test, you need fixture (ST310 for angle valve) which Lycoming will rent to you. This process is really tedious - I had to call a Lyc distributor (Aircraft Spruce) who called Lycoming to verify the tool is available, and it then drop ships from Lycoming. The rental for 30 days is a somewhat reasonable $100, but Lycoming also requires a $4,600 deposit before shipping (they REALLY want it back - refunded on return). It took a week to get the tool. You can buy an alternate tool from ACS for <$300, but it is out of stock until January, so I went with the rental. Before the rental tool fixture arrived, I was able to borrow the ACS tool (made by Sydow) from a neighbor, and in my hands, the ACS/Sydow version was superior to use.

The wobble test 
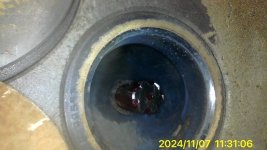
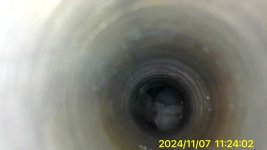
SB 388C measures the "lateral play" end to end in the valve guide. I believe the idea is that too little play and differential expansion rates will cause binding (morning sickness until everything warms up, and again under high load such as climb out). Too much play and there is excess room for deposits and contaminants to build up. For an angle value, the acceptable wobble is 0.015 to 0.030". To perform the measurement, an extension is fastened to the end of the valve stem, with the extension displaced in opposite directions by prying against the case, and the differential measured, either with feeler gauges against a set screw or with a micrometer gauge. My good cylinders were .020 and .022" with the faulty #2 only 0.012".

Next comes 
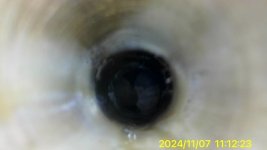
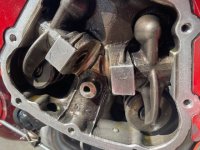
SI 1425A for reaming the valve guides. The valve springs have to be removed (this was done before the SB388C), and the valve pushed into the cylinder. A reamer is greased (to catch debris) and fed into the guide. A clean guide will accept the reamer with only hand forces - this was true of my cylinders #1 and #4. Valve guides with buildup with require more force - either a hand tool on the reamer or in my case, I used a power drill at very slow speed. Cylinder #3 had minor buildup (a trace of black coke on the bit) and a coating on the valve stem that cleaned off with acetone and scotchbrite. Cylinder #2 (the problem child) had a clean valve stem but more significant coking in the guide. After reaming, the wobble test was 0.018" - still my tightest but close to the rest. After all the reaming, the valves have to be fished back into the guide (a tricky endeavor), the springs and keepers reinstalled, pushrods and shrouds put back if removed, and rockers, covers etc. put back.

The plane is back in the air - two flight days with normal operations. I have asked Lycoming about using CamGuard additive in the oil (captures monomers that form varnish) and TCP fuel additive that scavenges lead.

I will post some pictures in a separate post for those interested.

Let the ideas and suggestions start ...
I do not have any of the symptoms yet that are covered in this thread, but have now received the McFarland reamer.I have also started using Camguard .Oil changes are at less than 50 hour intervals.Three cylinders have excellent compressions but number 2 has a slightly lesser compression and an audible hiss during compression tests. Perhaps exhaust valve not completely sealing. The info on Vans Airforce is invaluable. Hobbs for FMAH is 278. Would love to see a Utube video of the reaming process.
 
To those who have completed SI 1425A, did you have to drop the exhaust to help re-insert the valve, or were you able to work through the spark plug holes, with a pickup tool?

Also, to those who have used a magnet to help guide the valve back in, will a 1/2" magnet work, or does it have to be less than 1/2" in diameter?
After doing this thing many times, I've found it's not necessary to drop the exhaust. Saves a lot of time and work.

Magnet is not much help. I don't think even a 1/2" magnet is strong enough to support the valve by the end of the stem (which is what is needed). The job would be easier if that worked. You will need a flexible 2-claw pickup tool, one that opens up wide enough to grab and hold the 1/2" valve stem.

The piston becomes your "third hand" to support the value when lifting it back up into its guide. Obviously not much pressure - just enough to support the valve for a minute while you get it started into its guide. It's tricky and can take many tries to get it. A lot of patience is needed.
 

Attachments

  • s-l500.jpg
    s-l500.jpg
    19.6 KB · Views: 106
I do not have any of the symptoms yet that are covered in this thread, but have now received the McFarland reamer.I have also started using Camguard .Oil changes are at less than 50 hour intervals.Three cylinders have excellent compressions but number 2 has a slightly lesser compression and an audible hiss during compression tests. Perhaps exhaust valve not completely sealing. The info on Vans Airforce is invaluable. Hobbs for FMAH is 278. Would love to see a Utube video of the reaming process.
I highly recommend looking inside at your #2 exhaust valve with a borescope. Savvy Aviation has excellent information about valve/cylinder inspection, and actually looking at the valve may tell you a lot.
 
I highly recommend looking inside at your #2 exhaust valve with a borescope. Savvy Aviation has excellent information about valve/cylinder inspection, and actually looking at the valve may tell you a lot.
I only found my sticking exhaust valve after a routine compression check showed very low compression (15/80) with the leak clearly out the exhaust. No other significant symptoms with 715 hours on the engine. I uploaded the thorough (11 pics per cylinder) boroscope submission to Savvy with no issues noted in any cylinder including the problem one. The Savvy exhaust valve screening report also showed no problems and all valves in the green as they have been since the engine was new.

My first attempt to remedy was staking the valve with no change. Next, I lapped the valve using Mike Busch’s online tutorial and again, no improvement. Then I borrowed tools to wobble test the valve and bingo, problem found. After a lot of study and advice from friends smarter than me (this was my first sticking valve), I reamed the valve guide per Lycoming. Three wobble tests and 100 hrs later, the valve still checks good. I now own the tools and have tested the other cylinders with everything in spec.

One lesson learned was that boroscoping cylinders is helpful but not conclusive in determining cylinder health!
 
Last edited:
I highly recommend looking inside at your #2 exhaust valve with a borescope. Savvy Aviation has excellent information about valve/cylinder inspection, and actually looking at the valve may tell you a lot.
URL ?
 
Thanks, thought it might be this one which Mike feels too cold of CHT's are the issue. The problem is the vast majority of sticky valves on an angle valve 390 is cylinder number 2 and that is the hottest of the vast majority of IO390's. I realize CHT's are only indicative of a very small region of a cylinder.

 
Unless I missed it, so far, at 160 posts, no one with consistent long term 15W-50 Aeroshell use has reported a stuck valve.

Partial or full synthetic is the lube industry's standard response to high temperature coking, as synthetics exhibit greater resistance to thermal breakdown. 15W-50 Aeroshell is currently the only approved piston oil with a significant synthetic content.

Note the stem temperatures in this TRW illustration:

TRW 600w.jpg

Excellent illustrations here, from the Graz University of Technology, with bibliography. It mostly deals with turbines, but the physics are the same: https://aeroenginesafety.tugraz.at/doku.php?id=22:223:2232:2232

Research results, average for a wide range of oils. Note the temperature range at which deposition rate goes vertical. A very moderate increase in the oil's coking temperature can have a significant impact. If the oil's coking temp is on the right side of that dynamic line, it doesn't deposit coke.

ScreenHunter_2471 Oct. 28 08.42.jpg

The second factor, well recognized, is oil flow. More flow means less coking. Many of the stuck valve examples exhibit signs of low oil flow to the rocker boxes, and CHT on the high side. More oil to the rocker boxes is a good thing. However, there are limits on effectiveness in the context of valve stems. Unfortunately, we can't significantly increase oil flow inside the valve guide.

ScreenHunter_2472 Oct. 28 08.43.jpg
 
After doing this thing many times, I've found it's not necessary to drop the exhaust. Saves a lot of time and work.

Magnet is not much help. I don't think even a 1/2" magnet is strong enough to support the valve by the end of the stem (which is what is needed). The job would be easier if that worked. You will need a flexible 2-claw pickup tool, one that opens up wide enough to grab and hold the 1/2" valve stem.

The piston becomes your "third hand" to support the value when lifting it back up into its guide. Obviously not much pressure - just enough to support the valve for a minute while you get it started into its guide. It's tricky and can take many tries to get it. A lot of patience is needed.
I abandoned exhaust removal after the first “round” - indeed saves time.

I found the magnet is key - it supports the stem end and guides it to the guide.

However, I also crafted another key tool - coat hanger wire. I bent a hook on one end (small enough to go through the spark plug hole, large enough to hook under the stem at the valve face end and lift the valve) and a handle on the other to control orientation. Use the coat hanger to lift the stem end to the magnet, then reorient the hook to the valve face end and lift the weight of the valve, using the magnet to draw the stem into the guide. When the valve is lifted with the coat hanger close to aligned with the guide, the magnet draws it into the guide. A little practice - 30-90 seconds every time. I haven’t been concerned with cylinder wall nicks mentioned by another poster - in fact the valve can and will bang around quite a bit.

YMMV
 
Last edited:
I abandoned exhaust removal after the first “round” - indeed saves time.

I found the magnet is key - it supports the stem end and guides it to the guide.

However, I also crafted another key tool - coat hanger wire. I bent a hook on one end (small enough to go through the spark plug hole, large enough to hook under the stem at the valve face end and lift the valve) and a handle on the other to control orientation. Use the coat hanger to lift the stem end to the magnet, then reorient the hook to the valve face end and lift the weight of the valve, using the magnet to draw the stem into the guide. When the valve is lifted with the coat hanger close to aligned with the guide, the magnet draws it into the guide. A little practice - 30-90 seconds every time. I haven’t been concerned with cylinder wall nicks mentioned by another poster - in fact the valve can and will bang around quite a bit.

YMMV
The wire to hold the heavy end, and (strong) magnet for the small end to pull through the guide is how David Clark has recommended. With careful use of a wire hook there is no reason the valve has to bang around. A piece of copper wire from romex can lessen potential damage from a hardened coat hanger. The (alternate) dental floss method of pulling the valve back in just didn't work.

Exhaust removal for valve grinding might be necessary but certainly not a ream.
 
Lets add one more to the list, today I experienced the typical morning sickness on #2 cylinder which lasted for 20 seconds. To give some data, my CHTs are all very close to each other with a delta of 7-10F between the hottest and coldest cylinder. My #1 and #2 cylinder are typically within 1-2F of each other and the temps are in the 300F range. I use Philips X-country victory and typically change it every 25-28 hours, rarely get to 30 hours as I try to stick to the 4 month interval. Total engine hours is 224 now.
I will be preforming the reaming this week and will report back as how much stuff is found in the guide or valve stem.
Merdad,

Interesting. Your first occurrence in hours is about when I encountered this. I have been changing oil at 20 to 25 hours as you have although not Phillips Victory. I changed two aspects after reaming - oil change interval and use of MMO in the fuel (4oz/per 10 Gal). Maybe the oil change interval is not a factor in avoiding this stickiness. I do continue with MMO in fuel and have not had any issues since.

I read a post recently where adding MMO (6oz/per 10 Gal) to the fuel for a tank or two did the trick. It would be an interesting experiment. The tricky part is not knowing if the other shoe will fall.

Edited 11/2/24 to change MMO dose from (4 or 6 oz/Gal) to (4 or 6 oz/per 10 Gal)
 
Last edited:
Merdad,

Interesting. Your first occurrence in hours is about when I encountered this. I have been changing oil at 20 to 25 hours as you have although not Phillips Victory. I changed two aspects after reaming - oil change interval and use of MMO in the fuel (4oz/Gal). Maybe the oil change interval is not a factor in avoiding this stickiness. I do continue with MMO in fuel and have not had any issues since.

I read a post recently where adding MMO (6oz/Gal) to the fuel for a tank or two did the trick. It would be an interesting experiment. The tricky part is not knowing if the other shoe will fall.
Dennis,
I have one other friend with the IO390 that has also experienced this on #2 cylinder so it all seems a common issue but I guess no definitive answer yet as the cause.
Just to confirm, are you adding 4oz for each gallon or for every 10G of fuel. In earlier post I have read that MMO is added 4oz for every 10G of fuel. I believe I am going to start using it since no one has reported any issue or harm of using.
 
Thanks, thought it might be this one which Mike feels too cold of CHT's are the issue. The problem is the vast majority of sticky valves on an angle valve 390 is cylinder number 2 and that is the hottest of the vast majority of IO390's. I realize CHT's are only indicative of a very small region of a cylinder.
The problem with Mike Busch's hypothesis of sticking valves on cylinders that are too cool is the fact that all those years of running leaded fuel in liquid-cooled overhead valve engines that ran with CHT of about 190F for hundreds of thousands of miles never caused sticking valves. I always saw plenty of lead build-up on exhaust valves, but it was always wiped clean on the portion that runs in the guide. As Dan points out, oil coking from high temperatures on the valve stems is the issue, not lead fouling. The few auto engines I know of that had a history of sticking valves (Chevy 4.3 Vortec V6, PRV-B27) exhibit insufficient oil distribution to the rocker area. On the B-27, there was a fix to drill out some oil passages. The only way (that I know of) to improve oil in the rocker box of a Lycoming is to increase the oil pressure.

And before someone says that the old motor fuel had less lead than 100LL, that is not true. Although the Spec. for 100LL allows for about twice as much TEL as the old premium auto gas, nowadays it is made with higher-quality base stock that only requires about the same amount of TEL that premium auto gas had in it.
 
Dennis,
I have one other friend with the IO390 that has also experienced this on #2 cylinder so it all seems a common issue but I guess no definitive answer yet as the cause.
Just to confirm, are you adding 4oz for each gallon or for every 10G of fuel. In earlier post I have read that MMO is added 4oz for every 10G of fuel. I believe I am going to start using it since no one has reported any issue or harm of using.
Merhdad - 4 oz per 10 gals. The same crusty old timer who originally suggested MMO to me has further suggested reducing this and only increasing if there is evidence. I am loath to experience another in flight stuck valve so will stand pat for a while. Not sure how long it will take to confirm that the MMO is the “cure”.
 
Last edited:
Dennis, what oil were you using?
Dan - Currently AeroShell W100 Plus in the warmer months. I switch to Phillips X/C 20/50 in the “winter”.

I am intrigued by your AeroShell semi synthetic oil comment. I have not heard yet of anyone in this or the other IO390 sticky valve thread mention its’ use. I’d like to get away from the MMO use and if that works, I would switch.

Thanks

 
So no one runs out and blindly buys gallons of the stuff, MMO recommends 4 ounces per 10 gallons of fuel.

Oh, my bad. I missed adding the “10”. Yes, it is 4oz per 10Gal.
 
Oh, my bad. I missed adding the “10”. Yes, it is 4oz per 10Gal.
I had a friend with a turbo 206 Cessna. He had valve sticking problems, MMO was not doing the trick, he switched to synthetic 2 cycle motorcycle racing oil for top oiling, it seemed to solve the problem. Consensus was the 2 cycle oil is designed to lubricate in the combustion chamber, even during the burning event, providing lubrication, while not leaving deposits.
 
Today with the help of a friend we reamed my exhaust valve on #2 cylinder. Here are some pix and what we found. After removing the rocker arm, the valve was moving freely in and out to the point that I was wondering if it needed any reaming but since we had gone that far and already experienced the morning sickness, it was logical to move forward. We tied dental floss to the end of it and pushed it through and pulled it out of the top spark plug hole. You can see the two pix of how much gunk it was on the stem, cleaned with a scotch bright pad. Reaming the guide required more force than I had expected, the reamer wasn't turning as easily considering there was not much in the guide but once completed, we had some black soot/carbon like stuff on the reamer. A second pass through went easier but not by much, so if you see resistance on the reamer, that is normal. Now the part of fishing the valve back through the guide proved to be challenging, multiple times we broke the dental floss and at one point the valve got positioned upside down. But the third time was a charm and got the valve back through the guide. Now the valve moves much smoother through the guide with no resistance. I am really hoping this is the last time I need to do this.
 

Attachments

  • Image_2024-11-07 11_12_23_558.JPG
    Image_2024-11-07 11_12_23_558.JPG
    18.3 KB · Views: 175
  • IMG_3415.jpg
    IMG_3415.jpg
    79 KB · Views: 171
  • IMG_3414.jpg
    IMG_3414.jpg
    78.7 KB · Views: 171
  • Image_2024-11-07 11_31_06_125.JPG
    Image_2024-11-07 11_31_06_125.JPG
    46.2 KB · Views: 150
  • Image_2024-11-07 11_24_02_278.JPG
    Image_2024-11-07 11_24_02_278.JPG
    20.8 KB · Views: 178
I am all open to suggestions and would like to draw on other people's experience, I am considering using MMO in the fuel as some folks have suggested.
DanH observed that no one has stated that they had the “sticky” using 15W-50 Aeroshell. Could be no one is using this on this engine. It could also be that this oil is effective in controlling the conditions that lead to sticky valve.

I see two experiments here. Run 15W-50 Aeroshell. If no reoccurrence, happy joy joy. If you do see indications of sticky valve, implement MMO in the fuel - initially at 6oz per 10 Gal, then 4oz per 10 when comfortable.

In absence of any other information, If I encounter the sticky valve again, I will do this experiment.

Lots of other potential fixes have been discussed. I don’t see any that are permanent solutions.
The mystery of this issue remains unresolved and I believe till the cause is determined the solution will be just a guess work. Why #2 cylinder is the most if not the only affected one is one of the questions that I and many others would like to know.

As for Aeroshell 15w-50 which is a semi synthetic oil, I know of very few people who uses this type of oil and I was told a long time ago to stay away from any synthetic oil in a leaded gasoline use and I had observed it myself in a Rotax engine even when we used little AVGAS and 91 Oct from the pump as how the lead would remain in the sump and at each oil changed we needed to wipe that clean. But until we get a poll going to see how many of the 390 drivers use this oil , we may not know if Dan is just lucky or his luck is due to the use of 15w-50 oil. As another data point, a RV14 friend of mine now has over 700 hours on his engine and he has not had the sticky valve issue and uses Phillips XC oil. I am leaning towards MMO as there has not been any negative effect/harm of using it that I know of and the cost doesn't seem to be very inhibitive.
 
We are forced to use Aeroshell 15w-50 in our 172 because of the H2AD engine. So we decided to use the same in the 390. only 50 hours so far, so nothing useful to report yet.
 
The mystery of this issue remains unresolved and I believe till the cause is determined the solution will be just a guess work. Why #2 cylinder is the most if not the only affected one is one of the questions that I and many others would like to know.
Hypothesis time: Many have indicated a likely contributing cause of sticky valves is low oil flow to the rocker box/cylinder head. It may be that on front prop governor IO-390’s, cylinder #2 has the lowest oil pressure available to the lifters and therefore the rocker box. Also note that IO-390’s have larger piston squirter nozzles than IO-360’s which may reduce oil gallery pressure compared to the 360’s.

Skylor
 
As for Aeroshell 15w-50 which is a semi synthetic oil, I know of very few people who uses this type of oil and I was told a long time ago to stay away from any synthetic oil in a leaded gasoline use...

Yeah, the never-ending hangover of the Mobil full-synthetic AV-1 debacle. Operative words are "a long time ago". Intro was mid 80's, and gone 30 years.

Remember, Aeroshell 15W-50 is semi-synthetic, with both corrosion and scuff additives pre-installed. I'm not sayin' it's The Cure, but hey, don't let the old wives run your show. Let's get some field reports.

...and I had observed it myself in a Rotax engine even when we used little AVGAS and 91 Oct from the pump as how the lead would remain in the sump and at each oil changed we needed to wipe that clean.

Mehrdad, I had the sump off my 390 earlier this year to do an intake flange mod for direct mounting of an FM-200. A little gray film, same as any other sump, but no sign of sludge. Same for last year's prop overhaul...the usual 1/16" or so of centrifugal deposit in the crank nose, and nothing noted at the prop shop. As for rocker boxes, pertinent to this thread, no sludge there either.

Can't speak to flow rate, but #2, on the left, is definitely not dry.

Rockers 2 and 4.jpg
 
Last edited:
Yeah, the never-ending hangover of the Mobil full-synthetic AV-1 debacle. Operative words are "a long time ago". Intro was mid 80's, and gone 30 years.

Remember, Aeroshell 15W-50 is semi-synthetic, with both corrosion and scuff additives pre-installed. I'm not sayin' it's The Cure, but hey, don't let the old wives run your show. Let's get some field reports.


Mehrdad, I had the sump off my 390 earlier this year to do an intake flange mod for direct mounting of an FM-200. A little gray film, same as any other sump, but no sign of sludge. Same for last year's prop overhaul...the usual 1/16" or so of centrifugal deposit in the crank nose, and nothing noted at the prop shop. As for rocker boxes, pertinent to this thread, no sludge there either.

Can't speak to flow rate, but #2, on the left, is definitely not dry.

View attachment 73857
Thank you Dan, I value your opinion a lot and it would be nide to get a poll if possible. FWIW, here is a picture of my rocker box and my while I did not have much oil come out when I removed the cover, my other friend who has also had a sticky valve said, he had a bunch of oil coming out when he removed his cover. No slug in mine either but I have a fraction of hours as yours.
 

Attachments

  • IMG_3413.jpg
    IMG_3413.jpg
    79 KB · Views: 63
FWIW, here is a picture of my rocker box and my while I did not have much oil come out when I removed the cover, my other friend who has also had a sticky valve said, he had a bunch of oil coming out when he removed his cover.

Interesting differences in appearance between your head casting (left) and my circa 2005 casting (right).

ScreenHunter_2491 Nov. 08 19.04.jpg
 
Interesting differences in appearance between your head casting (left) and my circa 2005 casting (right).

View attachment 73905
It seems quality is going down as prices are going up. I had close to 800 hours on my IO360 that I bought in 2007 with zero issues. It worked like an older Toyota, just changed oil and go.
 
Today with the help of a friend we reamed my exhaust valve on #2 cylinder. Here are some pix and what we found. After removing the rocker arm, the valve was moving freely in and out to the point that I was wondering if it needed any reaming but since we had gone that far and already experienced the morning sickness, it was logical to move forward. We tied dental floss to the end of it and pushed it through and pulled it out of the top spark plug hole. You can see the two pix of how much gunk it was on the stem, cleaned with a scotch bright pad. Reaming the guide required more force than I had expected, the reamer wasn't turning as easily considering there was not much in the guide but once completed, we had some black soot/carbon like stuff on the reamer. A second pass through went easier but not by much, so if you see resistance on the reamer, that is normal. Now the part of fishing the valve back through the guide proved to be challenging, multiple times we broke the dental floss and at one point the valve got positioned upside down. But the third time was a charm and got the valve back through the guide. Now the valve moves much smoother through the guide with no resistance. I am really hoping this is the last time I need to do this.
We are preparing to work through SI-1425A due to morning sickness in the #2 cylinder. Can you confirm .4995" -.5005" was the correct reamer size for an IO-390? The SI lists multiple sizes, and I want to be sure to have the correct reamer on hand when the A&P shows up...
 
We are preparing to work through SI-1425A due to morning sickness in the #2 cylinder. Can you confirm .4995" -.5005" was the correct reamer size for an IO-390? The SI lists multiple sizes, and I want to be sure to have the correct reamer on hand when the A&P shows up...
That is the correct size, part # VGR-LC4.
 
I am diagnosing "morning sickness" in an IO-390 EXP, #2 cylinder, 160hrs TT. It sticks for about 1:30 (I recorded it) every cold start lately. Once it unsticks the engine runs normally, and hot starts aren't affected.

Has anyone had success running MMO (Marvel Mystery Oil) in the oil to clean some of the deposits, and forego reaming? An A&P suggested that I try this for 3-5 hours, to see if there was improvement, and then change the oil.
As a follow up to my previous post, we elected not to take a chance on any additional flights to try the MMO as a remedy for morning sickness, so I do not have any data to share for that.

After much debate, we decided to pause flying, and work through Lycoming SI 1425A for the #2 cylinder exhaust valve with an A&P. Similar to posts above, the valve guide had black deposits towards the piston end of the tube, shown by the borescope. The reamer (McFarlane VGR-LC4 .4995-.5005) showed soft black deposits in the grease after reaming. The exhaust valve did move freely by hand prior to reaming, for the record. The first ground run after completing the exhaust valve reaming showed no evidence of morning sickness, so we will resume flying for a bit, with plans to complete SI 1425A for the rest of the cylinders in the near future. Also, looking forward, it appears that our baffling will not allow clearance for the Valve Rocker Shaft to slide out for cylinder #4, so we will probably need to fabricate a small hatch in the baffling to allow clearance to complete the procedure for #4.

As a data point, yes our #2 cylinder is the hottest of the bunch, yet by only about 5º over #1. #3 and #4 run about 20º cooler on average, also within about 5º of each other. This engine runs on the cool side with #1 and #2 cal head temps at about 325º-ish, and #3 and #4 at 300º-ish. This is an RV-14 with an IO-390EXP.
What oil are you using and time between oil changes? 160 hrs TT, what did Lycoming say, and did they warranty this ?
 
What oil are you using and time between oil changes? 160 hrs TT, what did Lycoming say, and did they warranty this ?
25 hrs max....much lower, a lot of times due to caldender time,.... Phillips XC 20/50, Camguard in every oil change. The engine is a rebuild by one of the major, reputable engine builders, so no Lycoming warranty. We are recent co-owners (it's an immaculate build), but it will now be now on a healthy, and regular flying cycle going forward... after completion the builder ended up on a very light flying schedule (life changes), which I would guess it why we have seen this issue with a low TT on the engine.
 
Morning sickness - symptom at 406 hours Hobbs

I reviewed data yesterday that shows a sag in EGT #2 at startup on 11/15/2024

It was not noticeable to me in the airplane but the data is clear: EGT #2 sagged at around 2 minutes after startup. It initially climbed to over 1100 degrees then sagged to 860. Recovery was quick. See graphs below

10 hours ago I changed over from Aeroshell W100 Plus (summer oil) to Phillips 20/50 with Camguard (winter oil). The oil looks pristine (like honey....)

Potential actions

-1. Monitor
-2. change MMO from 4oz/10Gal to 6oz/10Gal for a tank or two
-3. change oil to Aeroshell 15/50 (DanH uses this oil)

I don’t like “just” monitoring. I will do #2 as well - increase MMO to 6oz/10 Gal and monitor. Perhaps something will happen in the next 10 or 15 hours. In any case I will change to the Aeroshell semi synthetic.

The experiment continues.
 

Attachments

  • IMG_0818.png
    IMG_0818.png
    274.1 KB · Views: 47
  • IMG_0817.png
    IMG_0817.png
    307.5 KB · Views: 48
That sure looks like loss of combustion. It is odd that it doesn't start right away though. I've not heard that sort of behavior in morning sickness.
 
Further thoughts to my most recent update… now that I am past the denial phase (mostly)

Recent Incident occurs 406 Hobbs, 357 Tach , 10 hours on Phillips XC 20/50, original issue occurred 193H 167T

Note that I elected to be the MMO experimenter - see post # 14.

I have been adding 4oz per 10 gal and did so faithfully since post 14. I also elected to shorten the oil change interval to 20-25 hours. The most recent incident suggests to me that these experiments are not the cure I have been searching for.

This recent occurrence happened 10 hours after changing back from Aeroshell W100Plus to PHillips XC 20/50. Reading thru this thread from the beginning, I sense that sticky valves are happening more often with Phillips oils and with the hottest cylinder. There was talk of a poll on this thread for oil type. How can I make that happen? It would be good to collect data on intervals between occurrence, oil type, cylinder, CHTs, maybe other things?
  • Vlad states that he adds MMO to oil as well as fuel in post 47
  • BillL suggests bleed holes to lower CHT#2 in post 70
  • scsmith suggests a higher oil pressure to increase oil flow in post 108
  • Rag states that upon incident he will use MMO at 6oz/10Gal for a tank or two in post 126
  • Wasatch states that his mechanic stated adding MMO in the oil will help in post 137
  • DanH notes that he has not had issues using Aeroshell 15/50 semisynthetic in post 162
Prudence tells me that I need to change my experiment. Perhaps the new experiment should be
  • Increase MMO to 6oz/10Gal for a tank or two
  • Change oil to Aeroshell 15/50
    • Continue 20-25 tach hours interval
  • Explore oil pressure increase
    • I think the data says I am close to max now but will check
  • Explore decreasing CHT in #2
    • Will reach out to BillL to see if pictures are available before drilling
  • Contemplate MMO in oil
    • VLad states volume added in post 47. What could it hurt?
Not a good experiment but I accept the complexity to avoid an in air issue

Thanks for listening
 
Not a good experiment but I accept the complexity to avoid an in air issue
I have the honor of being an early and multiple incident “victim”. Like others here, the uncertainty can rattle confidence, and does (at least at first) erode the enjoyment of flying. I too wanted to avoid further occurrences, and restore confidence in my wonderful RV. I decided that the best preventative was to “ream before it sticks”. Since my shortest interval between symptoms was 125 hours, and my annual flying was about 100 hours, I added reaming #2 exhaust valve to my annual checklist. (Once you have the tools - reamer, Valve Wizard - and experience, this is an easy bit of preventative maintenance).

Hardly an experiment that benefits the group knowledge, but this approach has accomplished a couple things:
1. I haven’t had another incident of a sticking valve. I have found coking, and I have found less clearance, but I haven’t had an in-air (very disconcerting) or on-ground occurrence since.
2. The data collection of VAF has continued much beyond my own experience, though we are far from a solution yet.
3. My enjoyment of flying is restored, and my confidence in my aircraft has returned.

YMMV
 
I have started using MMO in the fuel (first tank was yesterday) but I have little confidence that any of these are the magic cure since the data that we have collected so far does not have the smallest hint as what the cause is and why only #2 cylinder.
If we manage to get the poll going, we probably ought to add the typical flying habits (short flight vs longer flight, ROP vs LOP etc)

Reaming at each annual is not something I will be looking forward to.
 
Oil Pressure might also be good to collect. My engine typically will start at 80 to 90 psi and operate at 76 psi in cruise. The IO390 “book” says 95 psi is max normal operating pressure with 115 psi at startup. Maybe I have room to up that pressure a bit and see if that helps.

DanH’s advice is good - change one thing at a time. However, I have experienced this issue in flight and do not wish to do that again. I might do all and eliminate one thing at a time.

I echo Merdad’s desire to avoid regular reaming. There must be a better path forward. -
It is sad that it may take a engine out landing for Lycoming to pay a closer attention to this. Sticking exhaust valve is no a new thing to Lycoming but at this interval and condition, seems to be not in par with their experience.

Watch the engine data closely at the start up especially on the colder days as this is expected to show itself when cold.
 
Back
Top