What's new
Van's Air Force

Don't miss anything! Register now for full access to the definitive RV support community.

Smiley faces on AN470 rivets, should I replace?

jaypay

Member
Hopefully I can get some feedback on how I can improve setting AN470 rivets with an offset rivet set.

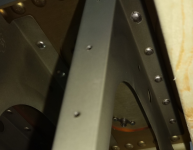
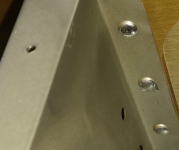
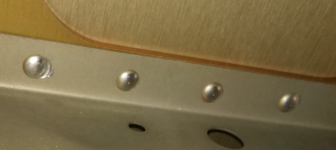
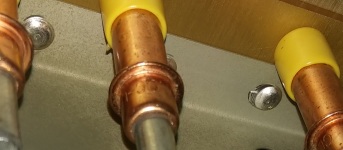
The rivets are AN470AD4-7, between the wing ribs and the main spar, RV-8. I was originally suspecting I had the wrong tool for the job, but it looks ok.

Currently using a MM135-17 1/8 AN470 X 5 1/2 X 401

Should those be drilled out? I have attached pictures of the worst offenders.

TIA. Julien
 

Attachments

  • Rivets5.png
    Rivets5.png
    1.2 MB · Views: 409
  • Rivets4.png
    Rivets4.png
    899.9 KB · Views: 410
  • Rivets3.png
    Rivets3.png
    1.7 MB · Views: 408
  • Rivets2.png
    Rivets2.png
    1.9 MB · Views: 393
  • Rivets1.png
    Rivets1.png
    1.7 MB · Views: 437
I was more prone than others to generate that particular defect. Particularly with an offset set. One revolution in my riveting was discovering these set caps. In addition to preventing the damage it acts as a training aid. If you have the gun tilted slightly it will leave a spot of orange material on one side of the rivet. In my experience trying to drill out the badly distorted heads is difficult because you can’t locate the actual center of the rivet
IMG_0573.jpeg
 
Last edited:
Mil-R-47196A is the standard industry reference for what is and isn't acceptable. I would encourage you to read through it. Vans has a copy of this spec on their website; https://www.vansaircraft.com/faq/mi...pec-rivets-buck-type-preparation-and-install/

Having said that, there is a non-zero chance to goof up the hole when replacing rivets, so you might want to check with Vans tech support before you get drill happy, especially on something as critical as a wing spar and see which ones they specifically recommend replacing and if you can get by with some of the "less bad" ones. The ones where the heads are smeared and for sure the one where it's actually cracked are way out of spec but engineering support from the manufacturer will always trump a generic mi-spec.

FYI- Those set caps work well, but offset riveting works better if you have 3 hands. One to hold the gun, one on the shaft of the set to keep it from rotating in the gun, and one for the bucking bar.
 
I can tell you what’s causing them in my experience.. when you are done driving the rivet, you are most likely releasing the trigger AND the pressure on the gun at the same time. Try this.. consciously apply pressure to the gun before, during and most importantly AFTER you release the trigger. Really try to keep the gun pressed into the work and isolate your trigger finger. I think what happens is that you release the trigger and the gun at the same time, and the gun hammers one additional hit, causing the smiley.
 
I have found that the offset is my last resort. Have you tried a regular set and on a bit of an angle? You’ll be surprised how much you can angle it and still get a decent set. Practice that. Have you tried pushing the rib over a bit? Always use your middle finger for trigger. Holds gun more in line with rivet set. I didn’t care for the plastic caps, I found that a piece of vinyl tape over tip of set worked best, not on rivet head. Replace once it’s worn. If you have tried everything else and absolutely have to use the offset make sure it’s taped to your gun so it can’t rotate. You may have to find the right position, and tape it for each rivet. Takes time but so does drilling rivets. Make sure your work is secure and not allowed to bounce/move. Find the right pressure, the offset will require more psi than a straight set. Lots of hand pressure on gun pushing against rivet. And most important, practice on scrap until you get comfortable. And then…practice some more.
If you’re gonna drill out the bad ones, get yourself a one handed centre punch and put a good centre punch on the rivet. Then drill with a#40 first. Use a right angle drill or a 6” or 12” drill bit If access is not good. You can bend the longer bits on a bit of a curve to get straight on the rivet head. Practice first. Try and stop short of drilling right through. Check that you’re not close to the side of the hole. Then step up to a #34 or 33 max. After that you should be able to snap head and grab shop head with a pair of side cutters that sit flush against the spar and rotate back and forth until it moves freely. Then you should be able to remove it. Use tape on side cutters so you don’t mar the surface. I believe Vans has a video on drilling out rivets as part of the LCP program.
As others have mentioned, only drill out the ones that Vans advising to.
What do the shop heads look like?
 
Last edited:
This won't be a popular reply and I expect some people to freak the f' out; but, I'm seeing something different.

A smiley on a properly applied (design wise) rivet head just isn't that critical; pride of workmanship aside. As most know, rivets are intended as a pure shear fastener. If it's swelled properly, both heads are essentially under nill stress from loading. What I'm seeing isn't necessarily the last, unloaded hit from the gun. It appears to be some angular offset of the rivet set; possibly from the off-set set rotating while hammering. This leads to the bigger sin of damaged adjacent parent metal.

Do what others have already suggested ( 2-3 layers of thick-ish tape will suffice if you don't set caps), keep the angularity null, maintain pressure through the last stroke, etc. If you're not already doing this, consider more more air pressure on the gun. The longer sets absorb more energy versus transferring all of it to the rivet; plus, any off-set (set shape) also means less set rigidity (absorbing even more of the energy). Don't just aim for equal energy/hit xferred to the work. Less hits means less opportunity for the off-set to rotate and introduce angularity.

Consider the above for future, similar riveting. Good thing is, there is ED and spacing margin. Best of luck.
 
Last edited:
A smiley on a properly applied (design wise) rivet head just isn't that critical; pride of workmanship aside. As most know, rivets are intended as a pure shear fastener. If it's swelled properly, both heads are essentially under nill stress from loading. What I'm seeing isn't necessarily the last, unloaded hit from the gun. It appears to be some angular offset of the rivet set; possibly from the off-set set rotating while hammering. This leads to the bigger sin of damaged adjacent parent metal.
My answer would be NO as well. Leave them as you will mess with the structural integrity of the parts by oblonging (is that a word?) the holes drilling them out. It is difficult enough to drill rivets out drilling them straight on with the 'dimple' still evident. Now you have little or no reference as to where the center of the rivet is. So: NO! These are shear rivets for the most part. The ribs: they will be held in place by the wing skins so only depend on these rivets to stay in place. I would also wonder what the shop head looks like.

The Mother Ship might have other recommendations/ideas. Give them a call as well......

Now: get some scrap pieces in the vice and use your offset rivet set until you get the proper technique to not make them smile. Just make you smile. 😊 IMHO YMMV.........
 
Last edited:
I experienced the same smiley problems with round headed rivets when I first started working with them. I found that a layer of blue masking tape over the end of the rivet set prevented almost all the smileys.
 
Thank you for all the information. Much appreciated. I will put these tips into practice and hopefully get better results on the nose ribs as well as the second wing.

Julien
 
You have enough advice.
However, for those considering removing round head (oval head) rivets, this tool is invaluable.
  • ATS 1341A
You can set the depth to insure you do not go deeper than the head. It aligns well even on squished heads.
It also helps to keep the drill perpendicular to the work. After the head is drilled, a sharp pin pinch of the correct size and a little side pressure and you can snap the heat off. Take a different pin punch and round the end so you do not mar the hole and drive the shaft out.
For thinner material, I machined a set that fits into a squeezer. It’s basically a flat set with a hole in the center. A dimple die is long enough on thin material to press the shaft into the hole in the die.
This die set works for any style of rivet.

I have removed thousands of rivets in my restoration work. These were removed out of necessity. Even at that, occasionally I mess up a hole, so think hard before removing rivets that may not need to be.
 
I did riveting as a full time job way back when. As said before:

Always use your middle finger for the trigger Use your index finger to point directly at the head of the rivet. It’s real easy to hold the gun slightly offset, and you’ll end up limp wrist-ing it.

Before you hit the trigger I do what I call the superman, or muscleman pose, to apply full pressure to the gun, and bucking bar, before, during and most importantly holding the full pressure until after the gun stopped.

Your smiley happens as you remove the pressure before the gun has stopped. As a conscious thought, just keep the pressure of the gun 100% fully pressed against the rivet for an extra second after releasing the trigger. This will significantly reduce smileys.
 
Unless you are better at drilling out rivets than you are at riveting, ;)which would be unusual in my experience, I would not drill out any of those rivets. Checkout Page 05-04 RV-ALL from the manual, second column. I'm half way through my second build. Like was previously said, I think long and hard before drilling out a bad looking rivet, especially if the shop head is not easily accessible, or the replacement parts are really expensive! My experience is that just as I start to think I'm good at drilling out rivets, one goes terribly wrong and I wish I could go back in time...
 
Last edited:
Unless you are better at drilling out rivets than you are at riveting, ;)which would be unusual in my experience, I would not drill out any of those rivets. Checkout Page 05-04 RV-ALL from the manual, second column. I'm half way through my second build. Like was previously said, I think long and hard before drilling out a bad looking rivet, especially if the shop head is not easily accessible, or the replacement parts are really expensive! My experience is that just as I start to think I'm good at drilling out rivets, one goes terribly wrong and I wish I could go back in time...
Yep. Just did this. Removed a bunch of flush rivets, then went to pop off the head on one and it split in half leaving half still there. Must not have have the drill perfectly centered or….. Took me longer to fix that than removing all the rest. (It’s in a skin that gets replace any way but I wanted to salvage the rib.)
Think twice about removing rivets, then think twice more…..
 
I was more prone than others to generate that particular defect. Particularly with an offset set. One revolution in my riveting was discovering these set caps. In addition to preventing the damage it acts as a training aid. If you have the gun tilted slightly it will leave a spot of orange material on one side of the rivet. In my experience trying to drill out the badly distorted heads is difficult because you can’t locate the actual center of the rivet View attachment 59788
A vote for the caps. They worked well for me also. And after drilling out more than a few I keep a supply of "oops!" rivets on hand.
I think most of your rivets are ok but maybe cosmetically not. I'm an AP/IA so I tend to use 43.13 for guidance more than anything else. Since it covers a lot of other things besides rivets it's a good book to have around. Good luck and "rivet on Dude"
danny
 
I did riveting as a full time job way back when. As said before:

Always use your middle finger for the trigger Use your index finger to point directly at the head of the rivet. It’s real easy to hold the gun slightly offset, and you’ll end up limp wrist-ing it.

Before you hit the trigger I do what I call the superman, or muscleman pose, to apply full pressure to the gun, and bucking bar, before, during and most importantly holding the full pressure until after the gun stopped.

Your smiley happens as you remove the pressure before the gun has stopped. As a conscious thought, just keep the pressure of the gun 100% fully pressed against the rivet for an extra second after releasing the trigger. This will significantly reduce smileys.
thats a great tip. those offset rivet sets are the worst....so frustrasting!
 
thats a great tip. those offset rivet sets are the worst....so frustrasting!
I’m ok with using the offset rivet set.. the problem is that they spin and their alignment gets off.. here’s what I do.. I use 2 inch masking tape and start around the shank of the offset rivet set, then continue wrapping around the spring then the rivet gun.. seems to keep it all aligned
 
I’m ok with using the offset rivet set.. the problem is that they spin and their alignment gets off.. here’s what I do.. I use 2 inch masking tape and start around the shank of the offset rivet set, then continue wrapping around the spring then the rivet gun.. seems to keep it all aligned
I take the spring off and tape it up.
 
If smile is not cracked and is minor, and one defect of many rivets that are good, leave it. Put corrosion protection on bare metal, alodine, primer.

If you drill it out (drill & punch) practice 10 times one scrap with success before trying it on plane. It takes time. Once mfg head is off you are committed don't rush it.

Thicker the stack up the harder and more risk.

The location or access situ (or in situ Latin for in original place) is a factor. You have to drill and pop Mfg head off perfectly. You have to drill center and straight in hole. Need room for punch, need tools, bits, drill guide, punch of proper dimeters... You can't always use a drill guide, and if access is bad this may be one to leave alone.

As mentioned you have to release trigger and wait a second before releasing pressure on rivet gun/rivet set.... I also tell bucker not to let up until he is sure rivet gun has stopped.

Use enough but MIN air pressure. Having a micro control valve on rivet gun is key that has been set for size of rivet. Just right is needed; too much is bad; too little is bad. I set it to where rivet is set by a short tease with partial trigger to make sure it sounds right, then smoothly but quickly pull full trigger and release just as I get to full trigger (which corresponds to a sound change of rivet is set). Time wise? I don't well under a second for 3/32 and 1/8. I go by set up test, and sound. IF YOU GO TOO SLOW the rivet gets harder (strain hardening) causing under buck and making re-setting harder (more air pressure and higher risk of damage) or cracking of shop head. Using too much pressure makes any mistake worse or risks over bucking. Devils in the details.

I typically use the biggest bucking bar I can fit. The more mass the better.... at least for me.

Not a fan of those rubber sleeves or rings. It blocks my view of how rivet set is aligned with rivet and structure. I also don't use a spring... Not recommended as this is a safety issue, but if you do, be careful and treat the rivet gun with a rivet set like a loaded weapon, keep finger off trigger and point is safe direction. What ever works for you... practice... mistakes happen. Onc size does not fit all, in both builder and situation, different techniques for different situations.

Use a squeezer whenever possible!!!! Ha ha. Use a helper when ever possible. I built my RV6 main spars way back when. I rented a LARGE pneumatic squeezer. Everyone was prefect. To drill out one of those spaghettis rivets out would have been a nightmare. Fortunately all were good.
 
Last edited:
Back
Top