I'm ready to close up my wings on my -14 and am a bit flummoxed as to how to buck the aft rivets in the center of the lower skin since my arms and those of my helpers are not 6 ft long. Any tricks appreciated. The photo shows where I am talking about marked in green.


Van's Air Force
You are using an out of date browser. It may not display this or other websites correctly.
You should upgrade or use an alternative browser.
You should upgrade or use an alternative browser.
Riveting Bottom Wing Skins
- Thread starter rockitdoc
- Start date

BravoAlphaRomeo
Active Member
What worked for me was to leave the wing in the cradle and use blocks to lift the entire cradle and wing so the leading
edge is around 20” off the ground. This varies depending on your height and your stool height. Then of course use blocks to gently hold the skin apart at the bottom say 10” or so which allows you to get your arm all the way up into the top rivets. If you have really short arms, you could be just out of luck and need two people. I wanted to have a good comfortable position while I did this and it was all I could come up with, but it did work.
Took me 4 days going slow for both wings. Good luck
Attachments
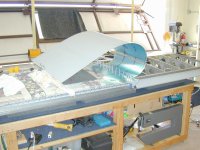
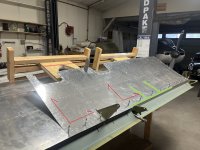
When I was riveting the bottom wing skin on my RV8, I placed the wing in two position.
To rivet the inner skin, I layed the wing flat like in the picture and all the inner rivet holes could be easily reached while the wing was in the lay-flat position.
I needed the wing to be in the up right position to rivet the outter skin.
However, I did not rivet the rear spar first. I incrementally rivet from the inboard lower spar and progressively moved outboard. I am 5'6" tall and my arm could reach all the rivets using this method. See the picture below. These are the general direction I was using
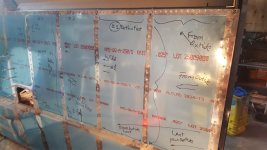
Also, I dry-run using clecos to incrementally close the bottom wing skin and wrote on the wingskin the sequence that worked. So that I didn't forget the sequence when doing the actual riveting. The 2nd picture shows the scribbling of the riveting step during the dry-run. I saw at least one Youtube video where the builder got trapped in to a corner. So I thought doing the dry-run was important enough for me to do.
To rivet the inner skin, I layed the wing flat like in the picture and all the inner rivet holes could be easily reached while the wing was in the lay-flat position.
I needed the wing to be in the up right position to rivet the outter skin.
However, I did not rivet the rear spar first. I incrementally rivet from the inboard lower spar and progressively moved outboard. I am 5'6" tall and my arm could reach all the rivets using this method. See the picture below. These are the general direction I was using
Also, I dry-run using clecos to incrementally close the bottom wing skin and wrote on the wingskin the sequence that worked. So that I didn't forget the sequence when doing the actual riveting. The 2nd picture shows the scribbling of the riveting step during the dry-run. I saw at least one Youtube video where the builder got trapped in to a corner. So I thought doing the dry-run was important enough for me to do.
Attachments
Last edited:
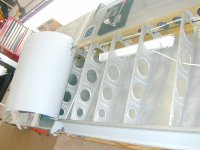
If you left it vertical and peeled the skin back leaving a row of clecos in the first rib and used a bungee to hold the skin open, someone bucks and someone rivets and you work from inboard ribs to outboard. Thus riveting yourself out of the wing. Laying it down you have to bend over and fight gravity keeping the skin open.
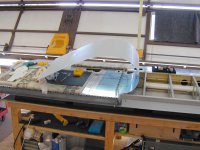
Here's what I came up with to get the skin out of the way while I try to reach the most aft rivets. Seems like it might work. At least I can reach them with my bucking bar in one hand while banging with the other. We'll see. Hopefully, the fact that six of the seven straps are not Snap-Ons will not affect the results. ")

mountainride
Well Known Member
Use a Bucking Bar Bumper or you will for sure end up with dings on the bottoms skins. Its really help it from slipping off the shop head on these and when it does, won't create a mark. I was able to use a shop stool to reach up and hit them all solo. https://mountainrideaviation.com/products/bucking-bar-bumper

AZSteve053
Active Member
As Larry mentioned - process for a 7, goes quick and relatively easy... 2 people for most of it is what I found best.On the 7, Vans is pretty specific about the order of riveting. Basically an "L" pattern toward the outboard. It's not difficult with two people. The last rivets are bucked by sticking an arm through the outboard rib holes. Slip and old sock over your arm.
Attachments