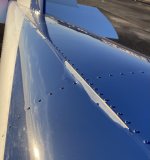
I have an RV12 that is now about ten years old and paint has started peeling along the seam between two sheets of skin on the upper tailcone/rear fuselage - see pic for clarity.
There are a couple other spots where paint is a little rough but I don't want to shell out $10k+ to have the whole plane repainted.
What are my options to touch up areas where paint has peeled and stop it degrading further? What do I need to look out for when buying products that are aluminum safe? Any other caveats to keep in mind?