

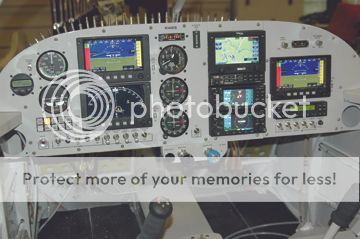
The cockpit is the information and control center of your plane. It’s the graphic interface to flight. Equipment options available to outfit your cockpit are vast and diverse. A sheet metal panel is the support frame for all of these devices, controls and switches. Applying graphics to the panel of a new or existing plane is now easy and cost-effective.
Dry transfers (also known as “rub downs” or “rub down lettering”) are the best solution to add nomenclature to your cockpit panel. They give you the ability to add text and graphics to a new panel or to a panel already installed. This flexibility is far superior to any other means of applying graphics. Sheets of dry transfer lettering have been available through art supply stores for many years from companies like Letraset, Chartpak, and Zipatone. The problem with using these is that the sheet must be repositioned for each individual letter. In the end it can be very challenging to space the letters properly and keep the lines of type straight.
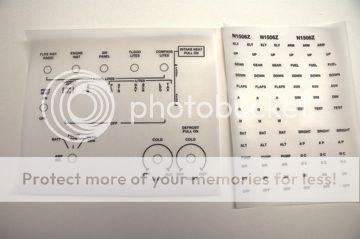
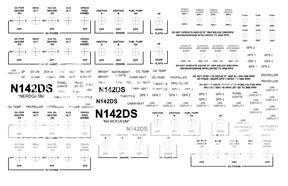
This is where “Custom Dry Transfers” come to the rescue. You can have sheets made with just the text and graphics needed for your panel project. The text is bold, fits the space, and application is easy. You’ll note that the sample sheet has multiple copies of the same text. This gives you extra copies in case an error is made in application.
Custom Dry Transfers begin as a page layout on your computer. Many software programs can be used to create this page. Adobe Illustrator, Microsoft Word, and Microsoft Publisher are the most common programs used to create page layouts for transfers. Other programs that can be used are Adobe InDesign, Quark Xpress, or Corel Draw. You can also provide a PDF file of your layout, but a “native file” from one of these programs is best, as it gives the dry transfer vendor the ability to edit your file.
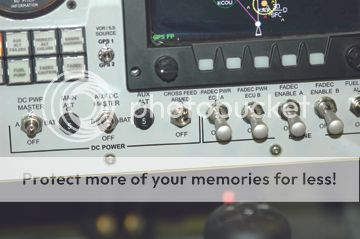
Before you begin your page layout, make a list of all the text items you want to have on your cockpit panel. It’s a good idea to include your call letters on your page and apply them in a number of spots on your panel. Surprisingly there are times when all of us forget the simplest of things, so having your call letters on your panel is wise. When you create your page layout it is important to allow extra space between each item, both vertically and horizontally. Take a good look at our sample sheet. It is important to space items so you can easily cut your transfer sheet up into strips or sections to make application easy. This is especially helpful for application to an existing panel with instruments and switches still in place. You can create a row of text that will line up properly with the centers of switches or controls on your panel. This will allow you to rub down an entire line of text in one pass.
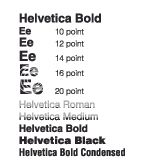
You should choose a font (typeface) this is easy to read. Arial, Helvetica, Franklin Gothic, and Futura are good choices. Font size or height is measured in points. We have found that 12 point type is good for most panel text. If you plan to have your call letters on your panel, use a bigger size, at least 20 point type. Fonts come in different weights. For example a common typeface is Helvetica (or Arial), which has different weights including Roman or Regular, Medium, Bold, Heavy, and Black. A Bold or Heavy typeface works best, but this is up to you. Condensed fonts will help shorten a word’s overall length when the length of text needs to be adjusted. You can also create vertical lines of text. Programs like Adobe Illustrator or Corel Draw do this best because you can center each letter in a vertical column.
In the process of creating your page layout it is very important to “proof the job.” Proofing involves checking spelling and overall fit. The software programs mentioned all have spell checking features, which you should use. It is important to check to make sure that the type fits the space where it will be applied. Simply print out your page and hold it up to your panel. You can cut the printed page up and place the text in its final place to check fit. Another way is to measure the overall height and length of the line or lines of text on your print-out and see that it will fit the space.
Perhaps you don’t have a computer or the time to create a layout for your panel graphics. This is no problem, because the custom dry transfer vendor can either create this layout for you or may have a layout that is already designed. You’ll need to let them know your call numbers to add to your sheet.
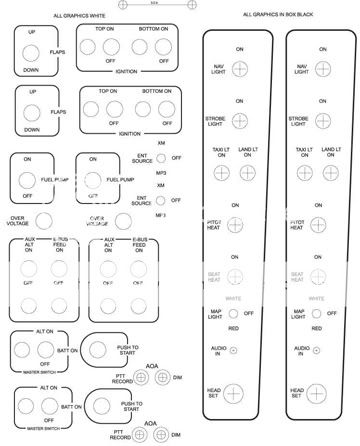
Custom dry transfers can be made in any color, even custom colors can be mixed. Black and white are the most popular colors. Red or orange are great colors for warnings or to convey important information. The color of your panel will dictate what color(s) you can use. Obviously, dark colored transfers work best on light colored panels and vice versa.
Logos and special text can be added to your transfer sheet. You may want to add a logo of the brand and model of your aircraft to the instrument panel. These can be even be done in the corporate colors of the manufacturer. Special text additions might be “No Smoking”, or “Smoking is permitted only outside this aircraft”, or any other clever verbiage you may want.
The next step is connecting with the dry transfer vendor (by phone or e-mail) to place your order. They can answer any questions you might have and consult with you on your panel project. They can also give you a breakdown of costs. Orders turn around in a day or so and ship by UPS.
In part 2 we'll cover application and finishing...
John
Dry transfers (also known as “rub downs” or “rub down lettering”) are the best solution to add nomenclature to your cockpit panel. They give you the ability to add text and graphics to a new panel or to a panel already installed. This flexibility is far superior to any other means of applying graphics. Sheets of dry transfer lettering have been available through art supply stores for many years from companies like Letraset, Chartpak, and Zipatone. The problem with using these is that the sheet must be repositioned for each individual letter. In the end it can be very challenging to space the letters properly and keep the lines of type straight.
This is where “Custom Dry Transfers” come to the rescue. You can have sheets made with just the text and graphics needed for your panel project. The text is bold, fits the space, and application is easy. You’ll note that the sample sheet has multiple copies of the same text. This gives you extra copies in case an error is made in application.
Custom Dry Transfers begin as a page layout on your computer. Many software programs can be used to create this page. Adobe Illustrator, Microsoft Word, and Microsoft Publisher are the most common programs used to create page layouts for transfers. Other programs that can be used are Adobe InDesign, Quark Xpress, or Corel Draw. You can also provide a PDF file of your layout, but a “native file” from one of these programs is best, as it gives the dry transfer vendor the ability to edit your file.
Before you begin your page layout, make a list of all the text items you want to have on your cockpit panel. It’s a good idea to include your call letters on your page and apply them in a number of spots on your panel. Surprisingly there are times when all of us forget the simplest of things, so having your call letters on your panel is wise. When you create your page layout it is important to allow extra space between each item, both vertically and horizontally. Take a good look at our sample sheet. It is important to space items so you can easily cut your transfer sheet up into strips or sections to make application easy. This is especially helpful for application to an existing panel with instruments and switches still in place. You can create a row of text that will line up properly with the centers of switches or controls on your panel. This will allow you to rub down an entire line of text in one pass.
You should choose a font (typeface) this is easy to read. Arial, Helvetica, Franklin Gothic, and Futura are good choices. Font size or height is measured in points. We have found that 12 point type is good for most panel text. If you plan to have your call letters on your panel, use a bigger size, at least 20 point type. Fonts come in different weights. For example a common typeface is Helvetica (or Arial), which has different weights including Roman or Regular, Medium, Bold, Heavy, and Black. A Bold or Heavy typeface works best, but this is up to you. Condensed fonts will help shorten a word’s overall length when the length of text needs to be adjusted. You can also create vertical lines of text. Programs like Adobe Illustrator or Corel Draw do this best because you can center each letter in a vertical column.
In the process of creating your page layout it is very important to “proof the job.” Proofing involves checking spelling and overall fit. The software programs mentioned all have spell checking features, which you should use. It is important to check to make sure that the type fits the space where it will be applied. Simply print out your page and hold it up to your panel. You can cut the printed page up and place the text in its final place to check fit. Another way is to measure the overall height and length of the line or lines of text on your print-out and see that it will fit the space.
Perhaps you don’t have a computer or the time to create a layout for your panel graphics. This is no problem, because the custom dry transfer vendor can either create this layout for you or may have a layout that is already designed. You’ll need to let them know your call numbers to add to your sheet.
Custom dry transfers can be made in any color, even custom colors can be mixed. Black and white are the most popular colors. Red or orange are great colors for warnings or to convey important information. The color of your panel will dictate what color(s) you can use. Obviously, dark colored transfers work best on light colored panels and vice versa.
Logos and special text can be added to your transfer sheet. You may want to add a logo of the brand and model of your aircraft to the instrument panel. These can be even be done in the corporate colors of the manufacturer. Special text additions might be “No Smoking”, or “Smoking is permitted only outside this aircraft”, or any other clever verbiage you may want.
The next step is connecting with the dry transfer vendor (by phone or e-mail) to place your order. They can answer any questions you might have and consult with you on your panel project. They can also give you a breakdown of costs. Orders turn around in a day or so and ship by UPS.
In part 2 we'll cover application and finishing...
John
Last edited:

