What's new
Van's Air Force

Don't miss anything! Register now for full access to the definitive RV support community.

Scott's RV14A: N52XL

Upper Cowl Prep for Paint

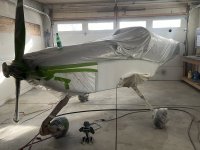
I primed the upper cowl a while back and today I began P320 sanding to get it ready for the next coat of primer.

The molding process for the fiberglass leaves a honeycomb texture on the exterior surface. Unless it is desired for this show through the paint (not) it has to be covered in primer, sanded, then primed again before painting.

So, I did the first coat of primer and today I sanded it with P320 to get it flat. Tomorrow, I will apply the second coat of primer and sand it with P400 in preparation for painting.

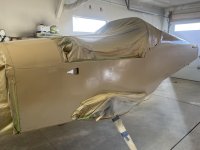
Here is what the surface looks like after the primer and before sanding it flat.

Cowl-Upper First Prime Coat CLoseup.jpg

After sanding with P320 the surface looks pretty flat. We'll find out tomorrow when the second application of primer goes on.

Cowl-Upper First Prime Coat.jpg
 
Upper Cowl Prep for Paint v2.0

Today I sanded the first primer coat with P320 to get it ready for the second coat of primer. Then, I applied the second coat. Tomorrow, I will sand the second coat with P400 to prep it for paint. This will eliminate the rest of the 'honeycomb' from below that was showing through and all the pin holes present in the fiberglass.

The photos below show the surface now is free of 'honeycomb'

Cowl-Upper Prime Coat 2 Closeup.jpg

Cowl-Upper Prime Coat 2.jpg
 
Sanding 2nd Prime Coat Upper Cowl

I began the P400 sanding of the second primer coat on the upper cowl today. Photos below show how the P400 reveals the pretty bad orange peel. My fault for using a fast reducer. Shop was at 65F so a slower reducer would have allowed a lot more flow. I won't make that mistake with the paint and clear.

Anyway, it doesn't matter except that a lot more sanding will be required to get it flat. Here's a couple pix of the fore and aft portion of the starboard side after a first P400 cut, and then a final cut. Getting all the peel flat is important if a flat paint surface is desired. Which it is.

Cowl Primer 2nd Coat 1st P400 Sanding.jpg

Cowl Upper Primer 2nd Coat 2nd Sand P400.jpg

Cowl Upper PRime Coat 2 1st P400 Sanding.jpg

Cowl Upper PRimer 2nd Coat 2nd P400 Sanding.jpg
 
Painting the Fuselage

I decided to paint the upper cowl and fuselage together. Silver metallics can take on different shades if parts are not painted together. This is because the metallic 'chips' might lay down at different angles and then reflect light differently. So, scuffing the fuse was done today. I used maroon 3M pads. It seemed like it was going to be a long process due to the large surface area involved. But, it only took 3.5 hours and three pads.

Fuse Paint - 3M Pads Used.jpg

The 3M pads work well to get rid of the aluminum cladding.

Fuse Paint - Scuffing Beginning.jpg

When all the reflection is gone the surface is ready for the wash primer. Those that used alodine can skip this step.

Fuse Paint - Scuffed.jpg

Fuse Paint - Scuffed Port Side.jpg

I will apply the wash primer and urethane primers tomorrow.
 
Last edited:
Fuse Scuffed and Wash Primed

Achieved a milestone today! Fuse is all scuffed and wash primer applied. I kind of dreaded this, but it wasn't so bad. The scuffing with the maroon Scotchbrite was the most tedious. But, that wasn't even that bad. It took about 5 hours total and 5 maroon Scotchbrite pads. I forgot that the bottom needed to be scuffed yesterday, so the 3.5 hrs and 3 pads was a preliminary estimate. The bottom is a lot of real estate and you have to do it lying on your back to get the best pressure on the pads.

Wash primer went on with no drama. It took 1200 ml, or just over one a quart of mixed primer. I didn't use a full face respirator, but should have. That stuff really got to my eyes. Lots of watering. Use a full face if doing this in an enclosed space.

Tomorrow, the urethane primer goes on. I will try really hard to reduce orange peel to a minimum to avoid having to block sand this prior to paint. It's a lot of real estate. Using the slow reducer should help. Temperature in the shop and skin surface is reading 61F, so the slow will not cure very fast. Gotta watch out for runs, but peel should be reduced. We'll see.

BTW, that shop is a std 20' x 20' two car garage. The fuse fits nicely at an angle.

Fuse Scuffed Ready for Primer.jpg

Fuse Wash Primed.jpg
 
Last edited:
That is a big milestone. Re. face mask comment, have you got a remote air supply while doing the urethane coat? The isocyanate in the hardener can pass through a normal respirator and eyes and is really not good for health. I've got a remote fed face mask and an air pump that sits outside the booth in fresh air.
 
That is a big milestone. Re. face mask comment, have you got a remote air supply while doing the urethane coat? The isocyanate in the hardener can pass through a normal respirator and eyes and is really not good for health. I've got a remote fed face mask and an air pump that sits outside the booth in fresh air.

Paul,
I’m using a 3M 6000 series face mask and cartridges. S’posed to be good for iso. If not, can I borrow your remote setup. That’s way better.
 
Paul,
I’m using a 3M 6000 series face mask and cartridges. S’posed to be good for iso. If not, can I borrow your remote setup. That’s way better.

I'm in AUS! Otherwise you could borrow it.

Sometimes hobbyairs come up for sale on VAF. In any case, I would hold off spraying urethane until getting hold of a full face remote feed, it's just not worth the harm that it can do to health.
 
I'm in AUS! Otherwise you could borrow it.

Sometimes hobbyairs come up for sale on VAF. In any case, I would hold off spraying urethane until getting hold of a full face remote feed, it's just not worth the harm that it can do to health.

Well, I’ve been looking for an excuse to get to Perth. You nearby?
 
Fuse Primed!

Got the fuse primed with the urethane today. My tube heater in the shop failed a couple days ago, so I have been using a kerosene space heater. Ugh. But, I was able to get the space, skin and paint to 65F before shooting it. Came out nice. Shooting the belly is the most difficult part. My gun has a 650ml cup, so if I start on the belly and run the cup to about half empty when the gun begins to starve, then go up top and shoot the horizontal surfaces I can use the whole cup. It takes two cups to complete the fuse.

I will wet sand the areas where there is orange peel (fortunately, not very much occurred, due to the slow reducer, I think) with P400. Then, color paint.

Fuselage Urethane Primered.jpg
 
Fuse Primer Sanding Begun

The urethane primer from Sherwin Williams requires the top coat be applied within 16 hrs or scuffing is required. In my shop (60-65F) the urethane is cured sufficiently to sand after about 8-10 hours. This makes it tough to apply the paint the same day. So, I usually just plan to scuff the primer with P320 prior to paint. This also allows me to get rid of any runs, drips or errors prior to paint. It adds a step and about 8-10 hrs, but the result is usually worth it. Block sanding the primer is about the only activity on this project that allows adult refreshments to be enjoyed while doing so. That, and frequent breaks, helps the tedium.

The other advantage of sanding the primer is the revelation of small scratches. These can then be filled prior to paint.

Fuse Primer Sanding and scratch filler.jpg

This area was sanded in about 10 minutes. So, I figure the whole fuse will take 5-6 hrs.

Fuse Primer Sanding Port Side.jpg
 
Well, I’ve been looking for an excuse to get to Perth. You nearby?

We left Perth when I retired, now 250 miles away, enjoying peaceful rural life.

Your painting is going well and no ill effects from the iso, that's good. I bought the 3M PPS system for spraying upside down, haven't tried it yet. Probably not so important for the primer but I want to keep with the wet edge for the top coat.

Did you use a creeper or some other aid when you sprayed the underside?

I have to get back down. It's been 30+ years. I want to dive the reef again before the oceans get to warm. You are great people.

The PPS system is great. Less solvent waste but more plastic waste. You can only shoot upside down until the cup is half full, but at least you have 300ml to use for that. But, in your case, you are already upside down, so the gun will starve when spraying the top of your plane. :D

No creeper, but that would have been better than cleaning the floor with my clothes. I have a lift, so I don't really need a creeper, but, I sprayed the plane in the part of my shop without the lift.
 
One Third Sanded...Two Thirds to Go

This took about 2.5 hours including the application of the fillers. So, I figure another 5 hours. The belly is about the size of each side. Maybe a little larger.

Fuse Primered and Sanded Port Side.jpg

At this point, I am starting to think wrapping would have been a smarter choice. The paint process is really time consuming. Also, it ain't cheap. I haven't painted the fuse or wings and my bill is $3500 for materials, to date. So, if pros are charging $30 grand, that is about right. But, in the end, I enjoy it.
 
Last edited:
The lift is nice. How high can you get the fuse for painting the belly? The painting and the effort it takes >>>> wrapping.
 
Fuse Primer All Sanded!

I gave myself a Christmas gift today since the family won't be at the house until tomorrow. Sanded the belly and starboard sides of the fuse. Did minor bodywork where pinholes occurred and a couple dents from bad rivet technique. Tomorrow, before everyone shows up for supper, I will hit the bodywork areas with primer to make sure the color is uniform when painted.

Took 8 hours. So, 10.5 hours total for the entire fuse for primer sanding.

Fuse Primed Pinholes Filled.jpg

Fuse Primed-Pinholes Filled Port Side.jpg
 
Christmas

I gave myself a Christmas gift today since the family won't be at the house until tomorrow. Sanded the belly and starboard sides of the fuse. Did minor bodywork where pinholes occurred and a couple dents from bad rivet technique. Tomorrow, before everyone shows up for supper, I will hit the bodywork areas with primer to make sure the color is uniform when painted.

Took 8 hours. So, 10.5 hours total for the entire fuse for primer sanding.

Wish I had known you wanted that. Several parts on my plane still need paint. :D
 
Second Primer Coat

Here's what the fuse looked like prior to second application of urethane primer.

Fuse Primered Ready for second primer.jpg


And, here it is after the second coat to the areas that needed bodywork, ie, dents and scratches and such

Fuse Second Primer Coat.jpg

Used the slow reducer thinking it would flow better. It did. But, I got runs in a few places where I got too close or tarried too long. So, I will sand these areas flat after 6 hours and reapply the urethane using fast reducer this time. Guess the fuse was cooler than I thought. Should've took its temperature.
 
Runs & drips

Here's what the fuse looked like prior to second application of urethane primer.

View attachment 52998


And, here it is after the second coat to the areas that needed bodywork, ie, dents and scratches and such

View attachment 52999

Used the slow reducer thinking it would flow better. It did. But, I got runs in a few places where I got too close or tarried too long. So, I will sand these areas flat after 6 hours and reapply the urethane using fast reducer this time. Guess the fuse was cooler than I thought. Should've took its temperature.

Dan Horton posted a neat trick for removing runs and drips. I use it instead of sanding.
Put a fresh single edge razor blade in the scraper tool.
Label one side "UP".
Grab a piece of 400 and the back rivet plate.
Drag the blade 10-20 times across the sandpaper with the "UP" side down.
It creates a microscopic curl on the "bottom" edge.
Use the scraper by gently placing it on the surface and dragginh in line with the drip at a 45 degree angle. The "UP side should be up. You'll see the drip get scraped away without cutting the area around it. Continue till it's gone. Way easier than sanding.
Sand the area after the drip is gone.
Re-scuff the blade if it looses the edge.

Thanks Larry. I saw that DH post and plan to use it here. It works very well, indeed.
 
Second Primer Coat Sanded, Ready for Third

I sanded the second primer coat with P320 today. Got rid of all drips, runs and errors and inevitably found some deep enough scratches and pinholes to fill with glazing putty. Once these areas are set, I will shoot another primer coat and sand again. Paint comes next. Hooray! It's a lot of prep, but it's usually worth it. The paint should look decent.

Fuse Second Primer Sanded.jpg
 
Fuse Silver Paint Beginnings

I found two pieces of sheet metal I stuck up on a shelf and forgot about. Duh. Turns out they are pieces that closeout the fuse under the horizontal stabilizer. Glad I found them cuz they need to be painted. So, I did that today along with the bottom of the oil door. The bottom of the oil door is easier painted off the cowl.

Fuse Painting-Oil Door and Tail Farings.jpg
 
OK, Now Paint Comes Next

The P320 leaves scratch marks that can be seen in the metallic. I found this out after painting the bottom of the oil door yesterday. So....I shot another coat of urethane primer over the P320 prepped primer on the top of the fuse where the silver metallic will go. Sanding this primer with P400 should do the trick. The bottom of the fuse is going to be solid white, which will be color sanded, so any P320 scratches in this location will be eliminated before buffing.
 

Attachments

  • Fuse Primer Last Coat on Top.jpg
    Fuse Primer Last Coat on Top.jpg
    235.7 KB · Views: 52
Second Primer Coat on Fuse Sanded

I took 10 days off and drove out to CA for an ocean fix, visited friends in AZ and NM and now I'm back and ready to finish the fuse painting project.

I first sanded the second primer coat with wet P400 to just knock all the nibs down and reveal the remaining orange peel and P320 scratches.

This gets a second sanding with P400 dry to eliminate the rest of the scratches and peel for a perfectly flat surface to which the color will be applied.

I like to use dry P400 for the last step because it's easier to see how much sanding remains during sanding after a quick wipe with a dry towel. If wet sanding is done, wiping still leaves a wet film and if any remaining sanding is required it can't be seen until dry. So, the dry paper is faster. Dustier, too. So, a mask is needed.

The photos below show the difference between the first P400 wet and the final P400 dry surface appearance.

Fuse Second Primer Sanded Wet.jpg

Fuuse Second Primer Sanded Dry.jpg


Fuse Second Primer Sanded Wet 2.jpg

Fuse Second Primer Sanded Dr 2.jpg

I will try to get all the second dry P400 sanding done today and paint the white tomorrow. I can then mask off the white and shoot the silver on the top part of the fuse on Thursday.
 
Last edited:
Painting Incidentals on Cowl

There are parts of the cowl that will not be sprayable when the cowl is installed on the fuse. So, these parts need to be painted first. One area is the recessed part of the cowl where the oil door sits and the hinge on the oil door. Since the oil door will be wired closed for painting the cowl, this area needs to be painted first. Also, the area of the cowl sitting behind the spinner is not visible when the cowl is installed, so, this also needs painting first.

Cowl masked to prevent overspray from getting on cowl surfaces:

Fuse Cowl Painting Incidentals.jpg
 
Cowl Incidentals Painted

I worked on the hardest part of this build, to date. Figuring out the livery and the colors

Here's what I have 'decided'

Fuse Paint Stripe Scheme.jpg


I painted the oil door recess and hinge and the forward nose of the cowl. Now, the cowl can be placed on the fuse and painted.

Cowl Incidentals Painted.jpg

Cowl Forward Nose Painted.jpg

Cowl Oil Door Recess Painted.jpg
 
I attached the oil door to the cowl and afixed the latch. Then, I laid the cowl on the fuse and masked off the belly. Silver paint applied to upper fuse and cowl. Tomorrow the clear will be applied.

Cowl Painting Oil Door Attached underside.jpeg

Cowl Painting Oil Door Attached.jpeg

Fuse Painting Upper Silver Prepped.jpeg

Fuse Painting Starboard Silver.jpeg
 
Last edited:
Fixing Scratched Canopy

I scratched my canopy. Surprise!

I started removing the scratches using P1500, P3000 wet or dry by hand at first. Then Novus to finish it. This works fine, but there's an even better/faster way.

Today, I tried using P3000 wet Trizact on my 3M DA polisher, then P5000 wet Trizact over the P3000 Trizact. This works even better.

Take a look. It's hard to capture in photos, but if you look through the canopy to the workbench on the other side you can get an idea of the differences.

View attachment 52335

View attachment 52336


The only thing to be careful with when using the DA is to not go fast and use lots of water. Otherwise you can heat op the plexiglas and burn it. This makes for damage that could be difficult to repair.
Hey doc. I'm looking for advice. I bought a 207 RV-6 this past year and I love the airplane. However, the previous owner allowed some scratches to develop in the front windscreen and sliding canopy. I am looking at how to buff out those scratches. It looks like you have come up with a good system. Can you point me in a direction to find out the process? Also the risks? It seems that these "scratches" are wide area blemishes, not deep single scratches. I'm thinking the previous owner would throw things on the dash or into the rear cargo area with little regard for bumping the plexiglass. Thanks.
 
I attached the oil door to the cowl and afixed the latch. Then, I laid the cowl on the fuse and masked off the belly. Silver paint applied to upper fuse and cowl. Tomorrow the clear will be applied.

Hey doc. I'm looking for advice. I bought a 207 RV-6 this past year and I love the airplane. However, the previous owner allowed some scratches to develop in the front windscreen and sliding canopy. I am looking at how to buff out those scratches. It looks like you have come up with a good system. Can you point me in a direction to find out the process? Also the risks? It seems that these "scratches" are wide area blemishes, not deep single scratches. I'm thinking the previous owner would throw things on the dash or into the rear cargo area with little regard for bumping the plexiglass. Thanks.
Sure. Process is pretty simple. If the area is small like less than 4" diameter, do this by hand. If larger, I use either a 3" or 5" DA polisher with Trizact discs to save time. By hand use 3M or Maguiar's wet or dry P3000 wet paper to get the scratches out. Then use P5000 paper wet to get the P3000 scratches out. Follow this with the Novus process using their rubbing, buffing and polishing compounds. Scratches will be gone.
 
I thought I was going to put the clear coat on yesterday, but I messed up the silver in a couple of places and got some smallish runs in the area under the HS. Since it's metallic, sanding these out left a color difference that the clear would have magnified. Although the runs were under the HS, it would have bugged me later on to leave it this way. So, I reshot the silver over the whole fuse. This was a good idea, anyway, since it provided a much more uniform silver with virtually no shadows. Silver is a particularly difficult color to spray well as shadows are really tough to eliminate. Even gun strokes and two coats worked out, however. Clear will be applied later this morning when the skin temperature in the booth reaches 60F+. It was 3F last night so my kerosene heaters are warming things up.
 
Sure. Process is pretty simple. If the area is small like less than 4" diameter, do this by hand. If larger, I use either a 3" or 5" DA polisher with Trizact discs to save time. By hand use 3M or Maguiar's wet or dry P3000 wet paper to get the scratches out. Then use P5000 paper wet to get the P3000 scratches out. Follow this with the Novus process using their rubbing, buffing and polishing compounds. Scratches will be gone.
Thanks for the info doc. It looks like it will be time consuming but not much flying going on at -23 outside. I'll start on an area toward the back of the canopy. I can take that off and learn the proper technique and if I mess up a little bit it will be much less noticeable than on the front windscreen.
 
Thanks for the info doc. It looks like it will be time consuming but not much flying going on at -23 outside. I'll start on an area toward the back of the canopy. I can take that off and learn the proper technique and if I mess up a little bit it will be much less noticeable than on the front windscreen.
Just go slow. Don't rush it. It's a tedious process, like other things a builder experiences.
 
Removed the masking from the bottom and installed the cowl. The color scheme is approximately what is shown, with a metal flake black stripe and a metal flake tan stripe separating the silver upper from the white bottom. I will mask off the silver today and get ready for the marathon of white-black-tan painting to come. The black and tan an clear need to go on within twenty four hours of the substrate beneath otherwise the substrate has to be scuffed.

Fuse with Cowl Color Scheme.jpg
 
Painted the first coat of white onto the bottom fuse this morning. Second coat going on at 5MST. You can see the difference in color between the unmasked cowl and the fuse. It really needs two coats. Tomorrow, I will mask for the black stripe and paint it in the early morning. SW says to wait 10 hours before taping, so I'll tape after at least that and paint the tan stripe. The next day, Sunday, I will paint the clear over both black and tan.
 

Attachments

  • Fuse Lower Painting 1st Coat.jpg
    Fuse Lower Painting 1st Coat.jpg
    3.2 MB · Views: 44
So, after two hours of masking for the black stripe (actually, gray metallic) I am ready to paint it. It takes a lot of prep (and tape) but the results should, I hope, be nice. After a 10 hour cure, I will remove the mask of the tan stripe, mask over the gray stripe, and shoot the tan stripe. Whew!

Fuse Painting Gray Stripe.jpg
 
9am MST. Gray stripe painted! I will remove the mask for the tan stripe after a couple hours cure to make sure I don't mess up the gray. Then, after 10 hours curing from 9am, I will mask off the gray and shoot the tan stripe. So far, so good. The gray metallic looks really nice.

Fuse Painting Gray Stripe.jpg
 
So, the freehand method for laying out the stripes turned out 'not so pretty good'. It wasn't awful, but it would have bugged me later. So.....I sanded it all off and will start again with a masking template provided by Aerographics. They provide a transfer that is perfectly smooth and is used as a mask for painting. Should have looked into it before. Oh well.

Laid out the registration number to see if it fits. I think it does and hopefully meets the FAA requirements.

Fuse Registration # Position.jpg
 
I started the cut and buff process a couple days ago on the starboard side and today I cut the port side and buffed with compound in one pass. 4.5 hrs. I will compound one more pass, then polish with two passes. Should take another 4.5 hrs. Time consuming, but the result is really satisfying. No comparison between the paint only and the cut and buff surface. I figure my smoothness ratio will gain me at least 25kts TAS and save 2gals/hr fuel burn. :)

Just being able to see the reflection of the shop in the fuse is worth the time and effort. Yeah, baby!

Fuse Cut and Buff Port Aft Before and After 1500.jpg
Fuse Cut and Buff Aft Port Side Reflection.jpg
 
Milestone!
I got the whole fuse color sanded with 1500 grit and rubbed out with Meguiars 100 today! I'm whipped. Time for a glass of chard and relax in front of tv.

Fuse Sanded with 1500 .jpg
Fuse 1500 Sanded Closeup.jpg
Fuse Buffed with Meguiars 100.jpg
 
I got the port side buffed with the second pass of Meguiar's 100 and polished with 205. Tomorrow, the same for the starboard side. This will get it ready for painting the stripes.

This process is really time consuming, but, in the end, worth the effort IMHO. The reflection is worth it not to mention the extra fuel savings and TAS! :)

Fuse Buffed and Polished Port Side.jpg
 
I thought that red yarn thing was raw ground meat at first. "Huh, would that work?" Then I figured it out, fortunately before trying it.

Dave
 
The thing in the photo of the cowl that looks like a piece of red shag pile carpet, maybe some sort of polishing mitt?

Did you have much trouble with any dust settling in the paint during spraying and before it flashed off?
 
Yes. Microfiber mitt.
No problem with dust or boogers. Clean floors with water. Use HVLP gun. Tack rag.
 
That's lucky. It all looks good in the photos.
Plenty of dust to deal with here, but we're on a farm in the midst of a very dry season.
 
Back
Top