What's new
Van's Air Force

Don't miss anything! Register now for full access to the definitive RV support community.

My New Stick Grip

RFazio

Well Known Member
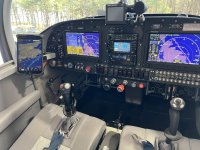
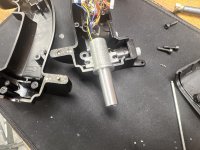
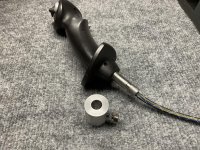
I needed more buttons. I had the tosten grips, Their CS-8 grip and it was nice. It worked great and felt good in my hands. But I wanted to add buttons. I had manual trim on both the ailerons and elevator and was using the hat switch for flaps and radio functions. Now I wanted to add electric trim. The Dynon system can auto trim and also adjust trim speed with aircraft speed. I also wanted to redo my center console and get rid of the trim handle and knob there now. So, I figured let me install the electric trim and clean up the console.

The plan was:
1. Install the new grips.
2. Install electric trim.
3. Install a new console.

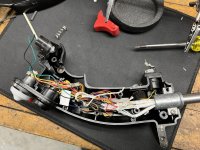
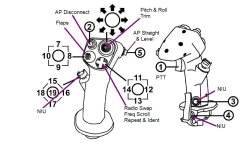
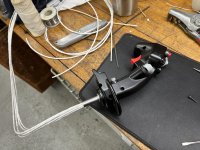
I needed more buttons. I looked at the Tosten MS military grip and the infinity grip. Still not really what I was looking for. The grip I chose was a Thrustmaster Hotas Warthog grip. This grip is for gaming. I has a USB output for connecting to the PC. I got one cheap on Ebay and took it apart. I rewired it and brought the wiring out the bottom. I now have more buttons than I know what to do with. I'm working on the second one for the copilot side. I also got one for the sim so I can use the same stick in the sim as I do when flying.
 

Attachments

  • IMG_2856.jpg
    IMG_2856.jpg
    476.8 KB · Views: 372
  • IMG_2846.jpg
    IMG_2846.jpg
    513.2 KB · Views: 280
The Functions

The functions I've connected up so far. On the bottom lever I'm adding the fuel pump, press on press off.
 

Attachments

  • HOTAS Warthog Stick Settings.JPG
    HOTAS Warthog Stick Settings.JPG
    66.4 KB · Views: 206
Not sure the age of your 6, but to add electric trim on some models (older) you have to have a different elevator, no way add a servo to existing.
 
Not sure the age of your 6, but to add electric trim on some models (older) you have to have a different elevator, no way add a servo to existing.

You can mount the servo on the deck under the empennage, then run a short Bowden cable to the trim tab. Mine's been flying with that setup for >20 years.
 
You can mount the servo on the deck under the empennage, then run a short Bowden cable to the trim tab. Mine's been flying with that setup for >20 years.

Hmm, you have any pictures? Im guessing “the deck” is in fuse, or did you cut underneath stab, mount , run cables…thanks Kyle.
 
very cool. I'm curious though; in the first picture, it looks like you've got a right handed stick installed in the left side of the airplane.

Is it a hassle to fly it that way with the palm rest and thumb switches backward, or something you adapt to pretty easily?
 
No Pictures

I should have taken some of the installation under the seats. I put in terminal strips under the seat pans. I had one before with the tosten sticks. It has 9 positions. I added two more for the trims and other buttons. Here you can see the 5 sets of 5 conductor wire. I used trim cable with 26 AWG wire.
 

Attachments

  • IMG_2848.jpg
    IMG_2848.jpg
    454.3 KB · Views: 198
Stick grip

Richard

That is a nice install and what a great looking stick, well done! As Terry stated above- do you fly with the right or left hand? It’s a military fighter jet style stick that was basically designed with stick in the right hand and throttle in the left. Why not move it to the right seat and fly from that there? That way you’re always flying with the stick in the hand it’s designed for and frees up your left hand for the throttle and the radio stack. Just a thought….

Since it’s basically a plastic gaming stick, how sturdy is the construction for long term use in an RV do you think? In any case that was a lot of thought that went into your modification and I salute your determination, nice job. You should consider offering your services to the VAF community, builders always seem to be looking for stick grips, yours came out pretty stunning.
 
Last edited:
Right Hand on the Stick

If you look at the picture of the stick installed you will see the left hand throttle to the left of the stick on the left cockpit wall. I have dual throttles. I can sit in either seat and have my left hand on the throttle and my right on the stick.

As far as longevity goes, if you look on the Tosten site you will see they use gaming switches in their sticks for longevity.

Plastic! No this stick is METAL, heavy, 2 pounds or more. Way more sturdy than the Tosten I had in there before.
 
Last edited:
Stick grip

Richard,

I totally missed that, you’ve really thought it all out, never mind!
 
Since it’s basically a plastic gaming stick, how sturdy is the construction for long term use in an RV do you think?

Actually, the HOTAS Warthog grip is a rather sturdy cast aluminum. It woudn't look or feel out of place in a real A-10.
 
I was going to comment on the right-hand grip as well as I missed the throttle on the left wall too. That said, if anyone is looking to do this with a left-hand grip, Virpil Controls makes matched left/right hand grips in a number of designs.

https://virpil-controls.us.com/
 
If you look at the picture of the stick installed you will see the left hand throttle to the left of the stick on the left cockpit wall. I have dual throttles. I can sit in either seat and have my left hand on the throttle and my right on the stick.

I missed that throttle as well. Nice job
 
My current set up has PTT, HAT switch for trim, plus autopilot disconnect and transponder ident buttons. And I sometimes have to look at the last two to make sure I get it right. I don’t think my poor brain can handle any more buttons!
 
Impressive but I'm a naysayer. I like simple a simple push to talk button and that's it. Simple grub. I mean I fly with finger tips most of the time. Trim and flaps are on the instrument panel near the throttle prop and mixture. Don't get me wrong I admire the Farkle of the whole thing. Farkle equals functional sparkle. My RV4 had trim flaps pushed the talk on the grip. The flap up-and-down toggle was on top. Occasionally I would hit it with a chart or something. It locked to the opposition but was Spring loaded to the down period of course being a tiny switch I needed to have relays to handle the load. With a larger panel mounted flap switch I don't need relays.
 
Stick grip

Walter,

I agree that looks like a complicated undertaking but RFAZIO did an amazing job and I commend him. I disagree slightly with gmcjetpilot. I flew the AH-1 Cobra in the Army and the A-10 and the F-16 in the Air Force and I think I can say that the whole HOTAS concept is valid. Whether you’re flying an F-16 at 540 knots at 300 feet or an RV at 1,000 feet the principles are the same. HOTAS reduces pilot workload by having everything in reach at your fingertips without having to look down into the cockpit- this equates to better situational awareness and a safer way to fly.

I also agree that keeping things simple is also good- just depends on what you want. RFAZIO is a smart guy in my book, I think what he’s done is a great credit to the whole “experimental” mantra we all live by.

RFAZIO- if I ever meet you drinks are on my tab…..
 
Last edited:
Thanks

Thanks for the comments Walter. That was my intent. To be able to select what I need without having to look for it.
 
The grip I chose was a Thrustmaster Hotas Warthog grip. This grip is for gaming. I has a USB output for connecting to the PC. I got one cheap on Ebay and took it apart. I rewired it and brought the wiring out the bottom. I now have more buttons than I know what to do with. I'm working on the second one for the copilot side. I also got one for the sim so I can use the same stick in the sim as I do when flying.

Very interesting. I have considered doing this as well but balked at the price tag for a new stick. I have the Thrustmaster HOTAS throttle on my sim and a different Thrustmaster stick (not the A-10, F-16, or F-18) and know they are built with great quality.

How did you find the fit-up of the stick to the RV stick?
 
R Fazio RV-6 is one of the nicest, cleanest I’ve seen. I saw it as he built it! I didn’t think I would have liked the flaps on the stick until I recently flew a Rocket with it on the stick.. changed my mind! Can’t wait to fly Richy’s -6 again!
 
A Little Machining Needed

The stick comes with a cast aluminum, I think, piece in the bottom that bolts it to the base. I cut the threads off and faced it off in the lathe. Then drilled it out to .440 if I remember correctly. I pressed in a piece of Crome Molly scrap I had lying around. It fits into a plug in the top of the stick, the same as the Torsten stick grips do. You can see the piece in the picture below. It was very easy to do. Tosten does this so you can rotate the grip easily to fit your hand. I decided to keep this ability.
 

Attachments

  • 70203C91-D922-4275-B289-3EFED008B500.jpg
    70203C91-D922-4275-B289-3EFED008B500.jpg
    447.1 KB · Views: 118
The Tosten Grip

Here is the Tosten grip with the plug that fits in the top,of the stick.
 

Attachments

  • 0211163B-C866-4135-8533-DB6E2BAEB73D.jpg
    0211163B-C866-4135-8533-DB6E2BAEB73D.jpg
    875.9 KB · Views: 110
RFazio, I recommend adding the groove around the base of that pin like the Tosten has. The screw will loosen eventually, and you'll be alerted to that by the handle rotating first. Without the groove, the "alert" could be the stick pulling out of the socket at an inopportune time...
 
Yes

I was going to do that when I make up the second stick. Forgot about it when I was doing the first. I think they also did it so that when you tighten the screw it doesn't bugger up that part of the stick and make it hard to remove. But you are right it won't come out also. You know how it is, as you do the second you get better at it. I'm going to change the way I brought out the wires also. I think I can use fewer wires and make it simpler to connect up. Once I'm done with the second one, I'll go back and redo the first.
 
Back
Top