What's new
Van's Air Force

Don't miss anything! Register now for full access to the definitive RV support community.

Need suggestions re prop gov cable

Davea320

Well Known Member
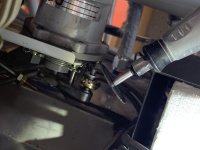
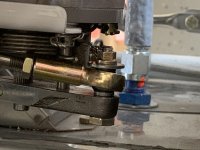
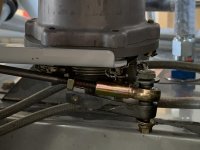
Looking for ideas to thread the rod end bearing on the prop gov cable. I installed the rod end bearing on the arm of the governor since the cable bracket prevents the bolt from being removed once the bracket is installed. Now that I have the engine mounted and want to connect the control cable, I’ve been unable to attach the cable to the rod end bearing.

I’ve tried twisting the entire cable (per Vans tech support) to thread it into the bearing, but the end of the cable will not twist with the rest of the cable into the rod end bearing. Looked at possibly removing the arm on the governor, (or sliding it aft) but it has some type of locking device on the attachment bolt.

Also, the rod end bearing bolt interferes with the governor housing when trying to remove. Searched for older threads related to this prob without much luck.

Any ideas would be much appreciated as I’ve exhausted all the possibilities I can think of.

(all wits have ended)
Dave
 

Attachments

  • 3D1C7EBC-AA5A-45F7-A501-CF2A39D3EB84.jpg
    3D1C7EBC-AA5A-45F7-A501-CF2A39D3EB84.jpg
    228.8 KB · Views: 210
governor rod end adjustment

Unbolt the rod end from the governor arm. Thread the rod end on to the cable end about where you think it should be located. Re-install the bolt to the arm. Move the arm (via the cockpit blue knob) and check for the correct travel range. Adjust the rod and on the cable as required (yep, requires removing the arm bolt). Reinstall the arm bolt and repeat the travel check. Once the travel range is correct, tighten the rod end jam nut and torque the rod end to arm bolt.

As for the bolt interfering with the gov housing....try putting the rod end on the opposite side of the arm, if that works (might not). You can also reverse the direction of the bolt, if that helps.

Looking at your photo again, you might need to re-orient the governor arm relative to the gov output shaft. Hard to tell from the photo. The governor arm angular position on shaft should be set first (if necessary), then adjust the governor cable to bracket location, and finally the rod end location.

Welcome the the fiddley part of airplane building. :)

Recent photo of mine:
IMG_0807.jpg
 
Last edited:
Thanks for the idea

Unfortunately I can’t remove the bolt as it interferes with the governor housing and the white cable bracket if I move the arm. Gonna try and cut off the bolt and mount the rod end bearing on the opposite side of the arm as in your photo and go from there. We shall see?..
 
Bolt

On mine it was not fun getting the bolt in and out a dozen times, but it does come out and go back in. It has to be in exactly the right spot. I recommend setting the rod end at fully screwed on. There's enough adjustment on the cable nuts to get the correct travel. I think I read in the manual that the important adjustment is fully forward to the stop.
 
Unfortunately I can’t remove the bolt as it interferes with the governor housing and the white cable bracket if I move the arm. Gonna try and cut off the bolt and mount the rod end bearing on the opposite side of the arm as in your photo and go from there. We shall see?..

I think this is why the bolt on mine is oriented the way it is......won't go through from the governor side. OK, maybe try removing the governor arm from the governor shaft. Loosen the screw holding the arm clamped to the shaft, slide the arm off the shaft spline.

Cutting the bolt works too....but you're still left with "how the **** does this thing go together?" There has to be some removal/assembly combination that works for this. Although I'll admit, even with the recess in the firewall, getting two hands and tools in there to do something is a bit challenging at times. :D

Larry's suggestion on the arm hitting the full forward stop (fine pitch, aka: high rpm) is important too, once you get to that point.

This falls into that category of airplane building/maintenance where you can see the part you need to get to, or you can reach in and touch the thing you need to get to......but not at the same time. :)
 
Last edited:
Bolt cut and reassembled

Ended up cutting off the bolt, since trying to remove the control arm was not recommended by the gentleman/prop shop I bought it from. And it was darn near impossible to get at the bolt on the arm. Reassembled with the bolt orientation opposite of what I had. Adjusted the rod end and brackets bolts for full travel and ….. success. Thanks for the input, this has been troubling me for days.

Dave
 

Attachments

  • 977AB282-4BAD-4A90-B94D-7790D9B16781.jpg
    977AB282-4BAD-4A90-B94D-7790D9B16781.jpg
    258.4 KB · Views: 163
  • 8AF590F2-B681-4C1D-9B12-3AFE5B97F45B.jpg
    8AF590F2-B681-4C1D-9B12-3AFE5B97F45B.jpg
    261 KB · Views: 156
Last edited:
Don't forget the bump in the control knob, that is the governor arm should hit it's stop before the knob in the cockpit runs out of travel.
 
Don't forget the bump in the control knob, that is the governor arm should hit it's stop before the knob in the cockpit runs out of travel.

Not sure what you’re referring to, “ bump in control knob”? Prop gov arm goes stop to stop.


Dave
 
What Tommy123 means is this: make sure the forward stop (ie: fine pitch or high rpm) is controlled by the governor arm contacting the arm stop first, NOT by the blue knob on the cable hitting the panel. This is true for all the engine control cables….you want the stop to be set by the device (mixture arm, throttle arm, governor arm, etc.)…..not by the knob/cable travel limit.
 
Adjustment

Vans recommends setting the control 1/8" from fully forward then adjusting the business end. Works well.
 
Back
Top