What's new
Van's Air Force

Don't miss anything! Register now for full access to the definitive RV support community.

Supporting the wing substructure for top wing skin install

Everwild

Well Known Member
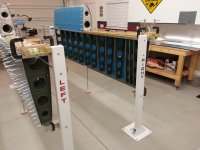
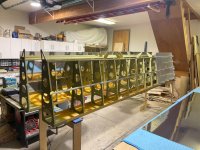
I'm at the point of installing the top skins on my -10 wings. Looking for tips or techniques on how other builders accurately true up the spar and ribs substructure for the prep and riveting of the top wing skins.

I don't want to introduce any twist or bend in the finished product and trying to figure out how accurate I need to be in truing up the spar before putting the skins on?

Using a digital protractor (I have a Wixey), it's easy to make sure there is no twist in the spar, but how straight does it need to be along the length (bow)? Right now there is a small amount of bow between the sawhorses.

Is it essentially self-jigging or do I need to put additional supports and shims in the middle of the span?

Thanks for sharing your experience and how you approached it.
 

Attachments

  • IMG_1006.jpg
    IMG_1006.jpg
    481 KB · Views: 104
  • IMG_1005.jpg
    IMG_1005.jpg
    430.6 KB · Views: 109
Last edited:
I riveted my wing skins with the wings in the vertical position and highly recommend it. Vans says to rivet with the wings on a table (ie flat) and my riveting partner did it this way but we both agreed the vertical position was better. Better support (it didn't move around) and easy to keep true.

I don't recommend a digital protractor for checking for twist. On my setup the main spar rested on a level fixture (aluminum angle bolted to a 4" x 4" post bolted to the floor and ceiling) with an angle adapter on the outboard end of the spar. I used the threaded support for the aluminum angle fixture to level the angle with a digital protractor. Then, per Vans instructions, I checked for wing twist (inboard/outboard) with two plumb bobs hung from the fixture.

To adjust hogging (bow) I made a threaded support and placed it mid span on each wing under the aft spar. Can't remember if I checked this by eyeball or with a stretched string, either is probably accurate enough.
 
Jig

I had a two jigs. To check for twist, i hung a pumb on thin fishing line from each end. Messure the gap between the resr spar and line esch end and adjust till they match. Finished wings one was dead nuts. The other had 1/64th.
Mid span was adjusted used using a fine fishing line strung accross the main spar. A sfrew jack was used to raise the spar mid span till the sag was removed.
 
Yea most of us use a jack in the middle to prevent sagging. Don’t rely on those wood boards being stiff.
 
I used a laser to check for sag and two four foot levels across the spar at each end to sight for twist. Google Winding Sticks. Once you get it perfect it’s equally important to keep it secured in place while you rivet. Recheck periodically during riveting.

37F7B253-1EEB-44D7-B0A3-9E9B3825470C.jpg
 
Once the skins are clecoed on, they'll take the shear load and prevent sagging. I'd expect that as long as the holes line up you'll be just fine, although you might need to hold the spar up to line the holes up. Once the clecos are in you're good.

Dave
 
Overkill

Thanks for the feedback everyone.

I'm going the overkill route and planning on fabricating a couple of steel posts and anchoring them to my shop floor. Probably, maybe not necessary with pre-punched, final sized -10 parts but...

I'll hang the wings leading edge up, then use a plumb bob to measure any twist between the main and rear spar. I also very much like the idea of being able to secure both the main and rear spars in a fixed position (fixture) while installing the skins. I'll use a jackscrew(s) in the middle to take out sag.

One of my elevators has like 1/8" of twist in it and it bugs the s&^^% out of me. I built it on a flat reference surface but somehow it still got twisted during the riveting process.

This will slow me down by a week but I like having the piece of mind. I'll donate them to my EAA chapter when done.

Credit, thanks to Jason Hess for the pic and inspo.
 

Attachments

  • 20121024_194403.jpg
    20121024_194403.jpg
    361.5 KB · Views: 83
Last edited:
Jig

That's how mine were done. Nice part is you can work both at the same time and do the leading edges and tanks.l without moving anything.
20140501_165354.jpg
 
Back
Top