What's new
Van's Air Force

Don't miss anything! Register now for full access to the definitive RV support community.

I'm 2 for 2! Cracking Fuselage Side Skin Bend

skelrad

Well Known Member
Friend
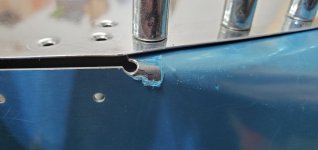
Welp, I managed to create cracks while making the curve in the -9A fuselage side skins (where the side skins bend to match the center section bottom skin and tail cone). I think I just overworked the aluminum while I was trying to get the curves right. One side has a 1/16" crack and the other side has a 1/4" crack. I know this is an all too common occurrence based on what I've read. My question - do I just stop drill the cracks and leave them as-is, or is it better to actually file away the entire crack by making a much larger cutout? What is the proper size hole for stop drilling?

(The pictures make the relief hole look rougher than it actually was - it was deburred and smooth prior to the bend. This is as I was starting to clean things up with a file.)
 

Attachments

  • 20230225_155011.jpg
    20230225_155011.jpg
    141.5 KB · Views: 375
Last edited:
I think you could stop drill the crack (3/32" or 1/8" per AC43.13) and deburr. It will be less obvious than a big hole, moreover this area is hidden once the steps are installed. Of course other builders will in future crawl under to look at how you went with this tricky job.

I had a similar issue on my -6A but caught it just as the crack was beginning to develop so I slightly elongated the relief hole to reduce the stress. It's probably better to remove the blue film first for this type of task! ;)
 

Attachments

  • 20230226_120154.jpg
    20230226_120154.jpg
    131.4 KB · Views: 258
  • 20230226_120228.jpg
    20230226_120228.jpg
    155.5 KB · Views: 243
  • 20230226_120247.jpg
    20230226_120247.jpg
    164.5 KB · Views: 205
Last edited:
That is a very tough area to work correctly on this fuselage. I remember struggling with it, even though it was years ago.

This one may be worth a call to Van's. That's a high stress area, and is a booger to access down the road for repairs if things don't go as planned.
 
Conical bend

I cracked one, but messed up a couple holes anyway so I replaced the skin. A couple tips if you decide to try again.
-Remove the blue vinyl. Draw lines.
-Debur the bend area thoroughly
-Fabricate a bending block with a conical radius. It doesn't have to be exact. I ground down a section of 1/8" aluminum angle from a small radius to a rounded radius.
-Clamp the break and use a large pipe wrench or similar cheater bar to make the bend. You get one shot. Don't work the part at all.
 
Stop drill the crack with a small bit. I think I used a #50. The nice thing here is that once all of the structure is put together, there is not much if any relative motion at the point of the crack that would propagate it further. I filled the stop drilled hole with a tiny dab of proseal. 1000 hours later, no sign of the crack enlarging. Build on!
 
Thanks for the help everyone. I've dropped Van's an email to get their take. Unless they say otherwise, for now I'm operating under the assumption that stop drilling the crack will be sufficient. Moving on for now!
 
Polish the hole

Polish the hole , file to course, You can buy cone shape craytex , Try granger , or ebay, Bend it slow, I have done several skins on rv4,
 
To close the loop - Van’s said that stop drilling is all that is necessary for this area. It sounds like this is far from an uncommon question. Sterling said the stop drill is plenty, but you can file away the entire crack if you want to make it look like less of a mistake. :D The other “cover over the sins” approach would be to drill, then fill the hole before paint.
 
I had a crack on both sides. I used both techniques. Filed out the bigger crack and stop drilled the smaller.
 
Others have provided sound advice on the crack. Sounds like you are set with that.

My advice is a general comment about building. There are times such as sliding a piece on a hard surface where the blue plastic can protect from scratches, but for most every other situation, the blue plastic should come off of every part the second you take hold of it to start construction for its intended purpose. Corrosion can, and will, develop underneath it over time if you leave it on. There really is no need to keep it on the aluminum once you have the piece constructed.
 
My advice is a general comment about building. There are times such as sliding a piece on a hard surface where the blue plastic can protect from scratches, but for most every other situation, the blue plastic should come off of every part the second you take hold of it to start construction for its intended purpose. Corrosion can, and will, develop underneath it over time if you leave it on. There really is no need to keep it on the aluminum once you have the piece constructed.

I get what you're saying, but the "over time" is a pretty key variable. I leave the blue film on while doing my initial fit, then it comes off when I'm ready to deburr and prep for riveting. I could remove it as soon as I grab the part to fit it, but given that the time lapse between initial fit and riveting is typically just a few days to a few weeks for me, there's not much added risk of corrosion for me to keep it on while I'm shoving the part around trying to get the fit right. For guys who mess with a part and then walk away for a year, that might be a different story.
 
After you drill stop, maybe make an exterior doubler that looks like it was intended. If anyone asks, you can say it was SBO22823 to beef up the step.
 
Back
Top