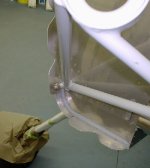
Installing the Skybolt fasteners with a gelcoat cowl and Skybolt pre made flanges has me perplexed.
I get using the magnets or triangulating the center hole...thats working.
What I don't get is upsizing the hole with a step drill. Skybolt tech support says each time a new step is drilled recalculate which direction to go to find center.
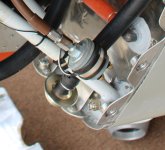
Also: I only have 10 cleco inserts, Do I get as many holes drilled as possible to final size and then install the skybolt fastener to hold everything in place to do the rest?
What Im missing is: What to reference to decide if you centered or not? Once you are using the step drill, the cleco centering insert is not there and the existing hole is bigger than the 15/32" hole you're drilling, so it's no help.
Just to save everyone time:
I get using the magnets or triangulating the center hole...thats working.
What I don't get is upsizing the hole with a step drill. Skybolt tech support says each time a new step is drilled recalculate which direction to go to find center.
Also: I only have 10 cleco inserts, Do I get as many holes drilled as possible to final size and then install the skybolt fastener to hold everything in place to do the rest?
What Im missing is: What to reference to decide if you centered or not? Once you are using the step drill, the cleco centering insert is not there and the existing hole is bigger than the 15/32" hole you're drilling, so it's no help.
Just to save everyone time:
- My flanges are already riveted to the firewall (I'd like to not make my own)
- Even with the gelcoat sanded off, the cowling is too opaque to accurately use a light.
- I can't get to the back side of most of the flanges.
- I only have two floating receptacles and anyway they only give you a very little bit of leeway.
Last edited:
")