Van's Air Force
You are using an out of date browser. It may not display this or other websites correctly.
You should upgrade or use an alternative browser.
You should upgrade or use an alternative browser.
Carbon Fiber
- Thread starter wirejock
- Start date
Carl Froehlich
Well Known Member
Don’t use Peel Ply. Error on the side of more epoxy.
Carl
Carl
No expert here at all, but if you watch some of Mike Patey’s carbon fiber YouTube videos, he does use clear coat very often for that purty finish. Darned amazing skills he has there.
https://youtu.be/tqGnlFYAq1I
https://youtu.be/IycGsGzD16k
https://youtu.be/tqGnlFYAq1I
https://youtu.be/IycGsGzD16k
Last edited:
Richard Connell
Well Known Member
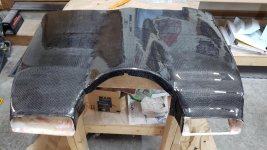
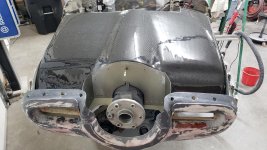
Short version... The Air Bits plenum gel coat was chipping. It's all gone. Belt sander! I hate gel coat.
Since it's rough, I'm considering a layer of carbon fiber.
How do I get that beautiful glossy carbon fiber?
Is that urethane clear coat?
One of the main challenges of getting this right is not distorting the weave while you fill it with (heavy) resin.
Two ways to deal with that, either try get hold of some carbon cloth with binder on one side, or brush a light coat of resin onto your surface and when it tacks off, lay your cloth down. As you progress to wetting it out it will now stay in place.
Once that layer has tacked, brush on another layer. Repeat until satisfied and then block it all flat. Clear coat if you like.
As Dan says, this won't be super light, but it'll look good.
Ive made a few bits this way.
wirejock
Well Known Member
Epoxy clear
Interesting. There's no UV inside the cowl. Maybe the clear isn't needed. Has anyone used West 207 on carbon fiber? It's a slow hardener but designed to harden perfectly clear. I've made some table tops with it. Time for some testing.
https://www.aircraftspruce.com/catalog/cmpages/westepoxy2_207-SC.php
Last edited:
RV7Guy
Well Known Member
Plenum
I have a plenum that turned out pretty good. After getting everything in final shape, filled and sanded, I decided to put a purdy layer of carbon on it. Can't post pictures but you can see pictures in the March Kit Planes.
The carbon laid on and wetted out. I used peel ply and got a great finish. I sanded down to 320 and squeegeed on some additional epoxy as needed.
In the end I sanded down to 3000 and had a nice gloss. The painter worked his magic and really brought out the finish with clear.
wirejock
Well Known Member
Here we go. Not finished. This is just one wet coat of 207.
I will edit if necessary.
Here's the skinny. Tips for the younger generation.
1. Mix a batch of epoxy with 206 and black dye. The black will really enhance the look. Apply a skim coat of the 206. Wet any surface where the fabric will be applied. This step really helps hold the fabric on side flanges and curves.
2. Cure 30 or till just getting tacky.
3. Lay down the carbon fiber. Leave it hanging. Don't trim.
4. Massage it into place.
5. Mix the 207. Different mix rate. Read the label.
6. Squeegee the 207 working from middle to the edge. Use excess to saturate flanges and sides. Keep working till the fabric is fully saturated.
7. Don't apply peel ply unless another layer will be applied. Excess epoxy should be skimmed toward the edges till it runs off. Capture or just let it drip on to drop cloth.
8. Cure
9. Trim off the excess. Carefull. The sharp stuff will draw blood.
10. Sand with 120 then 220. Just enough to rough the surface. Don't sand corners or bends with tools. Work them by hand. It looks thick but super easy to blow through the carbon fabric.
11. Clean thoroughly. Wash and dry.
12. Wipe with a tack cloth.
13. Mix 207 and apply a uniform layer. Chip brush works well at this point. Make sure to pull loose hairs and pre saturate it by dipping in the cup. Work center out and allow excess to flow off the edge. Use the excess to work flanges or complex curves. Use the brush or gloved hand to work flanges.
14. Flash the surface with a torch several times a few minutes apart. It helps remove air bubbles.
15. Cure
16. Wet sand flat with a stiff sponge. 220 to remove high spots. 400 to finish.
17. Wash, dry and wipe with tack cloth.
17. Mix 207 epoxy. Repeat steps 12-16 if necessary. If the epoxy is optically flat and no break through, apply this final coat with the chip brush as before.
18. Flash with a torch
19. Cure
20. Judgement call. I stopped at this point. Epoxy look like you could swim in it. So clear. Even though it's very thin, it looks inches deep. However, If you really want to sand, use 400 through 3000. Or, if it gets scratched up, you can always wet sand, cut & buff.
21. Cut with compound
22. Buff with polish

Last edited:
1001001
Well Known Member
No expert here at all, but if you watch some of Mike Patey’s carbon fiber YouTube videos, he does use clear coat very often for that purty finish. Darned amazing skills he has there.
https://youtu.be/tqGnlFYAq1I
https://youtu.be/IycGsGzD16k
One of the things that Patey does, I think, to get such nice looking carbon fiber weave is to pre-impregnate the cloth with resin. He doesn't explicitly show this step, but he's always applying sheets of cloth that are already wet. You can sometimes see him cutting the sheet from a larger sheet of cloth sandwiched between layers of plastic sheet, which he cuts with a rolling style cutter, usually.
That way, he's not stretching the fabric all over trying to squeegee resin into it while it's lying out on a curved surface, which will probably cause weird stretching and bunching. I'm no expert either, but from what I've seen some composite people do, it's all pre-layed up on a flat surface, impregnated with resin, and between two sheets of plastic to make the resin spread evenly, and make sure the cloth is all filled with no bubbles before ever laying it up into the final shape.
Its all a matter of technique. Use larger pieces of cloth than needed, wet out to the edge and cut back to avoid fraying. If bonding on top use peel ply. If finished part use plastic, but it is difficult to get the plastic to sit down flat if the part has any compound curve. Otherwise clear coat is required = a lot of extra work. Do not approach composite work with a metal mind set. Use more cloth than needed and cut back when still wet. Most composite parts that are not moulded are ground with a sanding disc to reach final size.


