I'm looking to use a terminal block somewhere within my RV8 center fuselage, that will connect power and ground wires originating at the switch panel, but then continue to the wing tips and tail. Any recommendations on where to install this that allows for any easy installation but avoids interference with flight control tubes, rudder cables, etc.?

Van's Air Force
You are using an out of date browser. It may not display this or other websites correctly.
You should upgrade or use an alternative browser.
You should upgrade or use an alternative browser.
RV8 Terminal block location
- Thread starter Rv8bill
- Start date

Carl Froehlich
Well Known Member
Not what you asked, so sorry….
I never use terminal blocks. Way too clunky, take up too much space and inject unnecessary wire junctions.
Many ways to skin this cat without using terminal blocks.
Carl
I never use terminal blocks. Way too clunky, take up too much space and inject unnecessary wire junctions.
Many ways to skin this cat without using terminal blocks.
Carl
It’s a great question for another reason though. If a mini atm fuse block was wanted in the fuse between the wings where would you put it. Or a little control board for something. If I put the ELT aft and had LEMO jacks and a cig lighter etc etc a little aft fuse panel would be cool.
As to terminal strips I’ve found solder sleeves for a split to be effective or crimp PIDG either way.
As to terminal strips I’ve found solder sleeves for a split to be effective or crimp PIDG either way.
Mikeyb
Well Known Member
There is surprisingly little space available under the floors in a -8 that is accessible once the plane is finished. The center bay under the seat behind the center section is the only place that you can get at bulkheads to mount anything. Be careful about mounting anything where the passenger footwells fit. Even then it is a lot of screws to remove to access. With the wings on it is really hard to reach. I put my lighting board and flap/trim relay deck there. I’m not sure I would do it again.
I'm looking to use a terminal block somewhere within my RV8 center fuselage, that will connect power and ground wires originating at the switch panel, but then continue to the wing tips and tail. Any recommendations on where to install this that allows for any easy installation but avoids interference with flight control tubes, rudder cables, etc.?
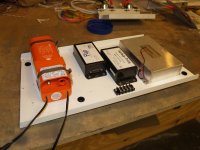
I fabricated a shelf that's aft of the aft baggage compartment. Put a single brace in the middle fore and aft, brace/support on the front and back, some nutplates on the mid longerons for easy removal if needed (haven't yet). Mounted the strobe control box, flap and trim control boxes as well as the ELT. Out of the way, easy to get to when you do your annual condition inspection, no interference with any controls.
Attachments
Last edited:

I put the flyleds control board under about where the passenger's right ankle would be. For the autopilot servo and the magnetometer, I ran wire directly to the device from behind the panel. Wire's pretty cheap, and if you have some conduit in the wing, getting it out to the device in the wing is easy.
Every connector you eliminate today is one less potential problem tomorrow.
Every connector you eliminate today is one less potential problem tomorrow.
N546RV
Well Known Member
I put the flyleds control board under about where the passenger's right ankle would be. For the autopilot servo and the magnetometer, I ran wire directly to the device from behind the panel. Wire's pretty cheap, and if you have some conduit in the wing, getting it out to the device in the wing is easy.
Every connector you eliminate today is one less potential problem tomorrow.
Same here with the FlyLeds board. Mine is mounted vertically to the seat rib. One thing I still need to figure out is a cover for the board, or some way to mask the "diagnostic" LEDs on it. I tested this setup in a darkened hangar with the footwells in place, and the LEDs on the board very obviously shine through the
gaps.
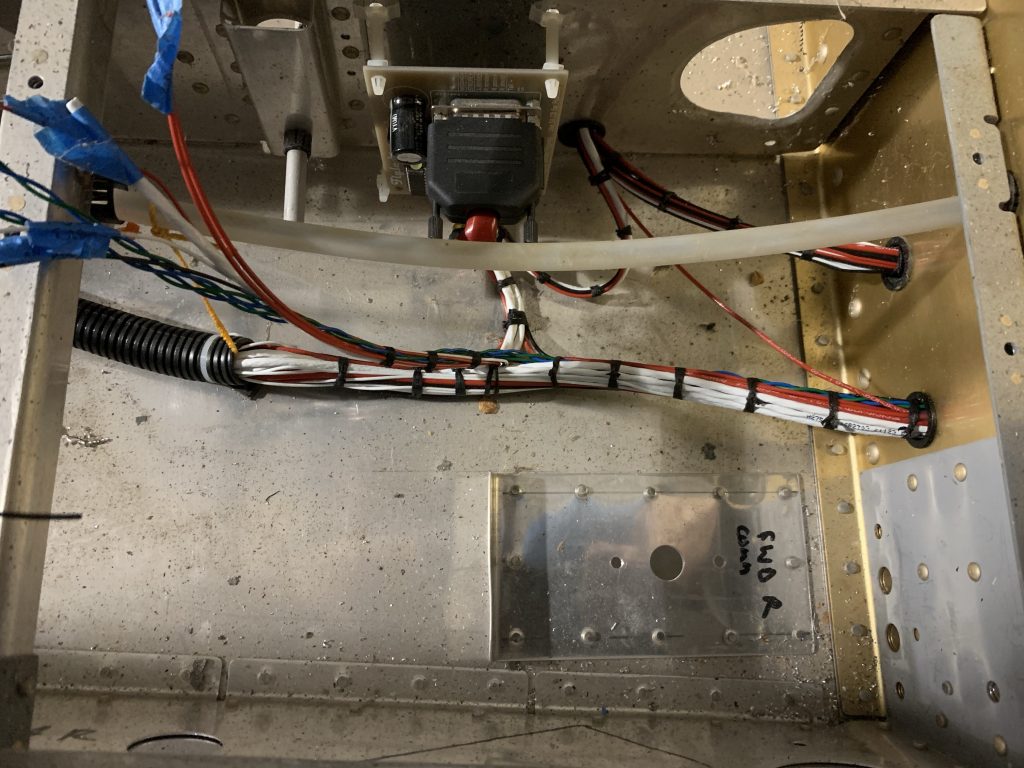
I was originally planning on terminal strips for wing connections, but decided against them due to space constraints under the seat floors. I'm going to be using handshake connectors instead. The connectors aren't really because I'm worried about puling the wings off some day, but really just an expedient for getting the wiring done. I built my harness on a table and then pulled it through the fuselage - this was enough of a pain without adding an extra 10' of wire for each wing.
I figure the handshake connectors, with heat shrink over each, are about the most reliable connectors I can have. I guess butt splices might be slightly better, but I don't feel like the difference would be significant.
ronschreck
Well Known Member
I fabricated a shelf that's aft of the aft baggage compartment. Put a single brace in the middle fore and aft, brace/support on the front and back, some nutplates on the mid longerons for easy removal if needed (haven't yet). Mounted the strobe control box, flap and trim control boxes as well as the ELT. Out of the way, easy to get to when you do your annual condition inspection, no interference with any controls.
Have you considered that the shelf and all that is mounted on it will need to be removed for access to the four horizontal stabilizer mounting bolts that should be torqued at each annual condition inspection? Those bolts do stretch and must be checked regularly, especially if you do aerobatics.
During my normal preflight inspection I always grabbed one of the horizontal stabilizer tips and checked for up/down movement of the stab. If I detected any movement at the attach points I would torque those bolts before the next flight. Because I flew hard aerobatics on a regular basis I replaced all four bolts at every condition inspection.
clam
Well Known Member
HS stab mounting bolt torque...
.... the "four horizontal stabilizer mounting bolts that should be torqued at each CI". I assume this refers to the forward spar. Is this Van's guidance or just a good idea?
Have you considered that the shelf and all that is mounted on it will need to be removed for access to the four horizontal stabilizer mounting bolts that should be torqued at each annual condition inspection? Those bolts do stretch and must be checked regularly, especially if you do aerobatics.
During my normal preflight inspection I always grabbed one of the horizontal stabilizer tips and checked for up/down movement of the stab. If I detected any movement at the attach points I would torque those bolts before the next flight. Because I flew hard aerobatics on a regular basis I replaced all four bolts at every condition inspection.
.... the "four horizontal stabilizer mounting bolts that should be torqued at each CI". I assume this refers to the forward spar. Is this Van's guidance or just a good idea?
ronschreck
Well Known Member
.... the "four horizontal stabilizer mounting bolts that should be torqued at each CI". I assume this refers to the forward spar. Is this Van's guidance or just a good idea?
Don't know if this is Van's guidance. At any rate, it just seems to be a good idea to check the attachment of the stabilizer as it is somewhat critical to successful flight.
Don't know if this is Van's guidance. At any rate, it just seems to be a good idea to check the attachment of the stabilizer as it is somewhat critical to successful flight.
First I've ever heard of this, but I'll give it a check. Might be worth starting another thread to see what others have experienced?
I like the shelf idea, how are you guys attaching it to the longerons? I'm afraid to drill any holes in them....
Have you considered that the shelf and all that is mounted on it will need to be removed for access to the four horizontal stabilizer mounting bolts that should be torqued at each annual condition inspection? Those bolts do stretch and must be checked regularly, especially if you do aerobatics.
During my normal preflight inspection I always grabbed one of the horizontal stabilizer tips and checked for up/down movement of the stab. If I detected any movement at the attach points I would torque those bolts before the next flight. Because I flew hard aerobatics on a regular basis I replaced all four bolts at every condition inspection.
Like I mentioned on my original post, the shelf is mounted to the mid longerons and attached with 6 screws to the longeron installed nutplates so yes it is removable if needed. Have not had to yet. Each individual control box is also installed with screws and nutplates so they are independently easily removable. I was still able to access the empennage through the baggage compartment to install an external ADSB antenna 3.5 ft further aft from the transponder antenna just aft of the -809 bulkhead a couple of years ago. If I had to get back all the way to the HS I would definitely have to remove the avionics shelf which would be quite easy.
I'm thinking you should be able to access the HS stab bolts after removing the VS fairing if they need to be checked. Never heard of a requirement to check and retorque the HS stab bolts. If that were required, then I would assume that every bolt on the aircraft would need to be checked and retorqued at each annual condition inspection. As far as I know, only the landing gear bolts are required to be checked at each annual but I may be wrong. Obviously if there's any movement of any surface it would require corrective action.
I do check for the security of the HS and the VS at every pre-flight. HS and VS attachment bolts are visually checked during the annual condition inspection while complying with SB 14-01-31 Horizontal Stab Crack inspection.
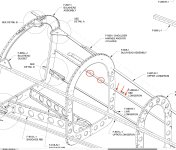
As far as adding nutplates to the longeron for the avionics shelf, it's no different than what is depicted on drawing 71 for the aft baggage floor as shown where the circles are at. All I did was add three equally spaced nutplates to the mid longeron on each side as shown by the arrows.
Attachments
Last edited:
Nihon_Ni
Well Known Member
I'm looking to use a terminal block somewhere within my RV8 center fuselage, that will connect power and ground wires originating at the switch panel, but then continue to the wing tips and tail. Any recommendations on where to install this that allows for any easy installation but avoids interference with flight control tubes, rudder cables, etc.?
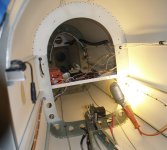
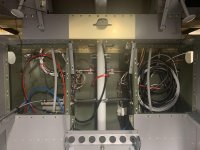
I put several terminal blocks on both sides of the inboard seat ribs below the pilot seat. To me, this was an easier method of connecting wires than other types of connectors. (The wings are not attached yet, so some of those wires in the attached picture are coiled below the footwells awaiting final install.)
Attachments
SuperCubDriver
Well Known Member
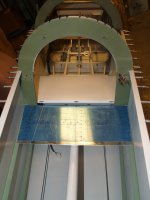
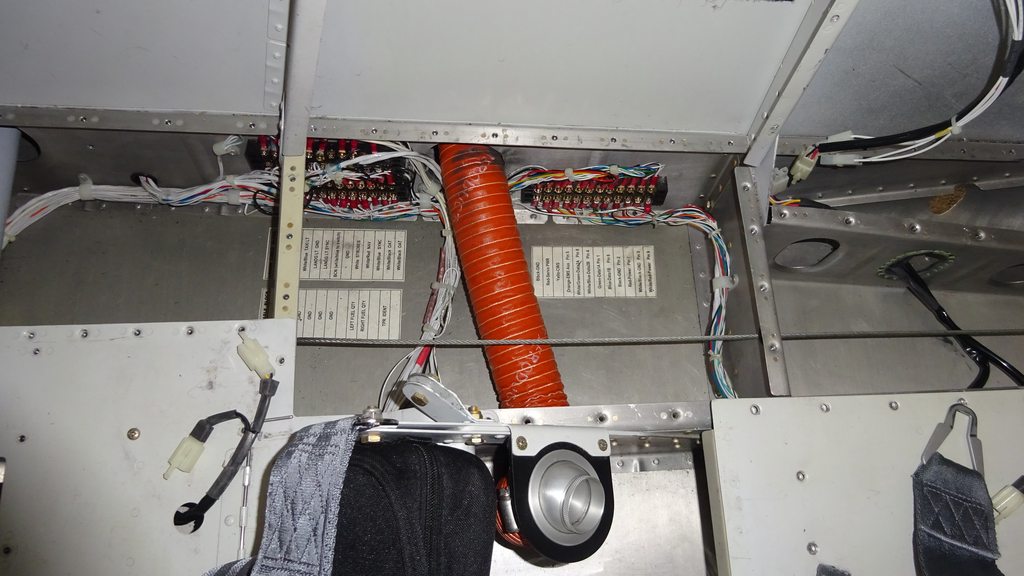
I put some terminal blocks on the right side below the floor boards. My floor boards are screwed on so removable. The terminal blocks connect the wing and tail wiring with the switches in the cockpit and also the AP servo wires with the EFIS. Note the passthrough for the scat tubing received some grommet edging to protect the tubing.
Last edited:

