AlpineAce

I'm New Here
Hi All, I just picked up an unfinished kit. My first step is to do the wings. I'll have to do one at a time as I have a 1 car garage, and short on room at the moment.
I have been reading a bit on the different versions of wing jigs. Id appreciate some feedback on what im thinking.
Id like to use some T-slot material (as I have used this for other fixtures in the past)
PXL_20220209_200639753-scaled.jpg


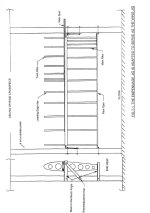
My concern is, about alignment: I have seen some mount directly to the floor, which is what im considering, but I doubt any floor is perfectly level, and with something of this length, Im worried it would be hard to tell if something was off from one end to the other.
So where is it critical to get set up right, and where can I adjust afterward? Im guessing the spars will provide some sort of alignment themselves?
is there some kind of laser alignment tool I can use?

I plan to mount to these plates, and the bolt the plates to the ground.
HTB18s5vXb1YBuNjSszeq6yblFXaM.jpg

Thanks!
 
What model? Assuming it’s a prepunched variety, you don’t have to obsess over the jig. All you have to have is something on each end to hold the spar. You will want to prop up the middle of the spar to take any bow out once you get to the point of adding skins, but whether or not the spar sits perfectly level or tilts downhill 2” because of the floor really doesn’t matter. It just needs to be straight with no twist, and quite honestly the skins will correct it if it’s not perfect anyway. My setup was made up of junk 2x4s with a piece of angle bolted on to set the spar onto. Worked fine and my wings came out with zero twist. My floor is far from flat.
 
If you're building a non-pre-punched kit, then you will need a wing jig. Don't worry about leveling the jig. Instead, make the wing support attachments individually adjustable so that the wing itself can be trued.

I found it worth making my jig to support both wings so that I could do similar tasks on both at the same time, without needing to rethink them. Hint, allow enough room to work between them and bring in parts. And make it sturdy so it doesn't move around.

Dave
 
Hi All, I just picked up an unfinished kit… I have been reading a bit on the different versions of wing jigs…
Hi AlpineAce,

You don’t say what model aircraft.

8020 extrusions are overkill.

For example, RV-6, not prepunched, some photos of my wing jig, ref also attached snips from RV-6 KIA.

Later kits with prepunched skins and substructure jig themselves with clecos.
 

Attachments

  • IMG_0875.jpeg
    IMG_0875.jpeg
    521.7 KB · Views: 7
  • IMG_0876.jpeg
    IMG_0876.jpeg
    155.3 KB · Views: 7
Last edited:
I built a -4, no holes, no pre-punch, jig/fixture was absolute requirement. Many ways to skin that cat, but what I did was use some well dried 2X6's with a wood bottom plate attached to the floor joists seen from the basement, and then I epoxied them to the floor. I did both at the same time, which you could do in a single garage if they are 4' between each other. I attached aluminum angles to the posts for the FWD and AFT spars to be clamped to. Per the plans, there are small holes drilled at the I/B and O/B ends of both spars, and a simple thread plumb bob protrudes through them, during the build of the wings, the thread is kept centered in the hole through the rear spar. It works very well to eliminate any twist or skew, and the clamps can be loosened and spars adjusted if things start to get away from you. Obviously (or not) , the FWD spar is leveled in all directions as the first step. I used small "kickstands" made from 1X2 for keeping the spars from sagging as needed until the L/E skins were installed.
 

Attachments

  • Wing build.jpg
    Wing build.jpg
    1.7 MB · Views: 18
Yes, the T-slot extrusion is overkill, but if you've got access to it cheaply, then it's a good option.
Here's mine, mostly scrap parts from work.
it has adjustable feet at the corners and middle, so can be levelled.
20241011_204611.jpg
Once I had the ribs and rear spar fitted I fitted a small vertical with an adjustable foot on top to support the rear spar and keep the whole assembly straight.
20250714_220924.jpg
You'll still need to level and align the spars properly, ie level, string lines etc.
 
Good advice above.

I would just add that I built my machine in a single car garage as well and I built both wings at the same time, using the same jig. On the two 4"x 4" wooden vertical uprights (bolted to the floor and screwed to the roof joists) I attached two horizontal peices of aluminium angle 2"x 2" which placed the wings about 3 feet apart, center to center. It wasn't a ton of room but it was enough to allow me to work on both at the same time.

Of course it took twice as long to build the wings because I was building two at once. :D