Piper J3

Well Known Member
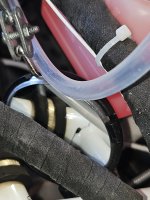
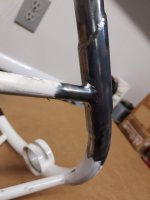
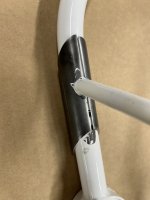
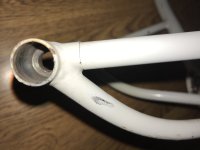
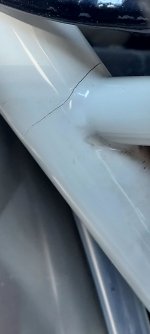
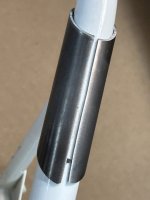
My friend is doing Annual Condition Inspection on his Legacy RV-12 and found a large crack in rear circular tube of the engine mount. Crack is on right hand side just above where the lower engine support arm is welded to the rear ring. Airplane is five-years-old and 500TT… operated gently off of hard pavement. Photo attached…


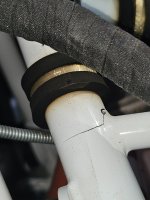
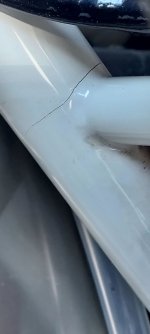
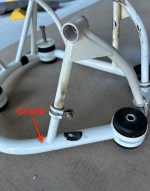
Some background…. The engine mount on my RV-12 cracked at 630TT. My crack was in the lower engine support arm on the left side. My airplane is an early SN and has first iteration of the engine mount design which does not include gusset plates at the engine case mounting holes. Photo attached…. I know of only one other RV-12 that had a cracked engine mount like this latest crack on the rear circular ring… and I believe int the exact same spot.


The purpose of this thread is to inform the RV-12 fraternity and to ask if anyone else has experienced a cracked engine mount…
 

Attachments

  • IMG_0020.jpeg
    IMG_0020.jpeg
    2.4 MB · Views: 307
  • IMG_0019.jpeg
    IMG_0019.jpeg
    1.8 MB · Views: 301
  • Resized_20240525_133417.jpeg
    Resized_20240525_133417.jpeg
    167.7 KB · Views: 294
That might be repairable by a good welder familiar with thin wall tubing; the original powder coating needs to be removed, and the mount checked for any other cracking. Make sure the weld gets inspected after the welder finishes and before powder coating to finish the repair. Hop that helps get the plane flying again.
 
Piper J3,
The photos, 2 are the left side yours and one of the right side crack, correct? Do you have a wider shot of the right side one to help guide my inspection? I will probably use a bore cam from the bottom rather than remove the cowl to check. I do regular checks since your crack but re-checking can’t hurt.
 
I am not seeing a Service Bulletin (yet) for the WD-1220 Engine Mount that is the subject of this thread.

However, there is an SB-00023, Nov 20, 2020 for the Engine Mount Standoff WD-1221.
 
I am not seeing a Service Bulletin (yet) for the WD-1220 Engine Mount that is the subject of this thread.

However, there is an SB-00023, Nov 20, 2020 for the Engine Mount Standoff WD-1221.
Yes, that is the one.
 
The misalignment in the tube that is broken clear through shows the part was fabricated with residual stress. You could re-align and weld it, but it will crack again and likely sooner. If you have a good fab shop nearby (think industrial equipment not Joe's trailer hitch), They could weld it with proper procedures. Then do a post weld heat treat to remove all of the stress (what should have been done in the first place).
 
Update….

Engine mount has been removed from airframe and cracked tube will be repaired by TIG welding an over-sleeve per instructions detailed in Aircraft Circular 43.13 Acceptable Methods, Techniques, and Practices – Aircraft Inspection and Repair.

The rear ring tube on the Rotax mount is 0.875 OD x 0.065 wall thickness. The crack is located in a section of the ring where the tubing is straight and not curved, so an over-sleeve can easily be fitted. The over-sleeve tube will be 1.000 OD x 0.065 4130 Chromoly and will match diameters very closely. Dimensions for over-sleeve length are dictated by tubing diameter. The over-sleeve tube will be split lengthwise and have ends cut at 30-degree angle to reduce stress concentration.

TIG welding will be accomplished by pre-heating the weld zone and using ER80S-D2 filler rod. Finished weld will be wrapped in mineral wool to allow slow cooling.

The cracked tube in my engine mount was repaired using the above method and now has 300 hours post-repair.

I’ll provide photos of the repair when completed…
Short of a full PWHT that's the way to do it. Chromoly likes to induce stress when welded. Do what you can to minimize it and you'll be good. Side note .065 sounds thin, but 8000hp top fuel dragster chassis' are built with .049 wall tube.
 
Update….

Engine mount has been removed from airframe and cracked tube will be repaired by TIG welding an over-sleeve per instructions detailed in Aircraft Circular 43.13 Acceptable Methods, Techniques, and Practices – Aircraft Inspection and Repair.

The rear ring tube on the Rotax mount is 0.875 OD x 0.065 wall thickness. The crack is located in a section of the ring where the tubing is straight and not curved, so an over-sleeve can easily be fitted. The over-sleeve tube will be 1.000 OD x 0.065 4130 Chromoly and will match diameters very closely. Dimensions for over-sleeve length are dictated by tubing diameter. The over-sleeve tube will be split lengthwise and have ends cut at 30-degree angle to reduce stress concentration.

TIG welding will be accomplished by pre-heating the weld zone and using ER80S-D2 filler rod. Finished weld will be wrapped in mineral wool to allow slow cooling.

The cracked tube in my engine mount was repaired using the above method and now has 300 hours post-repair.

I’ll provide photos of the repair when completed…
Can you post a wider shot of where this crack is located so we can check our mounts?
 
Arrow shows where rear tube is cracked. Crack is almost entire circumference of tube. Small hole was drilled to ascertain wall thickness of tubing = 0.065"
 

Attachments

  • Screenshot 2024-05-30 at 7.07.54 PM.png
    Screenshot 2024-05-30 at 7.07.54 PM.png
    2.1 MB · Views: 90