I have read each post in this thread and now introduce a different perspective.
I have not searched the forum or builder's logs at this point.
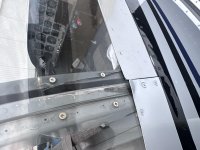
I picked up on a possible point of interest from the first photo in the first post. The flush screws attaching the canopy to the frame.
The Thorp TT-18 was the first homebuilt to utilize a "large" moveable canopy (comparatively). John Thorp had a lot of experience in canopy installations in his numerous designs. The installation detail for the T-18 also uses flush screws but specifies for holes much larger than the screw heads (from visual memory 7/16"- 1/2") and the canopy is attached using large flush washers.
The reason was the differential in the coefficient of expansion between the metal structure and the canopy plastic. This is compounded by the length of the edges.
I don't have much more to offer because I'm away from my computer archive and only have a sketchy recollection of discussing with John the approach of canopy attachment using Sikaflex alone, which was when he mentioned his concerns regarding the coefficient of expansion.
But I do feel it is worth considering if it hasn't been addressed before.
FWIW