What's new
Van's Air Force

Don't miss anything! Register now for full access to the definitive RV support community.

Fastback Builders/Owners Input?

Duhg

Well Known Member
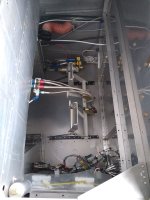
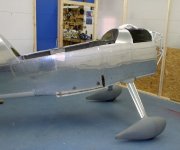
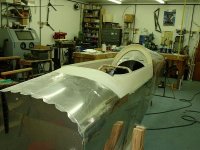
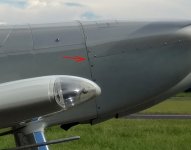
I'm to the point the instructions tell me to install the forward upper skin. I've bent my fuel lines, (then removed them) and installed fuel vent lines in the towers. Rudder pedals have been installed (and removed). Avionics trays have been installed (and removed). Wiring going back has been mostly installed, but nothing firewall forward. I know the skin needs to go on to move forward with glare shield and canopy, but want to be sure I've done my due diligence. If you were doing this over again, is there anything you wish you had reasonably done before those rivets go in?
 

Attachments

  • IMG_8758.jpg
    IMG_8758.jpg
    1.1 MB · Views: 155
  • IMG_8759.jpg
    IMG_8759.jpg
    948.7 KB · Views: 149
Last edited:
Yes! Lots to do first. Put off riveting that skin as long as you can.
Decide how you will attach cowl. If you use quarter-turn fasteners the mounting strip for those gets fitted and shimmed as needed to get the cowl to mate flush to the skin. It is attached with the same rivets that hold the skin to the firewall.
It is also much easier to route all the sensor leads and FWF wiring and the engine control cables with the skin off.
Also anything that will be mounted to the firewall, like pressure sensor manifold, cabin heat valve, oil cooler mount, brake fluid reservoir, battery box, if you will have any of those things it is a lot easier to install them with the skin off
 
Last edited:
Opinions vary ;)

The RV-8 allows nearly unlimited access to the back of the firewall, from the top, through the baggage door. The Showplanes glareshield gives top access behind the panel, and of course the center of the panel itself comes out.

Complete the skin, baggage door, glareshield and canopy, paint the interior, then install aux items.
 

Attachments

  • Aft of Firewall.jpg
    Aft of Firewall.jpg
    83.7 KB · Views: 178
  • On the Gear2 5-18-08.JPG
    On the Gear2 5-18-08.JPG
    67.1 KB · Views: 144
I pretty much did like Dan said. There is a ton of work left for your canopy. Obviously, don't rivet that skin at the firewall so you can do cowl attach later.
 
I pretty much did like Dan said. There is a ton of work left for your canopy. Obviously, don't rivet that skin at the firewall so you can do cowl attach later.

Can even do that. Just need to know the thickness of the cowl, and decide the attach method, i.e. hinges or 1/4 turns.

Note scallops in this photo.
.
 

Attachments

  • Canopy Frame Fitting.JPG
    Canopy Frame Fitting.JPG
    47.4 KB · Views: 167
Thank you, much appreciated. I haven't even looked at cowl installation yet or faced the mental dilemma of which fasteners I should like the most.
 
finish it

Agree with Dan - you have lots of access with fastback.

Only consideration when putting cowl fastener piece on is making sure you know where the canopy split is going to happen. I'd likely just cleco the very front row of rivet holes for now.
 
Only consideration when putting cowl fastener piece on is making sure you know where the cowl split is going to happen. I'd likely just cleco the very front row of rivet holes for now.

Good point, as the cowl split line location would be particularly important if using hinges to hang the cowl. I used Skybolts, and don't remember how I located the individual scallops prior to engine and cowl fitting. I did have a cowl handy, and may have made a estimate from measurement.

Which brings up a change I'd make next time. I love the 1/4-turns, but scallops on the sides make it very hard to install the lower cowl singlehanded without catching a corner between scallops and chipping the paint. Next one will get a solid strip along the side skin so there is little to snag with the cowl corner. In the context of this thread, it would also make split line location non-critical, as the holes for the 1/4-turns could be laid out anywhere.
.
 

Attachments

  • Chip.jpg
    Chip.jpg
    81 KB · Views: 105
  • Solid Strip.jpg
    Solid Strip.jpg
    56.4 KB · Views: 124
Back
Top