What's new
Van's Air Force

Don't miss anything! Register now for full access to the definitive RV support community.

My Plan for Sikaflex Bonding of Canopy

rockitdoc

Well Known Member
Sponsor
So, I plan to glue the canopy of my -14A to the canopy frame with Sikaflex.

The plan is:

1. Get all surfaces that will see the Sika scuffed good and cleaned
2. Mask the canopy so only areas that will see Sika are exposed.
3. Prepare all the surfaces with Sika Primer and Aktivator
4. Squirt Sika into cavity created by side rails and frame and along frame parallel to rollbar
5. Slip the canopy into position
6. Clamp canopy around the frame forward of the rollbar
7. Cleco the side frame rails tight
8. Allow to set
9. Trim excess that oozes out

Will this work?
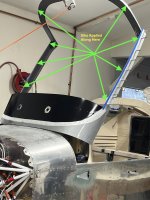
Canopy Sika Locations.jpg
 
Last edited:
Trim

So, I plan to glue the canopy of my -14A to the canopy frame with Sikaflex.

The plan is:

1. Get all surfaces that will see the Sika scuffed good and cleaned
2. Mask the canopy so only areas that will see Sika are exposed.
3. Prepare all the surfaces with Sika Primer and Aktivator
4. Squirt Sika into cavity created by side rails and frame and along frame parallel to rollbar
5. Slip the canopy into position
6. Clamp canopy around the frame forward of the rollbar
7. Cleco the side frame rails tight
8. Allow to set
9. Trim excess that oozes out

Will this work?

View attachment 40980

Trim? Maybe just use a tongue depressor to shape the fillet or remove excess. I can't remember but there's a time period to wait before pulling the tape. Too soon and it makes a mess. Too late and it's difficult to remove. Seems like I pulled it the next day. Maybe someone remembers.

Edit...
I remember.
Mask with tape then lay down a sacrificial mask right over the primary mask. After Aktivator and Primer, remove the sacrificial tape mask. Reapply another sacrificial mask if you want. Sika doesn't stick if there's no primer. When it's set, the mask should peel off.
 
Last edited:
Trim? Maybe just use a tongue depressor to shape the fillet or remove excess. I can't remember but there's a time period to wait before pulling the tape. Too soon and it makes a mess. Too late and it's difficult to remove. Seems like I pulled it the next day. Maybe someone remembers.

Edit...
I remember.
Mask with tape then lay down a sacrificial mask right over the primary mask. After Aktivator and Primer, remove the sacrificial tape mask. Reapply another sacrificial mask if you want. Sika doesn't stick if there's no primer. When it's set, the mask should peel off.

Should I apply the Sika to the canopy or to the channels on the side rails? Or both?
 
Sika

Should I apply the Sika to the canopy or to the channels on the side rails? Or both?

I'm not familiar with the 14 but on mine, the Sika was applied to the plexi then the frame positioned then clamps.
Whichever works best to fill the space. Just make sure both surfaces, plexi and frame, have been scuffed, aktivator, primer and sika applied. You can apply more later if necessary to fill a space or make fillets.
I recommend practicing with no products applied so you know exactly how to do it when its all gooey.
 
A couple other observations:
- you want to mask both for sika filets (the adhesive) and for sika primer (the black surface treatment). The tapes get pulled separately. The primer is very watery - after experimenting with several different tapes, found Frog tape worked best.
- spacers are keys, wherever the Sika adhesive is between 2 parts. Without spacers, the Sika can squeeze too thin for proper adhesion (recommended is 1/8” thick, but much thinner can be used in certain places)
- spacers get removed after setup (say 4-6 hours) and a 2nd application of adhesive fills the spacer gaps and makes clean filets
- fore and aft positioning is critical - this will be the gap between the canopy and the rear window. I used custom cut aluminum wedges clamped to the roll bar
- working time of the Sika adhesive is 1 hour (plus or minus minutes only) so plan ahead, and when it starts to set, STOP.

Best “off plans” mod I made. Good luck!
 
Fwd side of canopy

I noticed that your arrows showing sika bead don't include the fwd edge. Maybe just an arrow thing? I certainly bedded the fwd edge which demanded some crafty fillet tools to make the inside joint tidy.

+1 on the spacers to maintain elasticity in the bonded area.
 
O rings work well for spacers, they can be Cleco’d in position and no need to remove them.
 
I noticed that your arrows showing sika bead don't include the fwd edge. Maybe just an arrow thing? I certainly bedded the fwd edge which demanded some crafty fillet tools to make the inside joint tidy.

+1 on the spacers to maintain elasticity in the bonded area.

I wasn't planning on using Sika on the forward edge since the plans do not call for anything here when screws are used to attach the canopy.

Don't you think the riveted clips and epoxy would be enough to hold the forward edge in place? Or is it just 'belt and suspenders', which I respect and usually do myself.
 
O rings work well for spacers, they can be Cleco’d in position and no need to remove them.

Don,

Do you remember what thickness of O-ring you used, because my bottom canopy edge just fits in the channel created by the side rails. This means that if I use 1/8" shims the side rails are going to bow out this much.
 
I applied Sika to the forward edge as well. Filleting the inside (glareshield is difficult but a trimmed rubber weatherstrip applied later looked better anyway). With Sika, I eliminated the clips. For sides and around the rear window, I used fishing line as a spacer, tacked in place with cyanoacrylate.
 
I applied Sika to the forward edge as well. Filleting the inside (glareshield is difficult but a trimmed rubber weatherstrip applied later looked better anyway). With Sika, I eliminated the clips. For sides and around the rear window, I used fishing line as a spacer, tacked in place with cyanoacrylate.

Thanks Keith!

Here's where I am, so far with a few questions.

I got some fly float line which measures about 1/32" diameter at the skinny end and super glued it to the side skirts like you did. Can't extend it all the way to each end or the side skirt elevation will not match the skins at either end, but that probably doesn't matter re adhesion since most of the length is bonded with a 1/32" gap.

Canopy Side Skirt Shims.jpg

Canopy Side Skirt Shim.jpg

Now my first question. Some have glued the canopy on and clamped it to the interior skirt, then waited to glue the exterior side skirt on the next day. I am sure this works just fine.

But, what about applying Sika to the interior side skirt, then applying Sika to the exterior lower portion of the canopy, then clecoing the exterior skirt in place? Wipe the excess Sika that seeps out to create a filet and wait til sets up? Skips a step.

Canopy Side Skirts Clecoed.jpg


Second question.

I like your method of gluing the canopy in place without pushing it down against the cowl before applying Sika. Why introduce stresses if not necessary? I stuck some shims under my canopy to see how much gap there is at equilibrium stress. The center is the greatest, naturally, at 3/8". Is this too much gap? Does it matter?

Canopy Forward Gap.jpg
 
Last edited:
Use the right primer

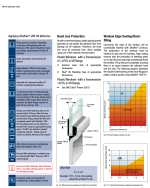
For anyone considering the Sikaflex option, you should make sure you understand their specific primer and activator recommendations for steel or powder coated steel (canopy frame) and plexiglass (canopy). When I researched this I saw many different primers being used by builders. Sika has a document "General Recommendations for Sikaflex 100 and 200 Series" which explains what primer is recommended.

https://usa.sika.com/en/search.html?q=pre+treatment+charts
 
Chart

For anyone considering the Sikaflex option, you should make sure you understand their specific primer and activator recommendations for steel or powder coated steel (canopy frame) and plexiglass (canopy). When I researched this I saw many different primers being used by builders. Sika has a document "General Recommendations for Sikaflex 100 and 200 Series" which explains what primer is recommended.

https://usa.sika.com/en/search.html?q=pre+treatment+charts

I think this is the correct chart
Sikaflex 200 Series Compatibility Chart
 
According to the chart as I read it, SP-204N is recommended for bare aluminum (anodized). SP-207 is the alternative process. With SA-205 as the pre-treatment.
 
According to the chart as I read it, SP-204N is recommended for bare aluminum (anodized). SP-207 is the alternative process. With SA-205 as the pre-treatment.

Yeah. But, in other literature by Sika Group, they recommend 209D. See below:

Screenshot 2023-04-22 at 7.54.43 AM.png

Screenshot 2023-04-22 at 7.54.03 AM.png

So...confusing.

Many builders have used the 209D with success. I am following their leads. The proof is in the ......
 
Back
Top