What's new
Van's Air Force

Don't miss anything! Register now for full access to the definitive RV support community.

SB-00036 REV 2 published (and new SB kits)

greghughespdx

Well Known Member
Advertiser
SB-00036 REV 3 published (and new SB kits)

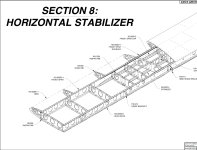
Van's has published SB-00036 REV 3, which requires inspection of the horizontal stabilizer rear spar on RV-3/4/6/7/8/9/10/14 aircraft, as well as new parts and steps necessary to comply with the bulletin should a repair or retrofit need to be performed on RV-3/4/6/7/8 models.

Note that customers who have already ordered SB-00036 kits (whether you've received your kit already or not) will receive the new kit automatically. There is no need to call or place another order. If we have questions about your order, we will reach out to you. The same applies to RV-7 and RV-8 empennage kit owners who received their kits between November 2022 and January 2023.

Also, please note that at this time we are shipping only the SB-00036 kits with non-powder-coated parts.


New kits are available on the Van's online store for the following kits (each link below will display the kits for that model(s). NOTE that we are currently shipping ONLY the non-powder-coated brackets (you will prime with a self-etching primer of your choice). If you order a powder-coated kit, we will not ship a kit to you until the parts are available, and we do not yet know when that will be. If you need to repair an airplane now, order the non-powder-coated kit.


The instructions and drawings in the SB document have been updated to reflect the new parts and changes. We have split the document into sections for each aircraft model, in order to try to keep it as clear as possible for owners.

We started shipping parts today and will continue to ship to people waiting on replacements as well as those with pending orders over the next several days.

What's changed: The parts were revised, and the steps to install the parts changed accordingly. It is important to review the new REV 3 version of the service document, as the prior versions no longer apply and the parts and processes have changed somewhat significantly.

Thank you again for your patience as we have worked though this issue, and as we get kits out the door to those who are waiting for them. We appreciate it very much.​
 
Last edited:
Minor edits

A few minor edits that should be saved up for the next revision:

Step 49 remove reference to "forward doubler". The "repair doubler" is mentioned in Step 50, there is no "forward doubler".

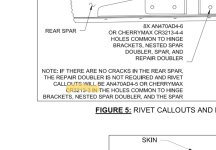
Figure 5 Rivet call outs. The rivets indicated at the top of the figure that are for the HS Skin, HS rear spar, and HS nested spar (only). They do not go through the hinge brackets. (the called-out length AD3-4 appears to be about right)
 
Nested Doubler

It is going to be a real bear go get the "Nested Doubler" to fit accurately without distorting the HS trailing edge, especially with dimpled rivet holes on the rear spar.

Skylor
 
Edit

A few minor edits that should be saved up for the next revision:

Step 49 remove reference to "forward doubler". The "repair doubler" is mentioned in Step 50, there is no "forward doubler".

Figure 5 Rivet call outs. The rivets indicated at the top of the figure that are for the HS Skin, HS rear spar, and HS nested spar (only). They do not go through the hinge brackets. (the called-out length AD3-4 appears to be about right)

Also, shouldn’t step 43 say match drill holes common to rear spar and nested spar doubler, and repair doubler(if needed) and not the skin?
 
Last edited:
From bottom

I have a crack requiring the repair doubler on front side of spar. Any thoughts about going about this from the bottom side of stab?
 
How to avoid de-constructing the elevator if there are no cracks

For a RV-6A non PP that does not have any cracks in the spar... there must be a way to match drill the nested doubler and new hinge brackets without needing to de-construct the elevator skin (in order to gain access to the fwd side of the spar). Will need to think about how to do this, possibly using some sort of template or a hole finder tool.
 
Typo? Cherrymax CR3213-3 listed. Should it be CR3213-4-3?

Also, it’s worth watching the Vans video on YouTube on lubricating the cherrymax.
 

Attachments

  • 94CBE645-E4A2-4063-87E7-956545C86FF1.jpg
    94CBE645-E4A2-4063-87E7-956545C86FF1.jpg
    143.6 KB · Views: 203
Last edited:
For a RV-6A non PP that does not have any cracks in the spar... there must be a way to match drill the nested doubler and new hinge brackets without needing to de-construct the elevator skin (in order to gain access to the fwd side of the spar). Will need to think about how to do this, possibly using some sort of template or a hole finder tool.

I had the same question and the instructions below were posted by another member: (at least for the hinge brackets)

Make a Jig. Go get a small length of 3 x 3 angle (or whatever fits). Clamp the hinge into the jig and match drill the bearing bolt hole then match drill the four rivet holes. Put the new hinge in the jig and match the bearing hole to the jig with a 3/16" rod (be sure it is square-may need small shims) and clamp. Match drill rivet holes from the back side of jig.

Instead of the large angle, you could take two sheets or bars and clamp both to some square stock or small angle stock. Making a jig like this is pretty simple with scrap material. No wood though, as it is too soft for match drilling. When match drilling, you need a fairly hard material to hold the bit while it starts the new hole. An exception would be using centering bits on a drill press with work clamped to the table.
 
Last edited:
Typo for correction on page 4. There are no lightening holes in the rear spar. Inspection is through lightening holes in the outboard horizontal stabilizer ribs.

“For RV-9/10/14 aircraft, inspection is accomplished though the lightening holes in the rear spar.”
 
Typo for correction on page 4. There are no lightening holes in the rear spar. Inspection is through lightening holes in the outboard horizontal stabilizer ribs.

“For RV-9/10/14 aircraft, inspection is accomplished though the lightening holes in the rear spar.”

Yes -- there are on the RV-9/10/14
 

Attachments

  • Screenshot 2023-02-28 at 8.06.11 AM.jpg
    Screenshot 2023-02-28 at 8.06.11 AM.jpg
    244.6 KB · Views: 192
@greghughespdx

Greg,
Did (could) engineering consider a simpler fix for planes that have no cracks, i.e. placing the doubler on aft face of the spar and then reducing the dimension of the hinge bracket by the thickness of the doubler? This would reduce the amount of labor and paint destruction for those planes flying?
 
Elevator rod end bearing adjustment?

Adding the nested spar doubler pushes the hinge brackets back a little, apparently 0.040" or less because the flanges are to be dimpled, not countersunk. And pushing the elevator back on the outboard end pushes it forward on the inboard end. But I see no mention in the current rev. of SB-00036 of a tweak to the rod end bearing on the outboard end of the elevator to compensate for this hinge offset. That having been said, I'm not an aero engineer, nor did I stay at a Holiday Inn Express last night.

And for heavens sake, if you do make such an adjustment, make sure your jam nuts are re-tightened :D
 
@greghughespdx

Greg,
Did (could) engineering consider a simpler fix for planes that have no cracks, i.e. placing the doubler on aft face of the spar and then reducing the dimension of the hinge bracket by the thickness of the doubler? This would reduce the amount of labor and paint destruction for those planes flying?

The way I read the SB, if there are no cracks and the plane was a PP'd model, no doubler is required forward of the spar and there is no reason to access the front of the spar. This should be a huge motivator for folks that don't have cracks to get the SB completed ASAP before cracks have a chance to show up.
 
Last edited:
Adding the nested spar doubler pushes the hinge brackets back a little, apparently 0.040" or less because the flanges are to be dimpled, not countersunk. And pushing the elevator back on the outboard end pushes it forward on the inboard end. But I see no mention in the current rev. of SB-00036 of a tweak to the rod end bearing on the outboard end of the elevator to compensate for this hinge offset. That having been said, I'm not an aero engineer, nor did I stay at a Holiday Inn Express last night.

And for heavens sake, if you do make such an adjustment, make sure your jam nuts are re-tightened :D

It appears that the new elevator hinge brackets are 0.040" shorter than the originals. I get this from the non PP kit directions and Figure 7.
 
It appears that the new elevator hinge brackets are 0.040" shorter than the originals. I get this from the non PP kit directions and Figure 7.

Thanks. I completely missed the fact that there's new hinge brackets on my first skim through the document.

Interesting that they took that approach. The MD3614M rod end bearing used on several models (maybe all) has a pitch of 24 TPI, so one turn is 0.04167".
 
Last edited:
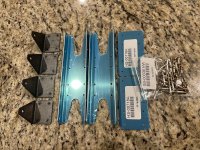
Pictures of the 000036 kit please

Could someone please post pictures of the SB-00036 REV 2 parts as received from Vans?

Is the HS-00716A nested spar doubler pre bent?

I am sure some pictures would answer many questions we have……….
 
Last edited:
What Greg said...

The way I read the SB, if there are no cracks and the plane was a PP'd model, no doubler is required forward of the spar and there is no reason to access the front of the spar. This should be a huge motivator for folks that don't have cracks to get the SB completed ASAP before cracks have a chance to show up.

In his post at this link, Greg H. said:

"To be ultra-clear, this is what matters most: Eventually, whether it happens in 100 hours or 100,000 hours, all of the RV-3/4/6/7/8 models can and quite possibly will develop cracks if they are flown/operated enough hours/cycles. There will be some significant number of airplanes that won't develop cracks within the lifetime of the airframe - but when it does happen, it matters."

That would be sufficient motivation for me.

I'm standing by for the kit and instructions for the -14, even though mine is a -14A. I'd like to pass it down to my grand-nieces/nephews.
 
I just tried to order via the Vans online store the kit shown below for my pre-punched RV-6.

SB-00036 REV2 kit for RV-8/RV-7/pre-punched RV-6 (non-powder-coated)

When checking out I couldn't complete the order because an error flag said this kit can only be ordered for RV-7 and RV-8.

??????????
 
Last edited:
I just tried to order via the Vans online store the kit shown below for my pre-punched RV-6 and when checking out I couldn't complete the order because the page said this kit is only for RV-7 and RV-8.

SB-00036 REV2 kit for RV-8/RV-7/pre-punched RV-6 (non-powder-coated)

??????????

Will take a look at that.
 
The way I read the SB, if there are no cracks and the plane was a PP'd model, no doubler is required forward of the spar and there is no reason to access the front of the spar. This should be a huge motivator for folks that don't have cracks to get the SB completed ASAP before cracks have a chance to show up.

Thanks, I miss read, it appears that only the "nested" doubler and new hinges brackets are needed when no cracks are present in the spar...whew! I will be doing this before I paint for sure.
 
Yes -- there are on the RV-9/10/14

I guess I was wrong, but it is far easier to see the forward-side of the outboard hinges by simply looking through the lightening holes in the outboard ribs. Just need a flashlight. :eek:
 
I guess I was wrong, but it is far easier to see the forward-side of the outboard hinges by simply looking through the lightening holes in the outboard ribs. Just need a flashlight. :eek:

How ya get there isn’t as important as getting there. :)
 
Note that this jig approach will not work, as described.
The new hinge brackets have the hole for the hinge bolt located in a different place to compensate for the added thickness of the nested doubler.

However, this approach may work well if you also put a shim under the foot of the new bracket that is the same thickness as the nested doubler, so that the new hinge bracket is shifted into the correct position. Then transfer the holes through from the back of the jig.

I had the same question and the instructions below were posted by another member: (at least for the hinge brackets)

Make a Jig. Go get a small length of 3 x 3 angle (or whatever fits). Clamp the hinge into the jig and match drill the bearing bolt hole then match drill the four rivet holes. Put the new hinge in the jig and match the bearing hole to the jig with a 3/16" rod (be sure it is square-may need small shims) and clamp. Match drill rivet holes from the back side of jig.

Instead of the large angle, you could take two sheets or bars and clamp both to some square stock or small angle stock. Making a jig like this is pretty simple with scrap material. No wood though, as it is too soft for match drilling. When match drilling, you need a fairly hard material to hold the bit while it starts the new hole. An exception would be using centering bits on a drill press with work clamped to the table.
 
Thanks. I completely missed the fact that there's new hinge brackets on my first skim through the document.

Interesting that they took that approach. The MD3614M rod end bearing used on several models (maybe all) has a pitch of 24 TPI, so one turn is 0.04167".

The approach they took is necessary to keep all the hinges in a straight line. If you shifted the bracket aft and then compensated by adjusting that rod-end hinge on the elevator, the hinges would no longer line up straight and would bind.
 
The approach they took is necessary to keep all the hinges in a straight line. If you shifted the bracket aft and then compensated by adjusting that rod-end hinge on the elevator, the hinges would no longer line up straight and would bind.

I think I see why. The rod end bearing adjustment approach would only work when the rod end bearing shafts are perpendicular to the web of the aft spar, correct?

To try to visualize the problem, I thought about how it would look if the rod end bearing shafts were perpendicular to the HS rear spar, and the outboard rod end bearing was offset by 0.04167" to compensate for the displacement of the hinge bracket hole due to the addition of the nested spar doubler. Then I pictured what would happen if you rotated the elevator + or - 90 degrees. I used 90 degrees to make things conceptually simple; one would never see that in operation. An elevator up or down angle theta between 0 and 90 degrees would result in sin(theta) * 0.04167" of alignment error, I think.

I guess what this translates to is that the rod end bearings really need to be at the correct height off the elevator spar, and the hinge brackets and elevator horn need to be properly drilled, or you're going to stress the hinges and their attachment points, esp. when you check for free and correct controls and exercise the controls over their full ranges. I would conclude that any binding of the hinges or flexing of the HS rear spar, the elevator spar, or the hinge brackets over the full up/down travel range should be cause for concern about the way the elevators are rigged. And the same thing applies to ailerons.
 
Last edited:
FYI, a REV 3 version of the SB doc was published earlier today with a couple of typo/part number corrections. Thank you to those who provided feedback.

In addition, the SB kits for the pre-punched models (SB-00036-KITPP and SB-00036-KITPP X) have been updated on the store to allow purchase by owners of the RV-6 and RV-6A who have pre-punched tails.
 
Note that this jig approach will not work, as described.
The new hinge brackets have the hole for the hinge bolt located in a different place to compensate for the added thickness of the nested doubler.

However, this approach may work well if you also put a shim under the foot of the new bracket that is the same thickness as the nested doubler, so that the new hinge bracket is shifted into the correct position. Then transfer the holes through from the back of the jig.

This approach should work well for the hinge brackets, I'm sure.

It will however be a real PITA to need to remove the HS skins in order to back drill the 8 matching holes in the nested spar doubler. The skins on mine have solid rivets and replacing with same again would require complete removal of the root rib so as to be able to reach inside with a bucking bar.

Alternatively, I expect that there must be a way to use a template to transfer the 8 rivet hole locations to the nested doubler. The hinge brackets already have the correct relative hole positions. These holes could initially be transferred to template strips, working on the bench. The template would then need to be temporarily held in correct position over the spar while the nested doubler is slipped in underneath for match drilling through the template. So the question is, how to hold this template strip in position?
 
Last edited:
This approach should work well for the hinge brackets, I'm sure.

It will however be a real PITA to need to remove the elevator skins in order to back drill the 8 matching holes in the nested spar doubler. The skins on mine have solid rivets and replacing with same again would require complete removal of the root rib so as to be able to reach inside with a bucking bar.

Just trying to reduce confusion here... Removing the elevator skins will not allow access to the HS spar in question.
So the skin that would need to be removed (opened up and pulled out of the way) would be the HS skin.
 
Just trying to reduce confusion here... Removing the elevator skins will not allow access to the HS spar in question.
So the skin that would need to be removed (opened up and pulled out of the way) would be the HS skin.

Typo by me... will correct in the post.
 
So as a non-builder owner of an RV-4 with little building knowledge, there's no way to install the nested doubler without undoing the HS skins, in order to access the front of the rear spar to match drill the new doubler, right? I have no spar cracks, so could do this without the forward doubler... but seems like I can't get away with leaving the skins on.

Just want to be sure of the scale of what I have ahead of me. Detatching the skins seems like it is a big deal, but obviously safety comes first.
 
I was under the impression that the oversize cherrymax rivets were normally used when replacing solid rivets in an existing structure as the cherrymax do not fill the hole when pulled to the same extent as solid rivets do when bucked, thus requiring a nearly perfect hole to begin with.

The SB calls out CR3213 (instead of the oversize CR3243) so I assume this isn't critical in this case? I was kind of inclined to go with the oversize 3243 after cleaning up the existing holes.
 
So as a non-builder owner of an RV-4 with little building knowledge, there's no way to install the nested doubler without undoing the HS skins, in order to access the front of the rear spar to match drill the new doubler, right? I have no spar cracks, so could do this without the forward doubler... but seems like I can't get away with leaving the skins on.

Just want to be sure of the scale of what I have ahead of me. Detatching the skins seems like it is a big deal, but obviously safety comes first.

If you don't have cracks, why do anything? The SB says that if there are no cracks you can reinspect every 12 months OR compete the modifications.
 
If you don't have cracks, why do anything? The SB says that if there are no cracks you can reinspect every 12 months OR compete the modifications.

Fair. I guess I was hoping to get ahead of any possible spar cracking by installing the SB kit -- but if installing the kit requires undoing the skins, I'm not really any further ahead than I would be waiting for (possible) cracks to appear and dealing both forward and nested doublers then.
 
Fair. I guess I was hoping to get ahead of any possible spar cracking by installing the SB kit -- but if installing the kit requires undoing the skins, I'm not really any further ahead than I would be waiting for (possible) cracks to appear and dealing both forward and nested doublers then.

...unless somebody can devise a way to fit the nested doubler to the back of the spar without opening up the HS skin.

I think it could be worth doing the mod pre-emptively to avoid possible future cracking, so long as it's not too onerous. If the spar cracks in future, then the HS must be opened up (to fit the other doubler on the fwd side) and also if the cracks are bad enough then the spar needs to be replaced.
 
I was under the impression that the oversize cherrymax rivets were normally used when replacing solid rivets in an existing structure as the cherrymax do not fill the hole when pulled to the same extent as solid rivets do when bucked, thus requiring a nearly perfect hole to begin with.

The SB calls out CR3213 (instead of the oversize CR3243) so I assume this isn't critical in this case? I was kind of inclined to go with the oversize 3243 after cleaning up the existing holes.

They are different but not too different. Check the hole size first. Refer to the Cherry spec for hole size. The max for 1/8 Cherry is .132 whereas a solid is .135. https://www.cherryaerospace.com/docs/catalogs/CA-1016.pdf
Use the right Cherry for the hole diameter and edge distance, whatever that is.

That's different enough to be easily affected by the drilling technique of a newbie, and given that drilling out those holes was one of the earliest things I did when building my -6A, I'm inclined to ream them for the CR3243. I'll decide once the old brackets are off and I can inspect the holes.
 
Apart from balance issues, inspection hatches about the size of the wing hatches could be placed on the underside of the HS to access and fit doublers to the front of the rear HS stab if needed. No need to make them removable. But….. as others have said, if no cracks, and there’s plenty of evidence that lots of aircraft have none why not just keep inspecting.
 
Greg
Thank you. Is there going to be a revised DWG 03 published to reflect the changes as was the previous case last year
 
Last edited:
Inspection hole location

Question for Greg.

I have an RV-8. The revised SB states:
"For RV-3/4/6/7/8 aircraft, the aft tooling hole in the horizontal stabilizer outboard rib can be enlarged to 7/16 to accommodate a borescope for inspection of the forward side of the rear spar. If no tooling hole is present, a hole no larger than 7/16 can be added to the outboard stabilizer rib located on the centerline of the rib 1.00 forward of the aft face of the spar. Refer to Figure 15."

Is it acceptable to drill a new 7/16" hole several inches in front of the rear spar for a better angle for the bore scope. There is a Base Leg you tube video showing this but it is not addressed in the revised SB.

Thanks for any advice.
 
If you don't have cracks, why do anything? The SB says that if there are no cracks you can reinspect every 12 months OR compete the modifications.

Years ago, a SB came out about the steel rudder pedals that required welding in updated parts or annual reinspections. I added the parts to get out of the required inspection and the down time for the repair so that I could do the repair at a time of my choosing. In the past two years, that SB became mandatory and the recurring inspection is no longer an option.

My RV-8 project has not flown and will get the new parts before it flys. My RV-6 has been flying 25-years and will get the update sometime in the next two years if it does not crack before then.

I have not ordered the parts kit yet to give others access to the parts that needs them. I can wait a few months before ordering the repair parts.
 
Kit Availability

Van's has published SB-00036 REV 3, which requires inspection of the horizontal stabilizer rear spar on RV-3/4/6/7/8/9/10/14 aircraft, as well as new parts and steps necessary to comply with the bulletin should a repair or retrofit need to be performed on RV-3/4/6/7/8 models.

Note that customers who have already ordered SB-00036 kits (whether you've received your kit already or not) will receive the new kit automatically. There is no need to call or place another order. If we have questions about your order, we will reach out to you. The same applies to RV-7 and RV-8 empennage kit owners who received their kits between November 2022 and January 2023.

Also, please note that at this time we are shipping only the SB-00036 kits with non-powder-coated parts.


New kits are available on the Van's online store for the following kits (each link below will display the kits for that model(s). NOTE that we are currently shipping ONLY the non-powder-coated brackets (you will prime with a self-etching primer of your choice). If you order a powder-coated kit, we will not ship a kit to you until the parts are available, and we do not yet know when that will be. If you need to repair an airplane now, order the non-powder-coated kit.


The instructions and drawings in the SB document have been updated to reflect the new parts and changes. We have split the document into sections for each aircraft model, in order to try to keep it as clear as possible for owners.

We started shipping parts today and will continue to ship to people waiting on replacements as well as those with pending orders over the next several days.

What's changed: The parts were revised, and the steps to install the parts changed accordingly. It is important to review the new REV 3 version of the service document, as the prior versions no longer apply and the parts and processes have changed somewhat significantly.

Thank you again for your patience as we have worked though this issue, and as we get kits out the door to those who are waiting for them. We appreciate it very much.​

In called the order bell line yesterday regarding my still pending order for the repair kits and was told that they aren’t shipping yet! Are they?

Skylor
RV-8
 
My RV6 non pre-punched kit is supposed to be delivered today via USPS

UPDATE: Kit delivered - Main nested doublers prebent and shaped as shown in the SB drawing (bowtie shape). Inside doublers (if needed for crack repair) included, hinge brackets shaped and pre bent. For the my non pre punched kit, no holes drilled (as expected). Bag full of rivets (solid and pull type) included along with a copy of the service bulletin.
 
Last edited:
Non-Powdercoated Kits

In called the order bell line yesterday regarding my still pending order for the repair kits and was told that they aren’t shipping yet! Are they?

Skylor
RV-8

I just got this squared away. Non-powder coated repair kits are currently shipping as Greg originally stated but for some reason my order which was placed before the Rev2 kits became available defaulted to the powder coated version which won’t be available for 2 more weeks. I cancelled the order and placed a new one.

Skylor
 
Back
Top