What's new
Van's Air Force

Don't miss anything! Register now for full access to the definitive RV support community.

Belly damage..

Tram

Well Known Member
Fuselage Damage..

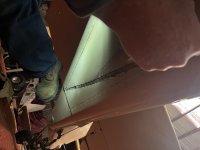
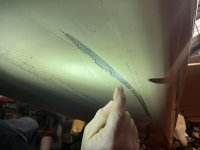
Looking at a bit of a project 6. At some point in its life it had an excursion over.. a low t-post I believe.. not 100% what the object was.

It’s been flying for a while like this, and is not thought to be a structural issue, but before I sunk some money into it, I thought I’d see what the VAF consensus was and how, barring deformed fuselage bulkheads, a repair of this skin could be carried out.

What says VAF?
 

Attachments

  • 977166D8-AE2B-40B4-8F43-390B270A9201.jpg
    977166D8-AE2B-40B4-8F43-390B270A9201.jpg
    244 KB · Views: 548
  • 746733F4-786E-45A6-9EC3-E93222973E49.jpg
    746733F4-786E-45A6-9EC3-E93222973E49.jpg
    243.5 KB · Views: 546
Last edited:
Not Too Bad. Probably.

Barring bent bulkheads on the other side of the skin damage I’d be willing to fly that airplane but I’d start getting stuff together for a proper repair right away. Hidden damage is the real worry. And the only real way to fix that is to replace skins.
 
Not the easiest repair, but the fix would be to drill the skin off, use it as a pattern to make a duplicate, then install the new one. The degree of difficulty shouldn't be horrible, but the repair will require a fair amount of time.
 
Not the easiest repair, but the fix would be to drill the skin off, use it as a pattern to make a duplicate, then install the new one. The degree of difficulty shouldn't be horrible, but the repair will require a fair amount of time.

….and a bucking buddy.
 
I’d start getting stuff together for a proper repair right away. Hidden damage is the real worry. And the only real way to fix that is to replace skins.

Hidden damage is the real worry, I agree. Friend of mine owns the airplane, so I should be able to twist his arm into looking into it more.

Obviously hidden damage would change this variable, but assuming the best, which is probably the worst idea, any idea what the "proper repair" would include?

I'd love to expect the current rivets could be drilled, a new skin cut, slid in place and riveted back, but I doubt it's anything near that simple.
 
Hidden damage in this instance *should* be no more than a tweaked bulkhead flange, which would be a fairy easy repair with the skin off.
 
Does it need structural repair? Tough looking at a pic, but looks like just the paint got scrapped off. Any visible gouges or scratches? Any signs that it dented or deformed in that area? Do see one small crease at the very end that could be patched, but that's it via the pics, which is not really way to diagnose damage. Obviously the bulkheads and other internals also need to be checked. As long as this isn't going to be a showbird, I would consider an external patch vs skin replacement - way easier. No one really sees the bottom of the plane. There is an AC with approved repair methods. Could even bring the patch all the way to each seam, and would be completely un-noticeable. Only a two or three pound penalty.
 
Last edited:
Go down into The Pit......

Does it need structural repair? Tough looking at a pic, but looks like just the paint got scrapped off. Any visible gouges or scratches? Any signs that it dented or deformed in that area? Obviously the bulkheads and other internals also need to be checked.

Somebody needs to crawl down into the back of the fuselage and see what the damage is there. Are the bulkheads bent or cracked? How badly is the skin creased inside? No one likes to crawl back there (ask me about my remote compass hook up some time...) but it HAS to be looked at.
 
From your photo it’s actually along the side of the fuselage below the horizontal stab that extends to the bottom
 
Last edited:
Are there 2 scratches or is it a picture from different locations? If it is on the underbelly near the tail wheel, it should be pretty easy to verify if any non-skin damage was done just by taking the bulkhead out. If it is found to have only damaged the skin, I would probably do an exterior skin patch riveted and epoxied on and some touch up paint. Replacing the center section would be a huge job.

Good Luck.
 
This is always going to be easier to fix by replacement of the skin but really it's not a big deal and the worst part about it is getting comfortable while drilling the skin off and keeping the rubbish out of your eyes.

Think of it this way:

Time to drill that skin off - maximum 6 hours.
Fabricate and back-drill a new skin - probably no more than 8 hours.
Prep and prime - 2 hours
Repair any frame damage - 6 hours (if needed)
Clean up fuselage skins and prep for installation - 4 hours
Rivet new skin on - two people, 4 hours max.

Total man hours: 34

Put your mind to it and you'll have that done in 3 to 4 days in the shop.
 
Somebody needs to crawl down into the back of the fuselage and see what the damage is there.

Yeh, I agree. Someone needs to look at it. I have a couple 12 year olds and I can hand them a camera. :D

From your photo it’s actually along the side of the fuselage below the horizontal stab that extends to the bottom

No. It's along the belly.

Are there 2 scratches or is it a picture from different locations?

Single scratch. Different angle. Not sure why the software rotated the first picture.
 
Small people.....

Yeh, I agree. Someone needs to look at it. I have a couple 12 year olds and I can hand them a camera. :D

When they're done with that, send them over and I'll have them finish securing those wires in the WAY back of SuzieQ that are near impossible to get to.......:p
 
I’d want to know how the scratches got there. If it’s along the belly then my concern is did the airplane run over something and if so how did the prop miss hitting the same object?
 
This is always going to be easier to fix by replacement of the skin but really it's not a big deal and the worst part about it is getting comfortable while drilling the skin off and keeping the rubbish out of your eyes.

Think of it this way:

Time to drill that skin off - maximum 6 hours.
Fabricate and back-drill a new skin - probably no more than 8 hours.
Prep and prime - 2 hours
Repair any frame damage - 6 hours (if needed)
Clean up fuselage skins and prep for installation - 4 hours
Rivet new skin on - two people, 4 hours max.

Total man hours: 34

Put your mind to it and you'll have that done in 3 to 4 days in the shop.

Add 3hrs to r&r rear vert & horiz stabs for easy access inside that last bay & as Planenutz says-job done.

As a side note, would be VERY interesting to see how the incident was noted in the logs…
 
This is always going to be easier to fix by replacement of the skin but really it's not a big deal and the worst part about it is getting comfortable while drilling the skin off and keeping the rubbish out of your eyes.

Think of it this way:

Time to drill that skin off - maximum 6 hours.
Fabricate and back-drill a new skin - probably no more than 8 hours.
Prep and prime - 2 hours
Repair any frame damage - 6 hours (if needed)
Clean up fuselage skins and prep for installation - 4 hours
Rivet new skin on - two people, 4 hours max.

Total man hours: 34

Put your mind to it and you'll have that done in 3 to 4 days in the shop.

It may be different on a 6, I dunno, but on a 7, that bottom skin mates to the fuselage center section bottom skin, so...

This estimate seems optimistic to me, but I'm no expert.
 
I've seen worse on a -6 that ran over a marker cone and creased the lower side skin and the recommended repair (by a highly experienced aircraft maintenance engineer) was to leave it alone. It has been fine for years, with no further development. Something to consider.
 
One needs to consider the repair and how difficult it is to have exact alignment and hole diameters with a replacement skin. Misaligned holes, oversized holes and the difficulty of bucking those new rivets all contribute to a weaker assembly than what you might have with the crease.
 
Tram,
I have replaced a belly skin. With an experienced partner, it can be done in 12 hours. Call me and I will share details.
Joe
541-954-2661
 
It may be different on a 6, I dunno, but on a 7, that bottom skin mates to the fuselage center section bottom skin, so...

The -6 is the same as the -7 in this respect and as you say the bottom skins overlap, however this shouldn't present too much of a problem. Repairs are often easier to accomplish than the original construction because you're simply back-tracking on the original work. All the thinking has been done for you.

Drilling rivets out is pretty quick work if you do it right. You could probably unbutton that lower skin in an hour if you know what you're doing. It helps if you enjoy skin work of course and not everyone does. So yeah... if Joe reckons he can do it in 12 manhours I'd be prepared to back him on that. Good effort.

One other consideration might be to splice in a new piece of skin with a lap-joint and double row of rivets at the middle bulkhead, leaving the original skin in place up front. Not as nice as a complete new skin but probably slightly easier and just as strong if done correctly. Just a thought. Personally I would go with the new skin myself.

First things first though - you need to make a start, Tram.

I look forward to hearing about the outcome. Best of luck.
 
Based only on the picture, I would take paint remover and strip the area along the scrape out 2 inches on each side and the ends and then inspect the depth of the damage if any. There is no bulkhead in that area except at the very end of the scrape that is not in the picture.

There looks to be some damage in the last foot or so and it can be repaired with a standard repair. I would not replace the entire skin.

You can find the procedure for an acceptable repair for most airframe damage in AC 43.13-1B.
 
Last edited:
Back
Top