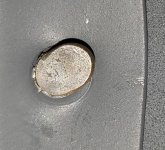
I'm getting better, but I'm still not a big fan of riveting on rounded surfaces. I managed to get through most of the rounded bottom portion of my 9A tailcone without incident. I did have one rivet that gave me fits though. I drilled it out and decided to upsize it and use an oops rivet (upsized the hole to #30 with a reamer). The result was another terrible rivet, but more troubling than that, a dimple that looked like it exploded. The bad rivet is in one of the flange tabs of a tailcone bulkhead. While the other rivets in the rounded portion aren't exactly runway model status, they're passable, and all of the other rivets in the bulkhead are fine. I'm trying to figure out what, if anything, I should do with that cracked dimple. Upsizing it again wouldn't really do much because of the extent of it all. Do I just leave it? Thoughts?

Van's Air Force
You are using an out of date browser. It may not display this or other websites correctly.
You should upgrade or use an alternative browser.
You should upgrade or use an alternative browser.
Cracked Dimple
- Thread starter skelrad
- Start date

Curios, which rivet set do you have? A large swiveling one or a small mushroom?
I found that the large swiveling one works well for flat surfaces, and I can use it alone even if I have to reach far with both of the hands.
However, on rounded surfaces, it seems to swivel too much -- a short stem small mushroom set (I think I have 1" from Cleaveland Tools) works much better for me. It does require a helper though so I can hold the gun with both hands to keep it from slipping.
Also, there is NAS1241 rivet which is only a half size larger. It kind of gives you an extra chance since you can upsize it to a full size "oops" if things don't go as planned.
David Paule
Well Known Member
If there's enough edge distance, drill it out until it's round again and a larger rivet, or if you must, a screw fits it. Then either dimple both flange and skin together and drive that rivet or replace the rivet with a screw. If you do use a screw, in the worst case, if you can't dimple the larger hole, you can use a protruding head one. Yeah, it'll look odd but it'll work.
For a better reply, contact Van's support.
Dave
An old retired aerospace structures guy.
For a better reply, contact Van's support.
Dave
An old retired aerospace structures guy.
PaulvS
Well Known Member
It's hard to tell from the photo whether the tab is wide enough (i.e. adequate edge distance) to allow another rivet hole to be drilled either side of the bad hole. If there is the space, then that's what I'd do, and fill the bad hole with epoxy prior to painting.
As an aside, it's easy to upsize #40 hole to #30 with a drill bit, since it's self-centering. And I think you could've used a normal 1/8" flush rivet there instead of oops, the larger head size would not be noticeable to anyone else.
As an aside, it's easy to upsize #40 hole to #30 with a drill bit, since it's self-centering. And I think you could've used a normal 1/8" flush rivet there instead of oops, the larger head size would not be noticeable to anyone else.
Curios, which rivet set do you have? A large swiveling one or a small mushroom?
I typically use the swiveling rubber set for flat areas - works great. For the curved areas I switch to the smaller set, like you mention. In this case, the real culprit was the bucking bar - I had an awful time finding the right angle with the bucking bar for some reason. Most of the rivets are fine, but this particular one was determined not to set nicely. I was going to give it one more shot until I saw what the edges of the dimple looked like. I've never had a dimple crack in multiple places like this.
It's hard to tell from the photo whether the tab is wide enough (i.e. adequate edge distance) to allow another rivet hole to be drilled either side of the bad hole. If there is the space, then that's what I'd do, and fill the bad hole with epoxy prior to painting.
As an aside, it's easy to upsize #40 hole to #30 with a drill bit, since it's self-centering. And I think you could've used a normal 1/8" flush rivet there instead of oops, the larger head size would not be noticeable to anyone else.
I'll have to check on the edge distance - it would be close. I did upsize the hole to #30 (with a reamer since a dimpled #40 is already a little bigger and the reamer works really nicely....usually). In this case, I'm not sure that any other rivet would have mattered to the dimple cracking outcome, but I am with you on using 1/8" rivets. I have used a number of them vs oops, and even knowing where they are I have a hard time finding them.
If there's enough edge distance, drill it out until it's round again and a larger rivet, or if you must, a screw fits it. Then either dimple both flange and skin together and drive that rivet or replace the rivet with a screw. If you do use a screw, in the worst case, if you can't dimple the larger hole, you can use a protruding head one. Yeah, it'll look odd but it'll work.
For a better reply, contact Van's support.
Dave
An old retired aerospace structures guy.
Thanks for the ideas. I'll check with Van's and see what they say. I hadn't thought of using a screw. I would drill out the hole and go up to a larger rivet size yet, but I think the cracking is bad enough that it would take an absolutely gigantic rivet diameter to fill an enlarged hole.

